This one should have been better – MBReviews
ASUS has started to release its WiFi 7 models, one after the other, so I decided to buy the already-one-year old RT-AXE7800 because that’s just the type of person I am. Yeah, so if you haven’t already read all the reviews available online, then welcome and you may be in for a treat because I usually test these devices a bit different than the rest, as you will see. OK, so what does the RT-AXE7800 promise to offer?
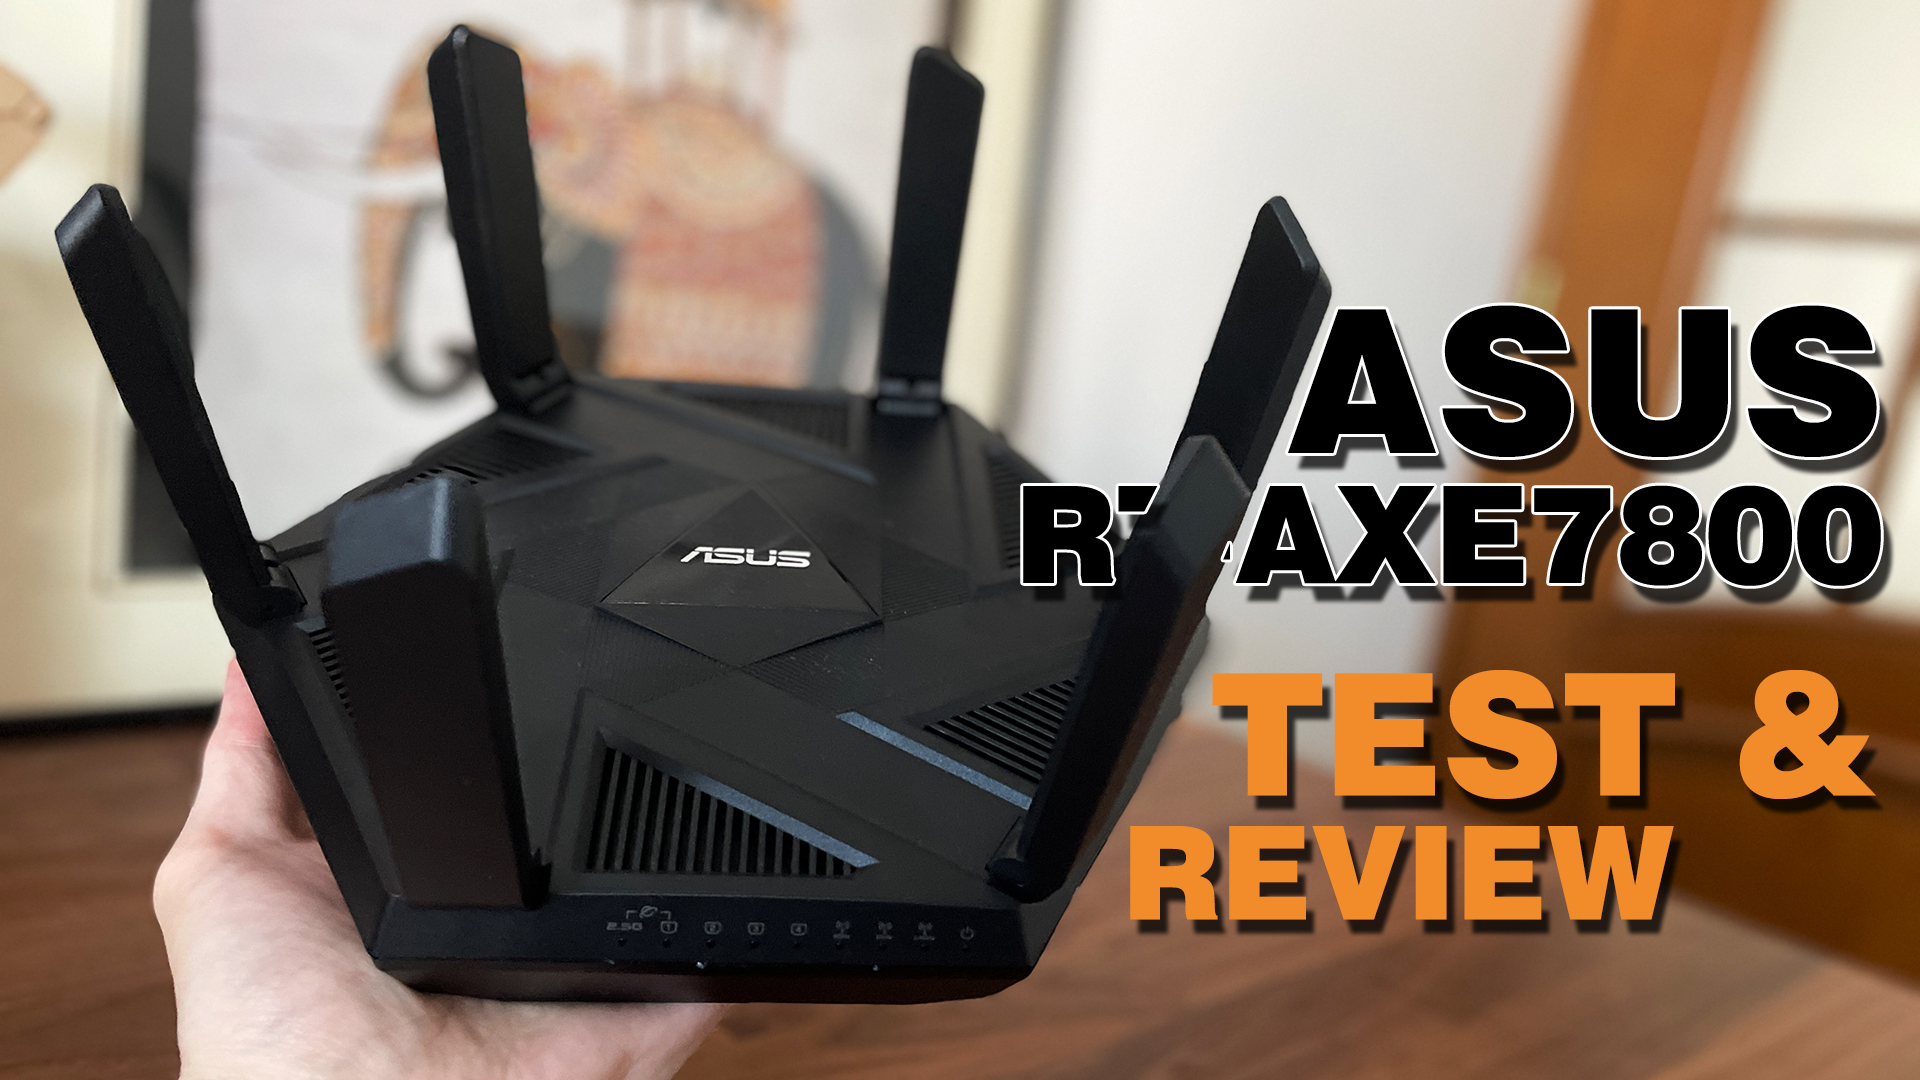
The most important aspect is the third radio band, which operates on the 6GHz frequency, but we are still limited to the 160MHz width, only the WiFi 7 devices have pushed farther reaching 320MHz, for now. OFDMA is also supported and we do get one 2.5GbE port which can be used for both WAN and LAN purposes. I don’t think that’s enough, but ASUS seems to have gotten more generous with its newer devices.
The RT-AXE7800 was not among the lucky ones it seems. I did see that there is support for the LAN aggregation, something that is missing on the ExpertWiFi EBR63, but I also saw support for WAN aggregation. It’s not just the usual failover, load balancing algorithms, but actual increased bandwidth, although it’s just up to 2Gbps. It’s still something. The OS is also feature-packed and you can use this device to create an AiMesh network, but I saw that there is no support for Merlin which is a bit of a shame.
Design and Build Quality
Let’s now talk about the design of the RT-AXE7800. I admit I have seen better, but I have also see much worse. The router has a sort of arachnid look and, since the antennas are non-removable, the router comes with all six of them folded at the top, you know, just like when a spider curls up its feet after being slapped. I did make a video which shows how easy it is to change the antennas on routers that have them non-removable, but these antennas will be a pain to change due to their wide base.
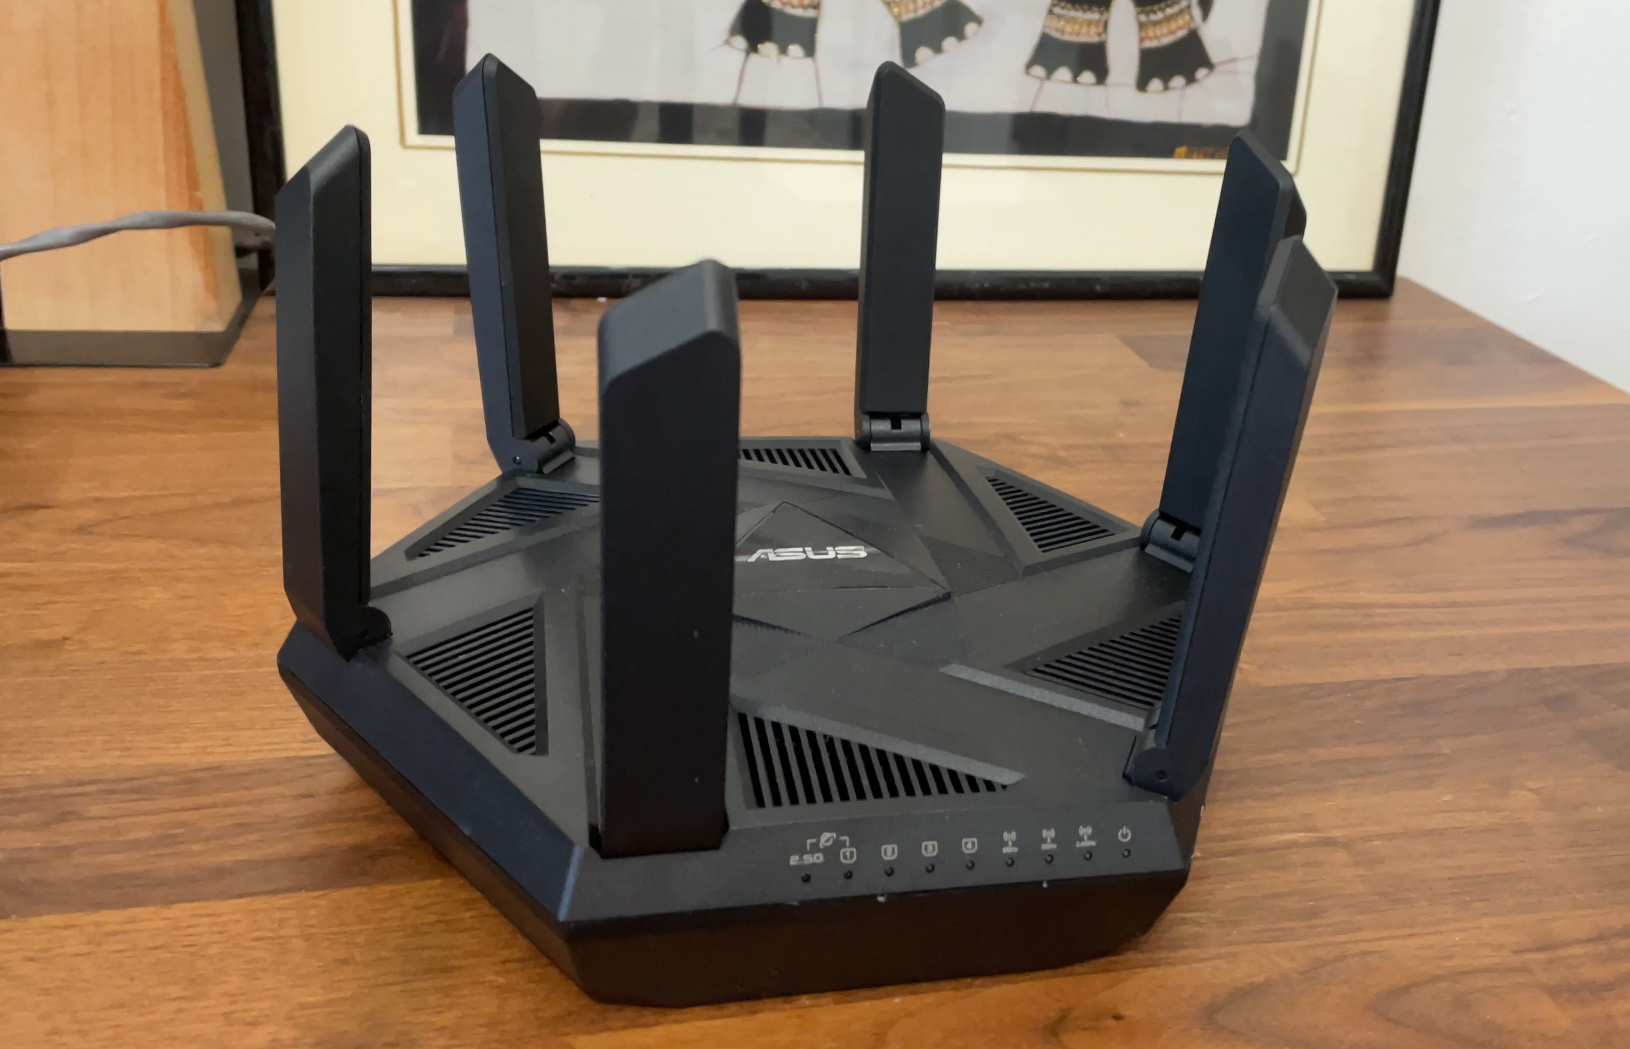

At least the device itself is fairly compact and ASUS has added the option to mount the router on the wall if there is no space on a shelf. As for the LEDs, there are lots of them, accurately showing the status of various aspects of the router. They did not go with the single disco light that other brands went with, thank God. Now let’s talk about the ports.
There is a DC-In port on the left, followed by three Gigabit LAN ports, the third supporting link aggregation with the fourth Gigabit port. And this last one can also function as WAN, same as the 2.5GbE port that’s farther to the right. And then we also get a USB 3.0 port.
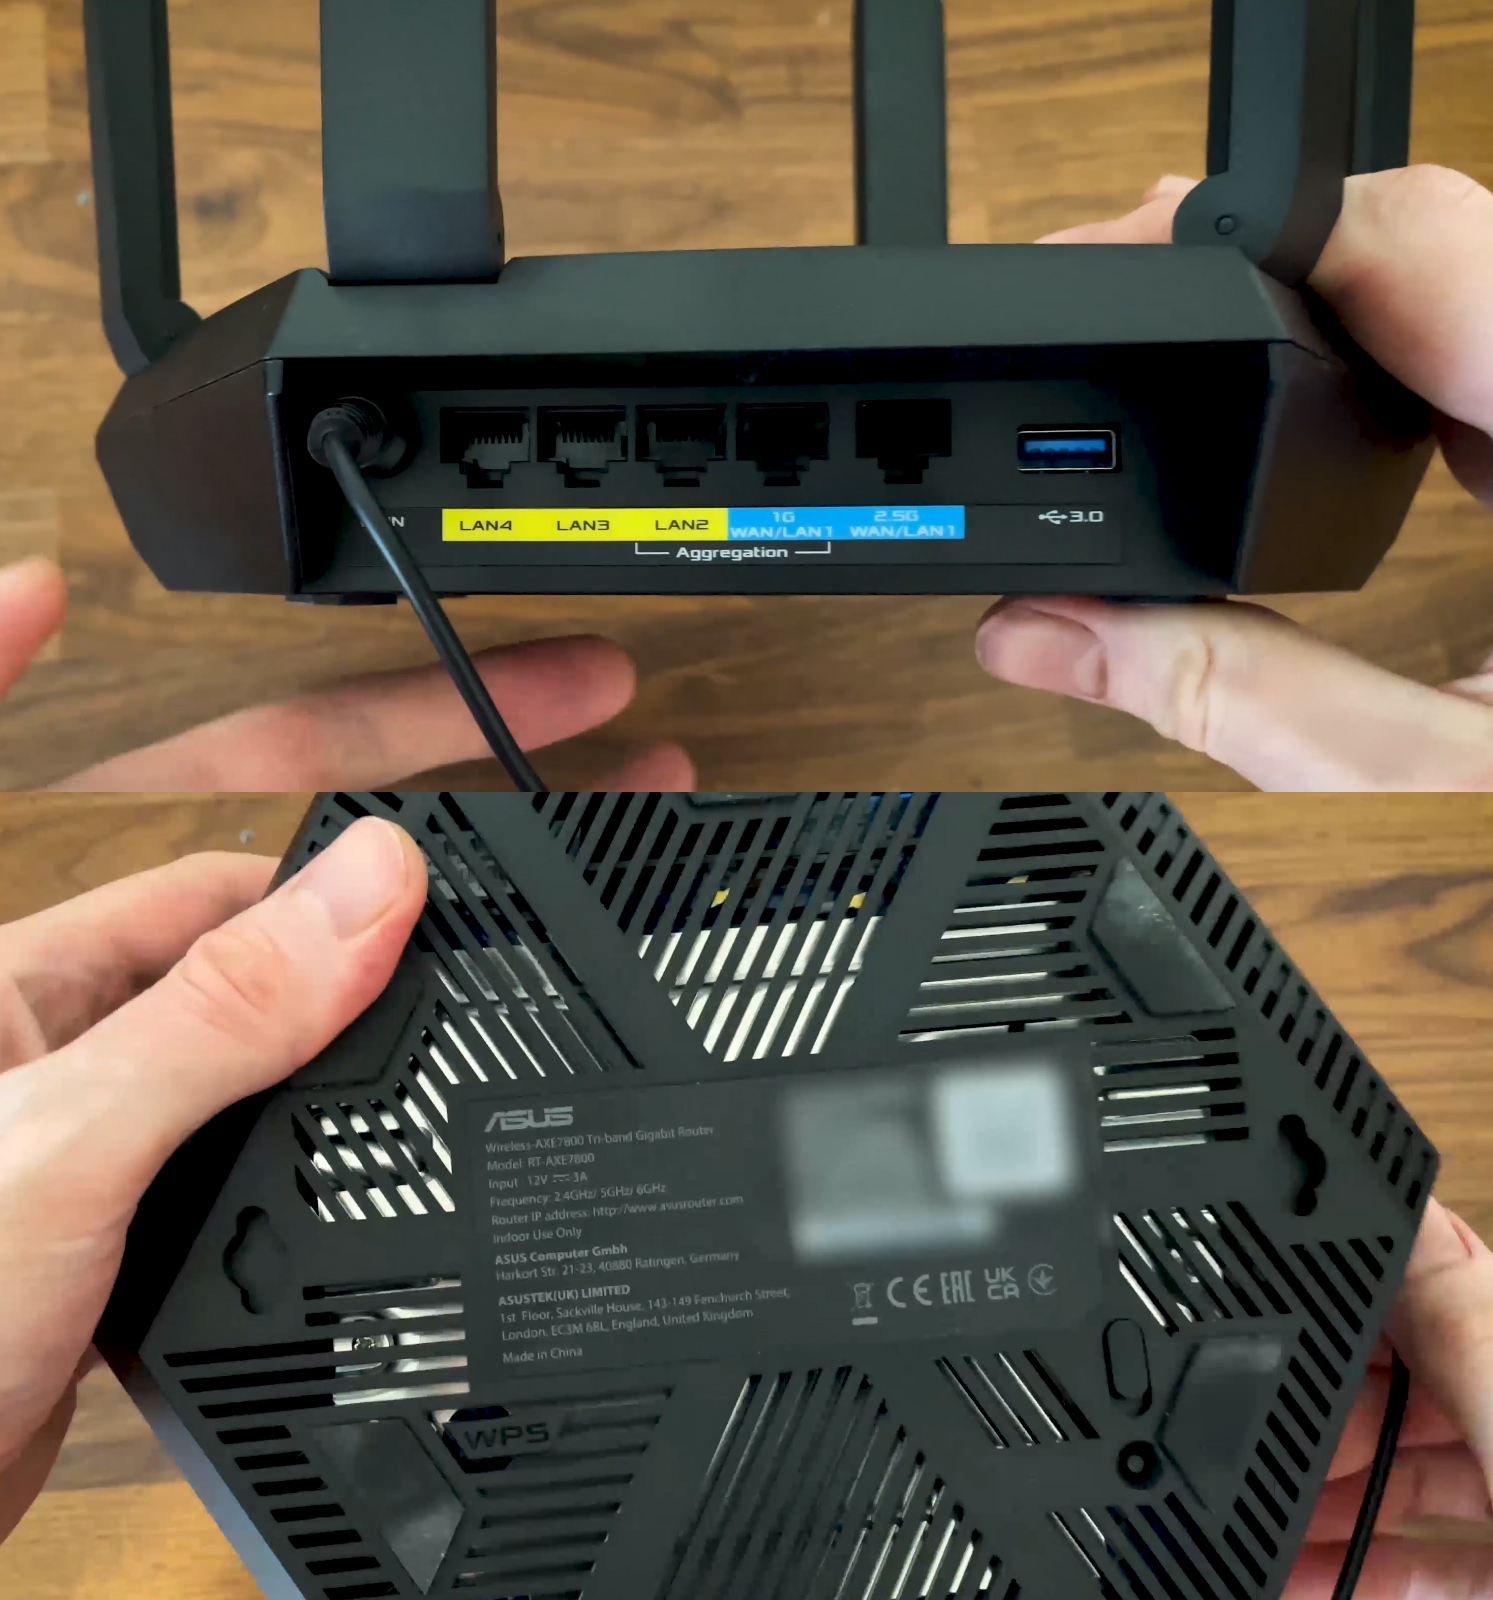

The usual set of buttons is positioned on the bottom side and the developers definitely showed their creative side here which I definitely enjoyed.
The Heat Management
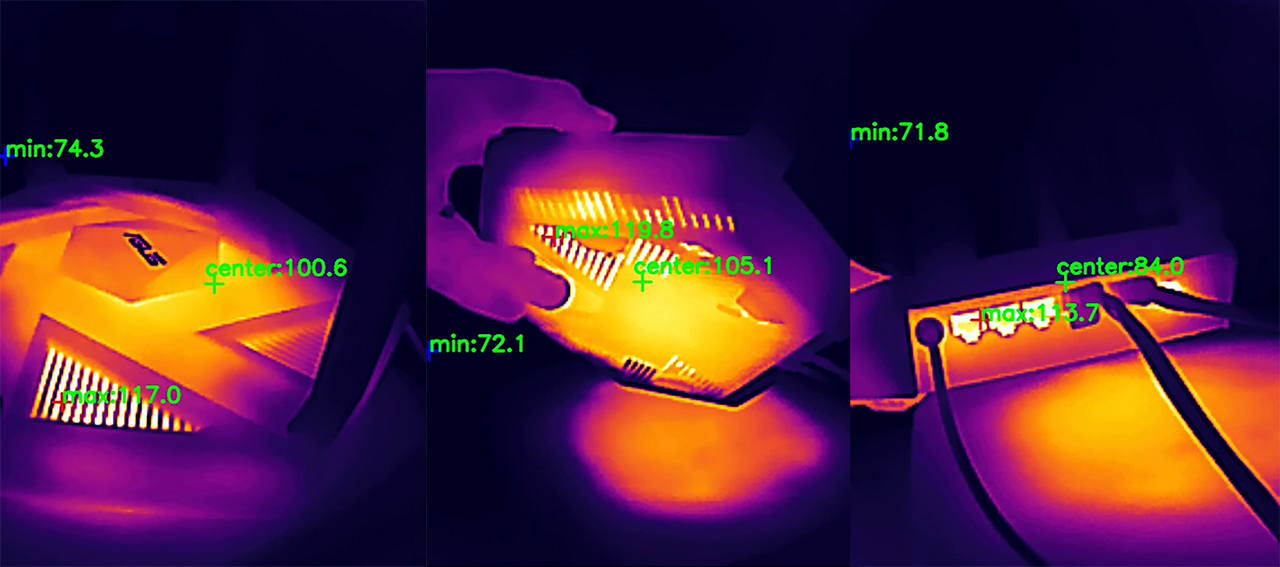
As for the heat management, ASUS has been very generous with the ventilation holes both on the upper section, as well as on the bottom side. But, we’re still dealing with passive cooling, so is that enough? I did use a thermal camera to get an idea and as expected, we can see some warm spots appearing, but that’s normal since the heat is being pushed away from the chipsets.
The temperature doesn’t rise above reasonable limits and I doubt it will anywhere in the future, so there should be no fears of thermal throttling.

ASUS RT-AXE7800 Quick Teardown
ASUS doesn’t like you opening up their routers and they make that very clear when they add those warning stickers on top of the screws, but, at least in the US, you should be protected from such transgressions, well, you should. Anyway, I did open up the RT-AXE7800 and I have documented each step in a dedicated video. The process is fairly straight-forward. There are four screws that need to be removed and then use a prying tool to detach the bottom side.
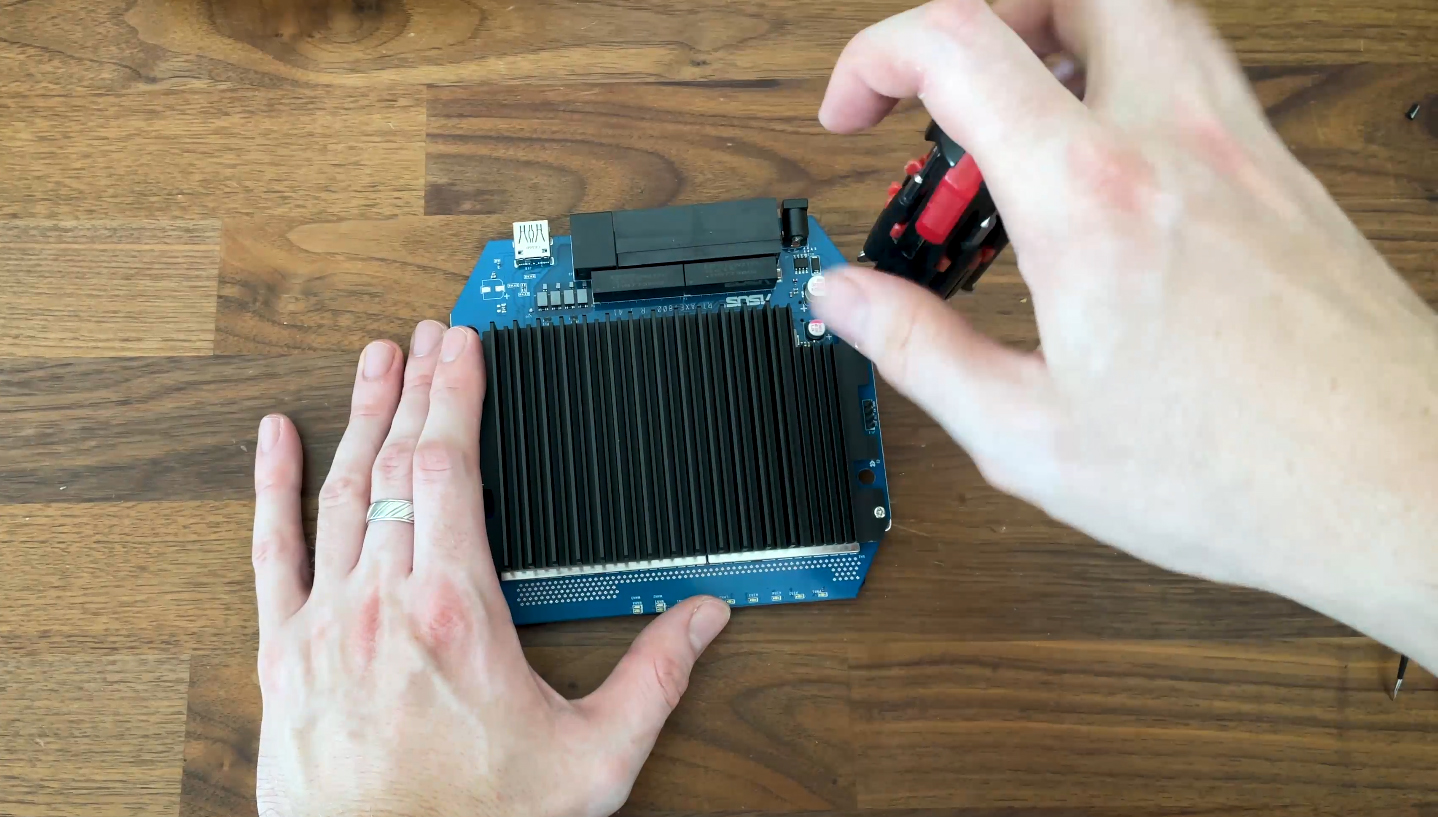

Then, we can see some heat spreaders on both sides of the PCB which also need to be taken out and this does involve detaching the antenna connectors as well. Nothing too complicated though because no gel or glue or whatever it’s called is used here. Then, we get to see the main components.
| ASUS RT-AXE7800 | ASUS RT-AX86U Pro | ASUS RT-AX88U Pro | ASUS ROG Rapture GT-AX6000 | |
| CPU | quad-core 1.7GHz Broadcom BCM6756KFEBG | quad-core 2.0GHz Broadcom BCM4912 | quad-core 2.0GHz Broadcom BCM4912 | quad-core 2.0GHz Broadcom BCM4912 |
| RAM | 512MB Samsung SEC201 K4A4G165WF | 1GB (2X Samsung SEC 234 K4A4G165WF) | 1GB (2x Samsung SEC 310 K4A4G16) | 1GB (2X 512MB) SKHynix (H5AN4G6NBJR) |
| Storage | 256MB MXIC (MX30LF2G28AD-TI) | 256MB MXIC (MX30LF2G28AD-TI) | 256MB MXIC (MX30LF2G189C-TI) | 512MB MXIC (MX30LF2G28AD-TI) |
| Switch | Broadcom BCM53134SKFBG | Broadcom B50212EB1KMLG PHY | MaxLinear MXL SLNW8 2.5GbE Ethernet PHY | Broadcom BCM50991E |
| 5GHz Radio | Broadcom BCM6715KFBG 802.11a/n/ac/ax 4×4:4 | Broadcom BCM6715KFBG 802.11a/n/ac/ax 4×4:4 | Broadcom BCM6715KFBG 802.11a/n/ac/ax 4×4:4 | Broadcom BCM6715KFBG 802.11a/n/ac/ax 4×4:4 |
| 2.4GHz Radio | Broadcom BCM6756 802.11a/b/g/n/ax 2×2:2 | Broadcom BCM6710KFFBG 802.11a/b/g/n/ax 3×3:3 | Broadcom BCM6715KFBG 802.11a/b/g/n/ax 4×4:4 | Broadcom BCM6715KFBG 802.11a/b/g/n/ax 4×4:4 |
| 6GHz Radio | Broadcom BCM6756 802.11a/n/ac/ax 2×2:2 | – | – | – |
The Wireless Test (6GHz & 5GHz)
Now let’s see the throughput that I managed to measure using multiple types of client devices. For the 5GHz radio band, I relied on a laptop equipped with an Intel AX200 As the WiFi 6 client, another laptop with an Intel 8265 and a Pixel 2 XL smartphone for the WiFi 5 client devices. As for the WiFi 6E client, I used a PC that was equipped with a TP-Link TX3000E adapter.
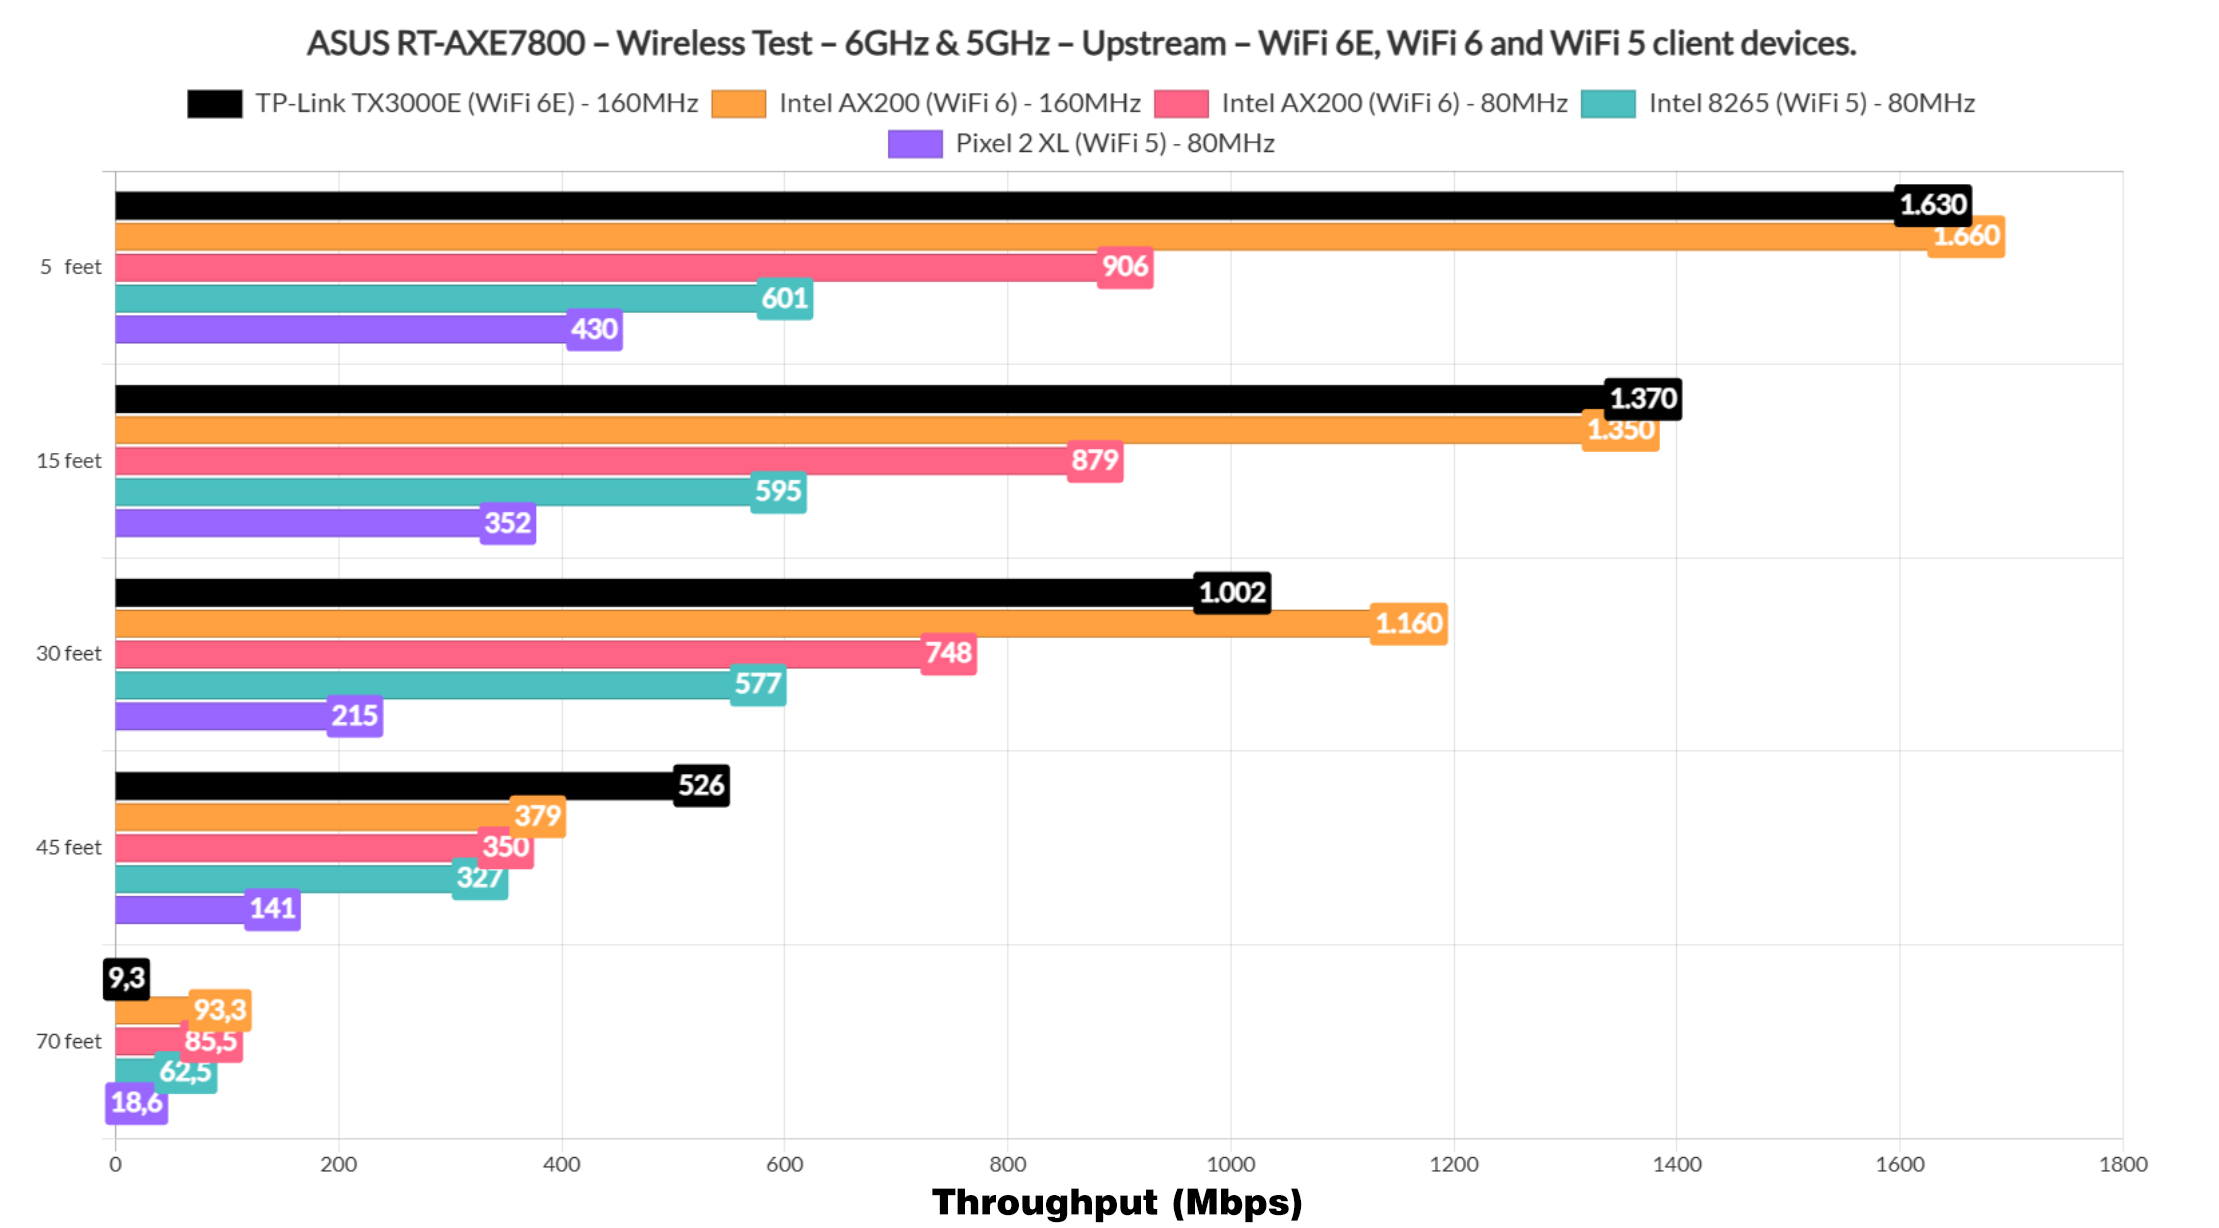

Upstream, I saw that the throughput easily broke through the Gigabit limit and, as you can see, the WiFi 6E and the WiFi 6 clients managed to offer a very similar performance, at least near the wireless router. That’s because both were using the 160MHz channel bandwidth and there weren’t that many interference to mess things up.
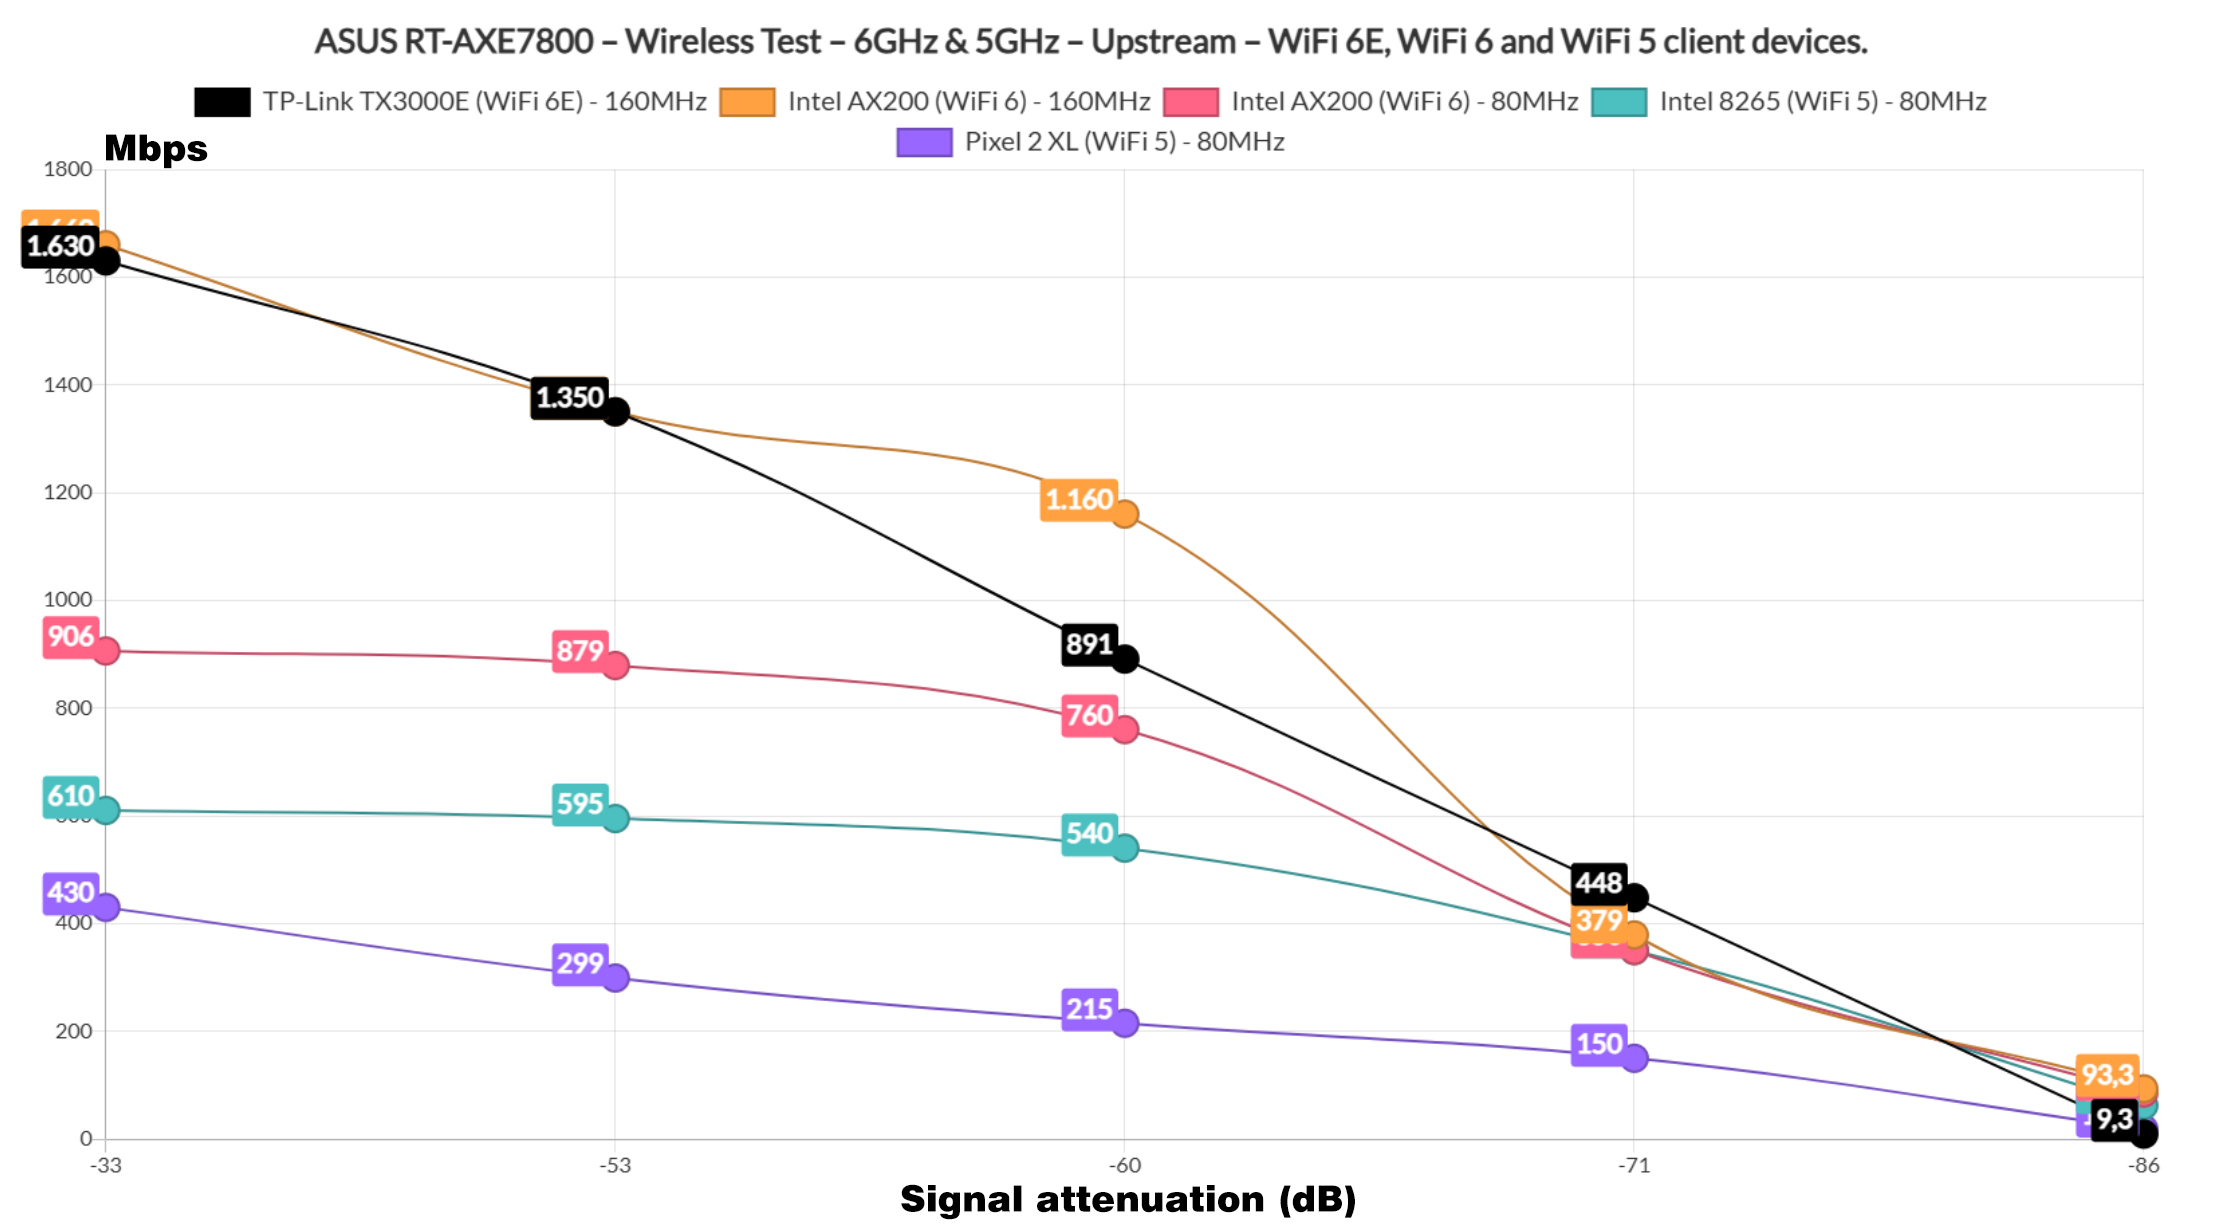

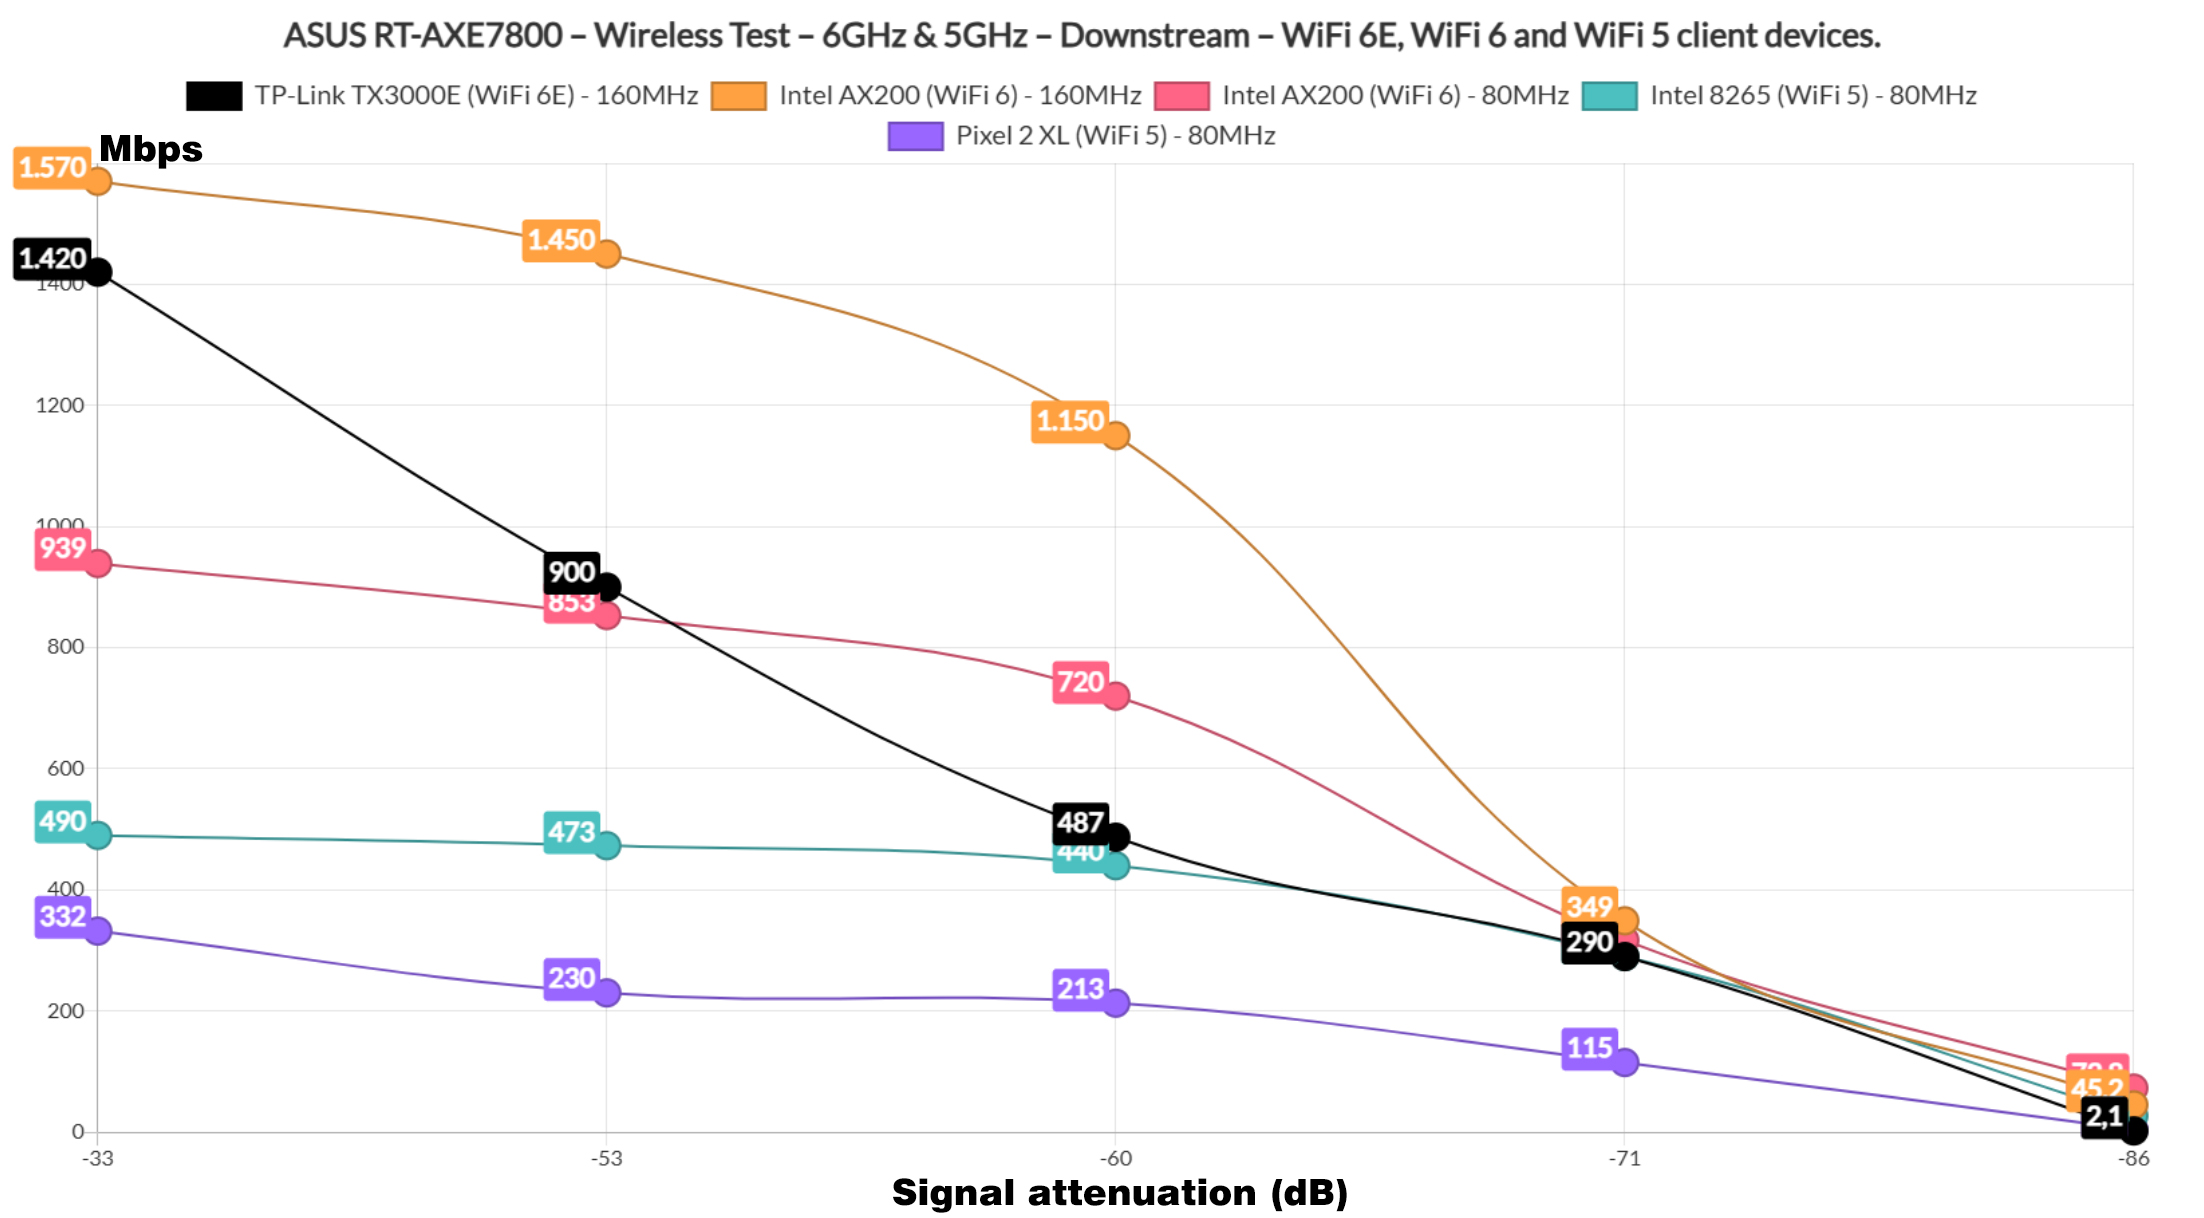
We can see it in the signal attenuation graphic, which also reveals that a measured -86dB will still allow the two aforementioned client devices to be near 100Mbps. Downstream, the WiFi 6 client did a bit better which was interesting, but it’s an overall decent performance.
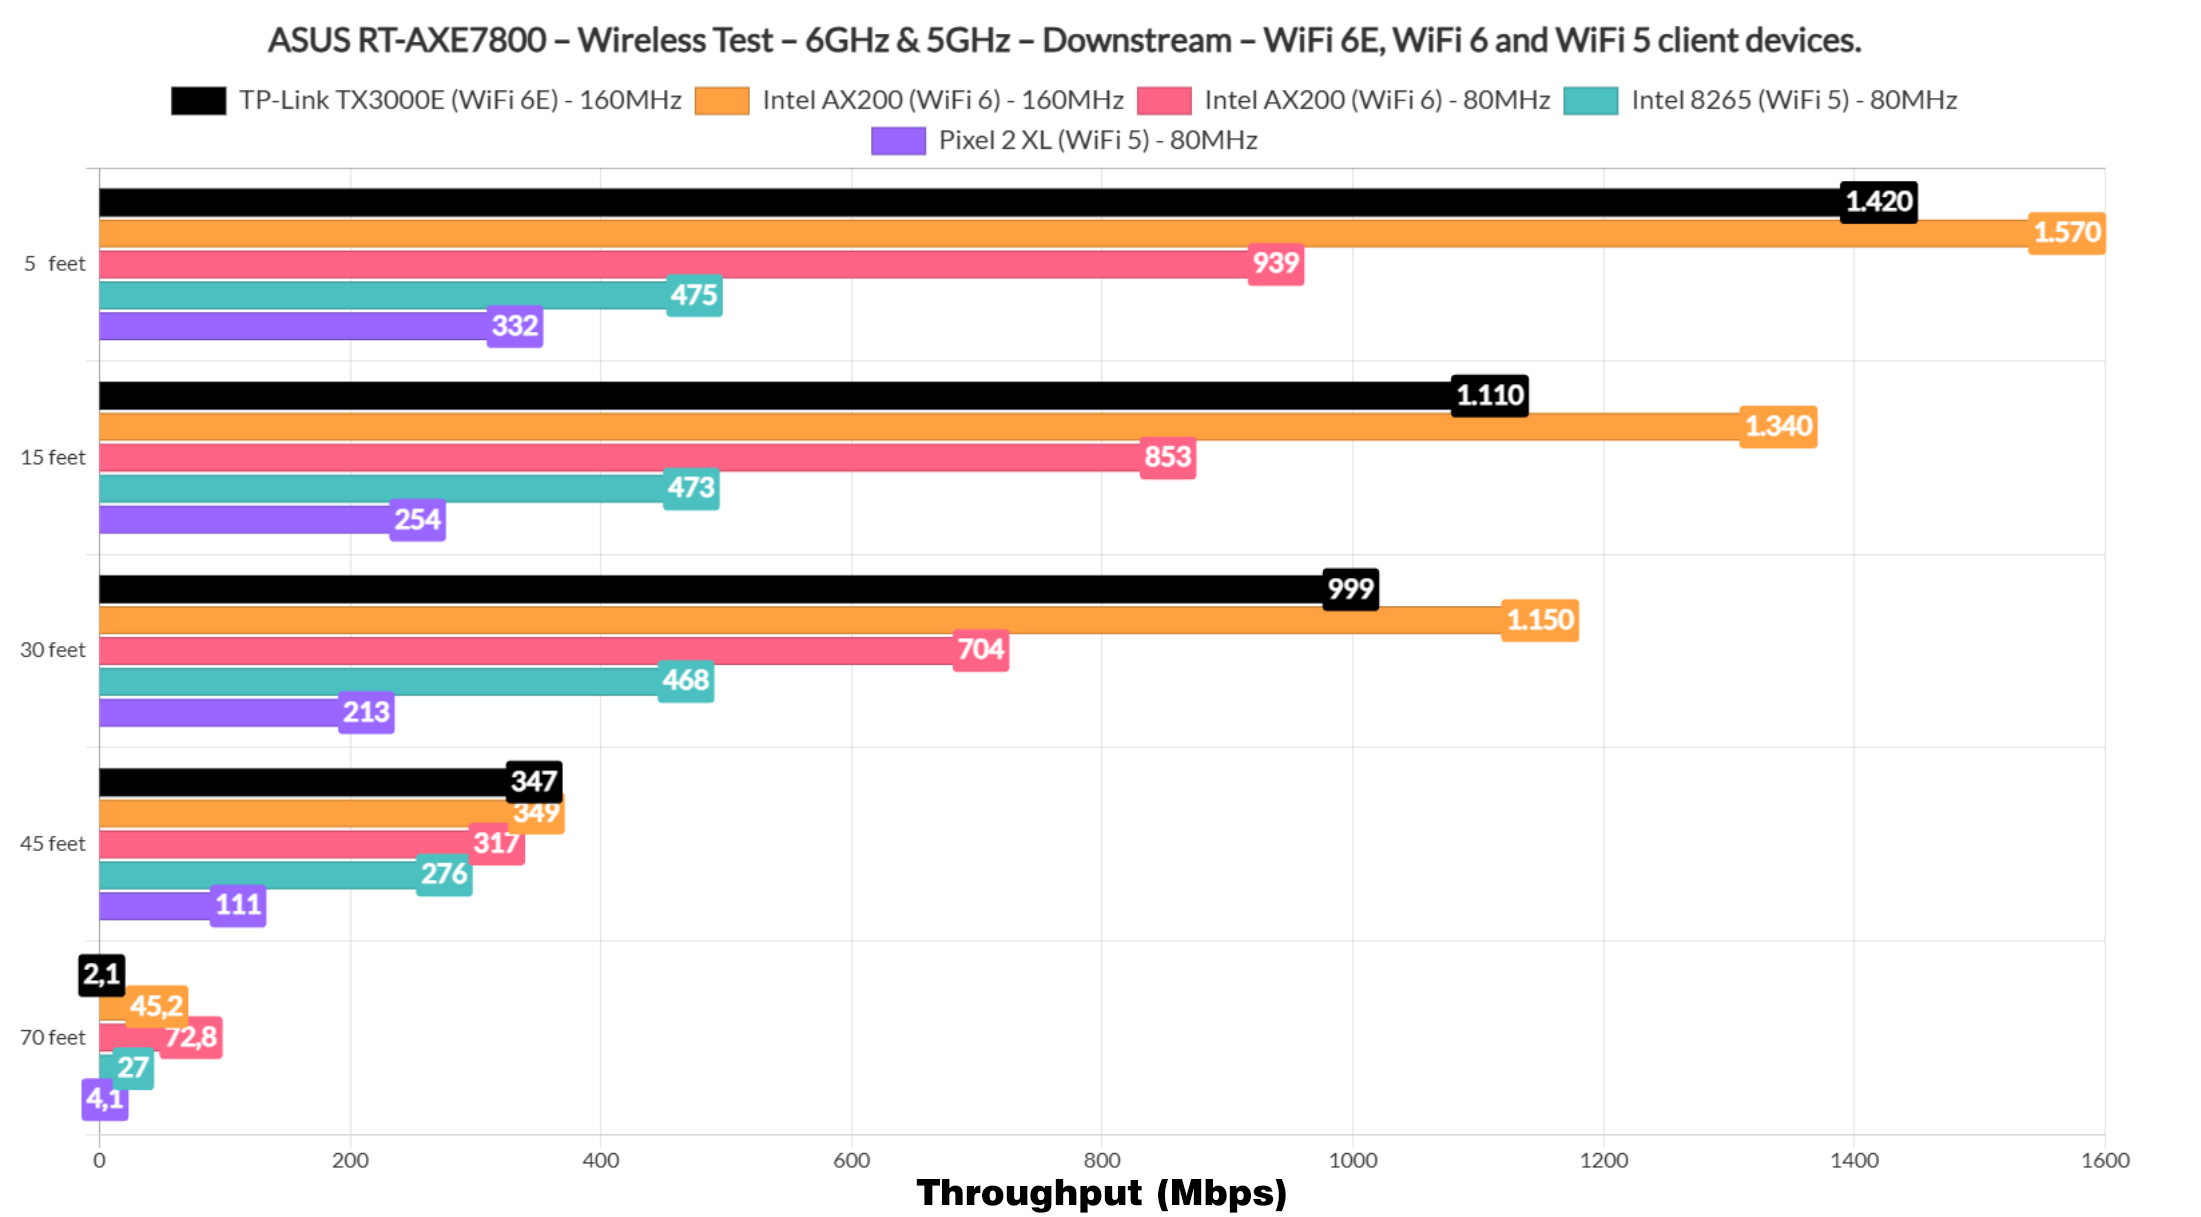

As for range, we again need to look at the signal attenuation graph which reveals that at -71dB, we get way more than 100Mbps on all clients minus one, while at -86dB, we can see that the WiFi 6E barely managed to offer a couple of megabytes.

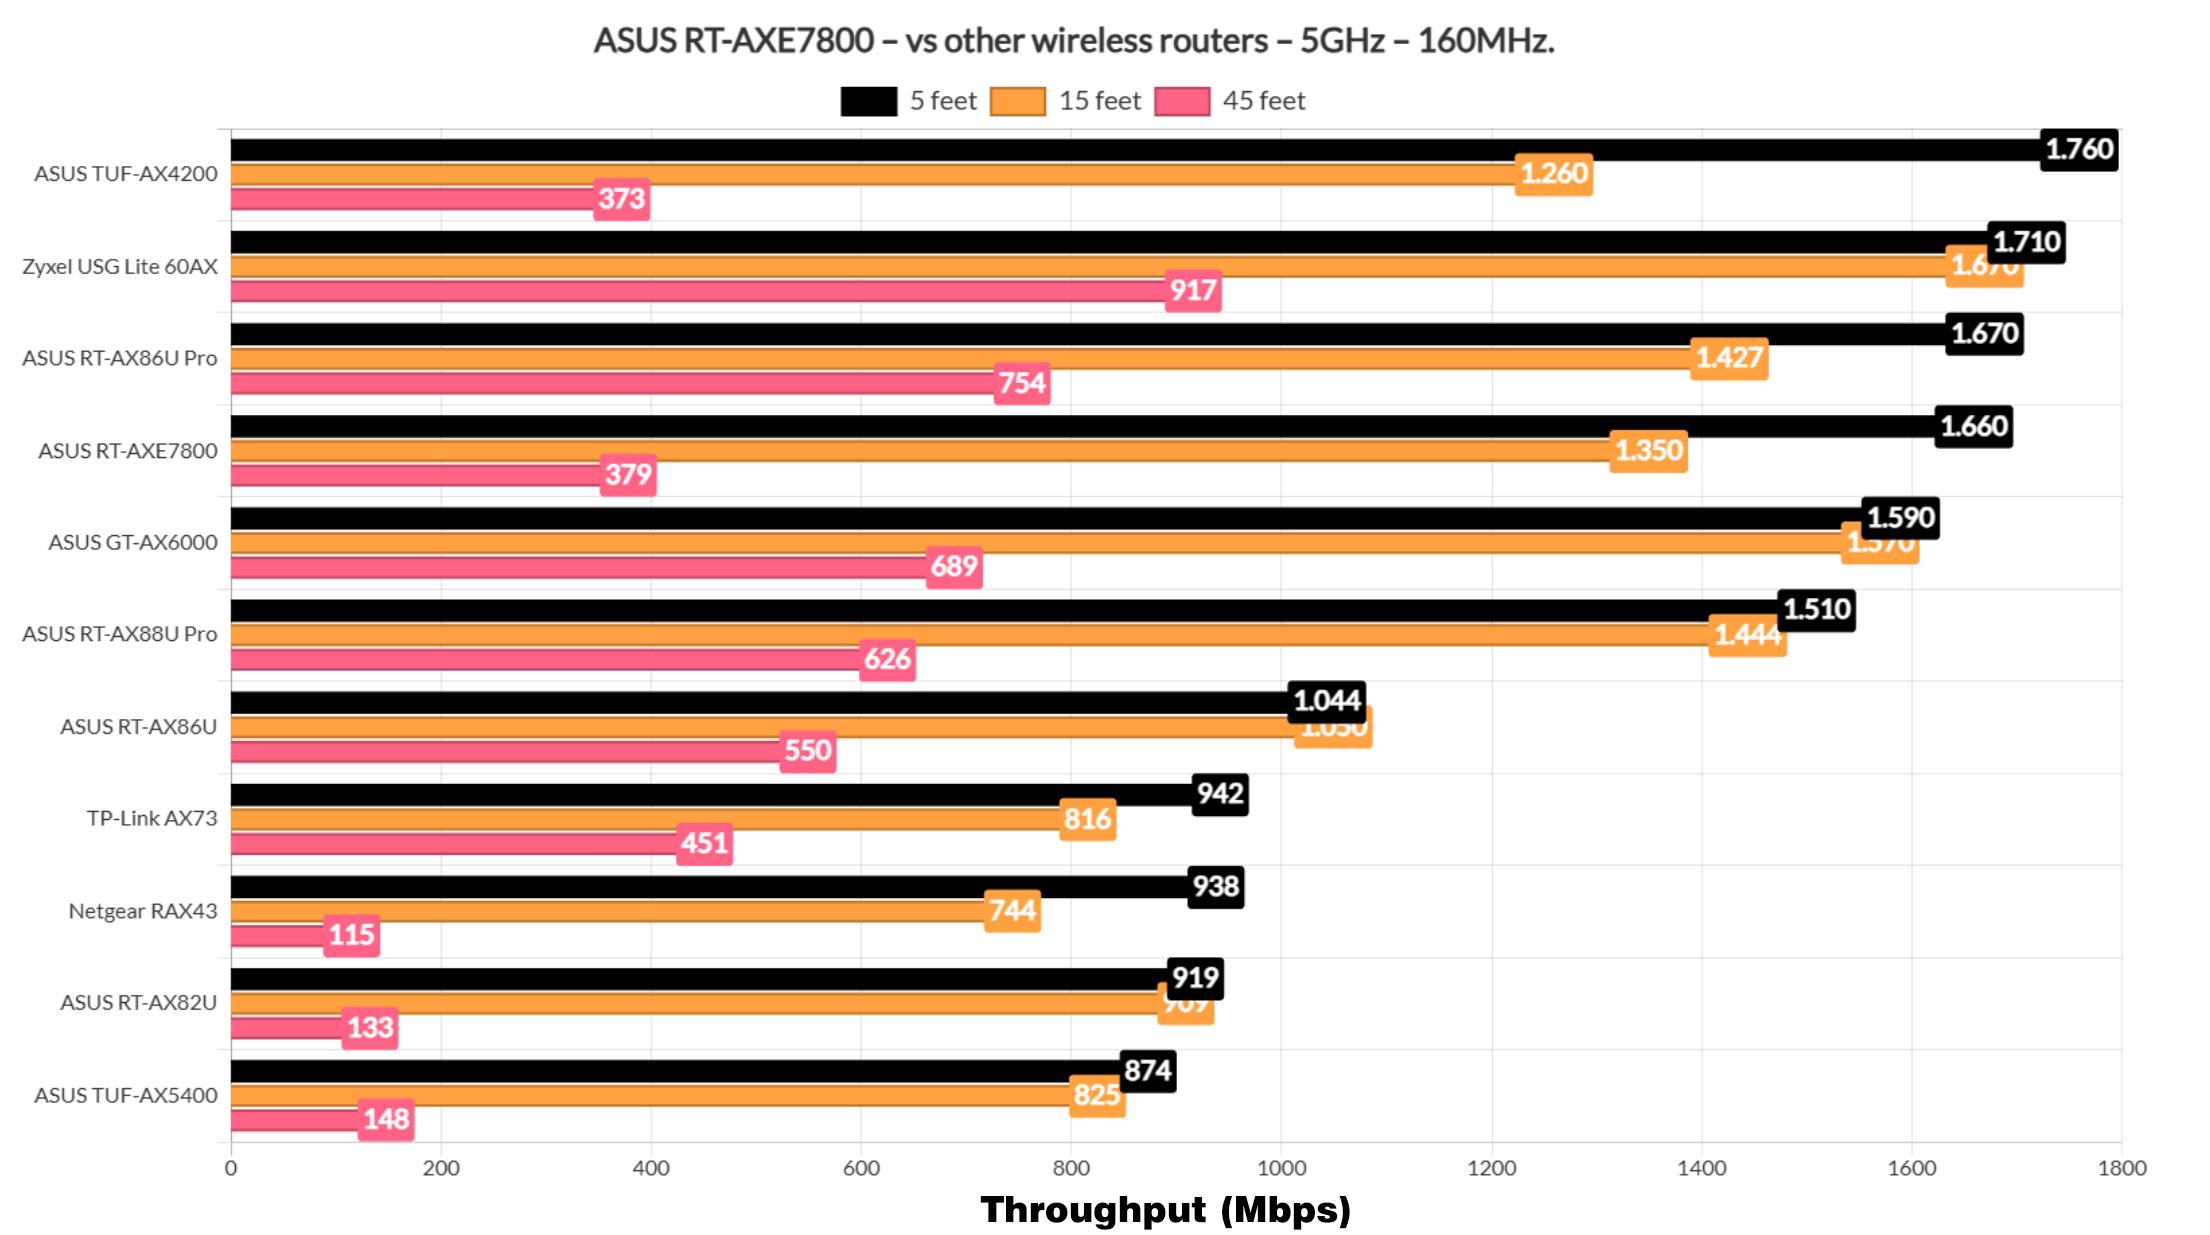
The other clients did much better though. When compared to other wireless routers that I tested so far, using the 160MHz channel width, does put the RT-AXE7800 fairly close to the top, in between the RT-AX86U Pro and the GT-AX6000.

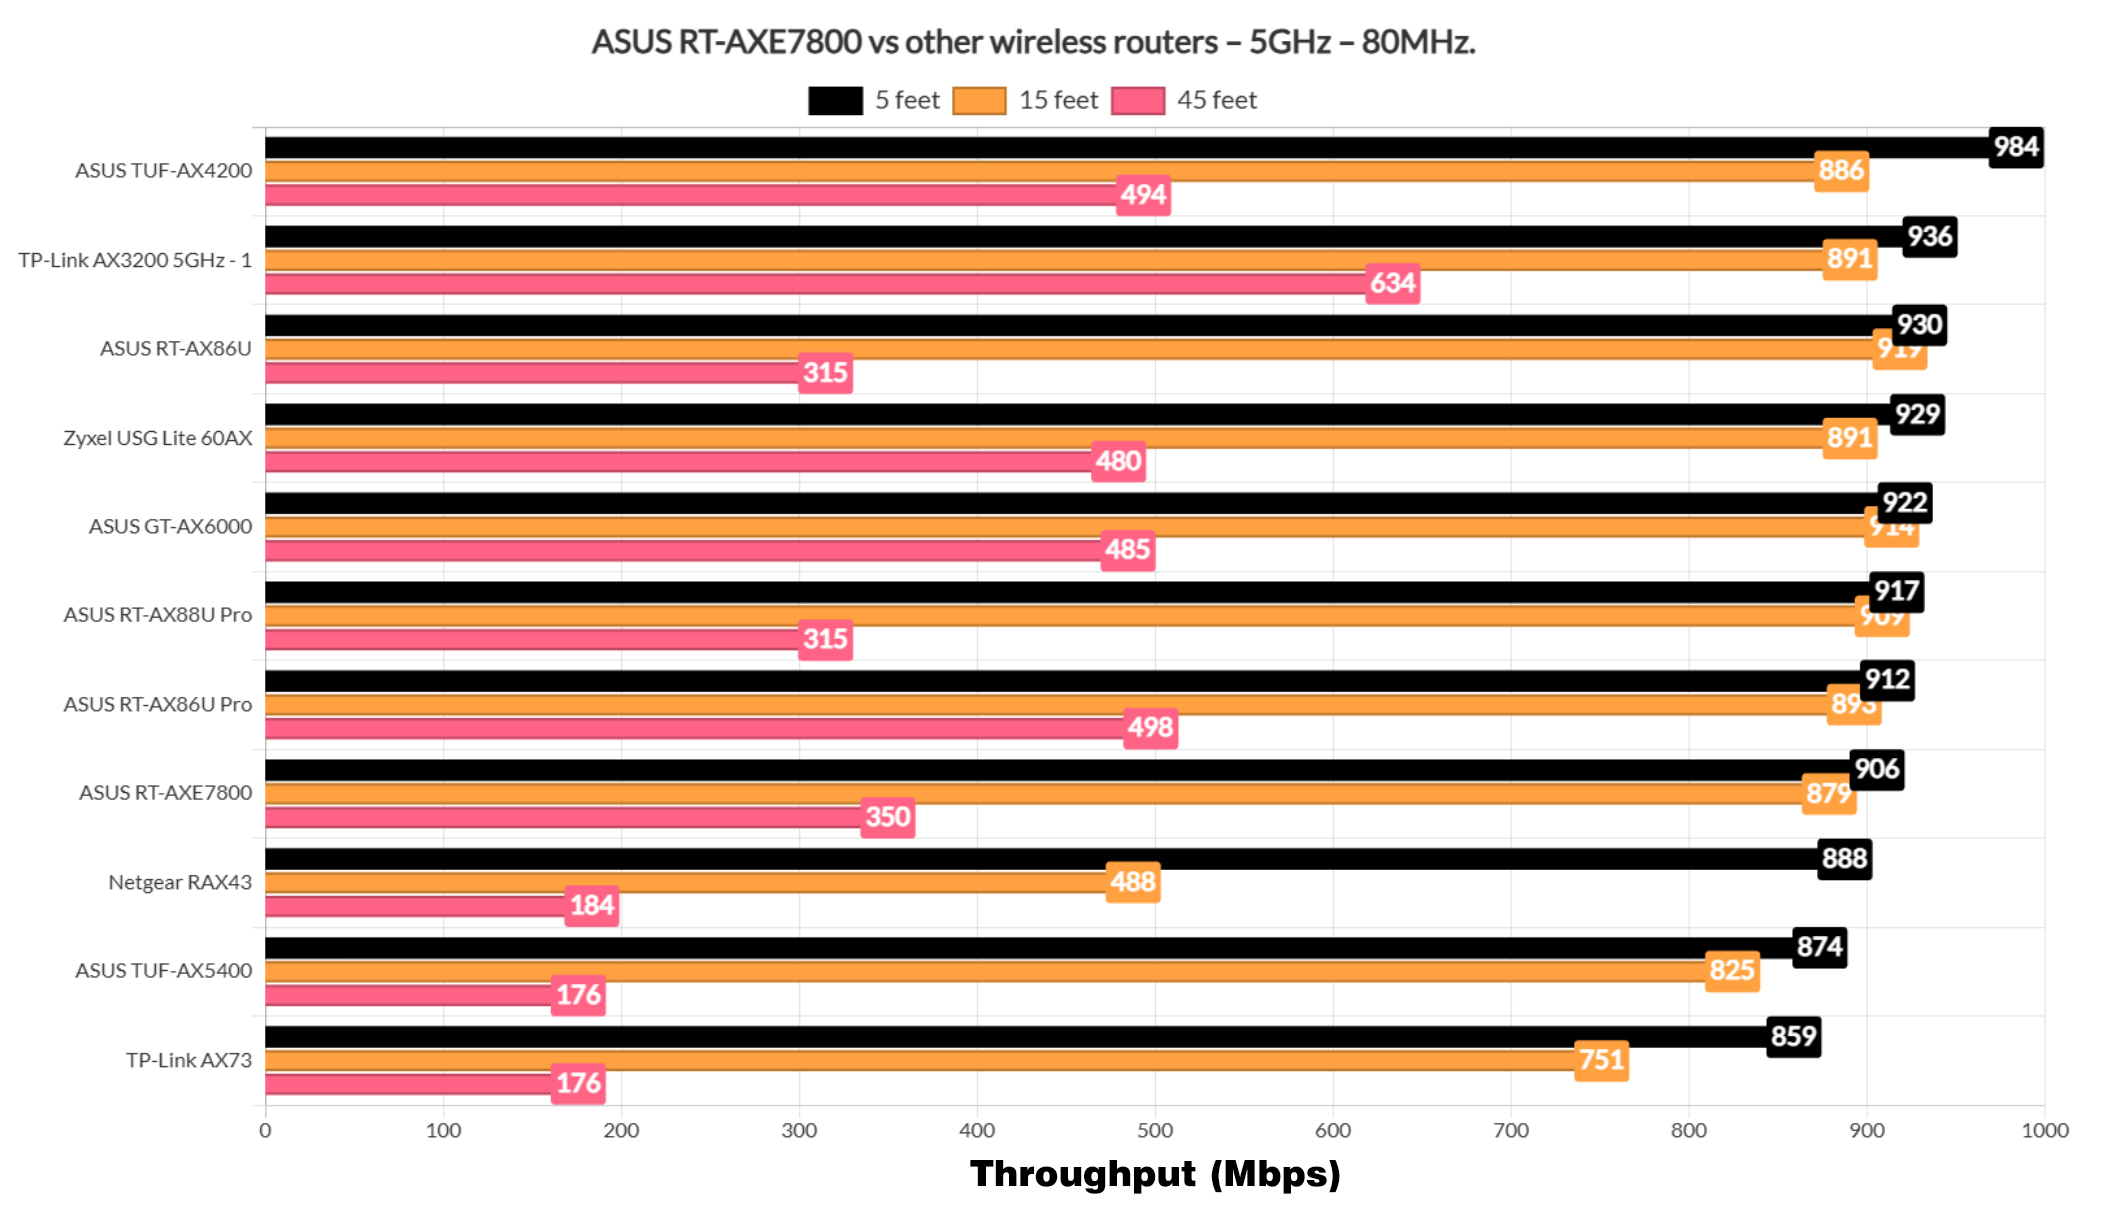
When using the 80MHz channel bandwidth, it’s a bit less impressive, but then again, it’s above 900Mbps, so I won’t complain that much.

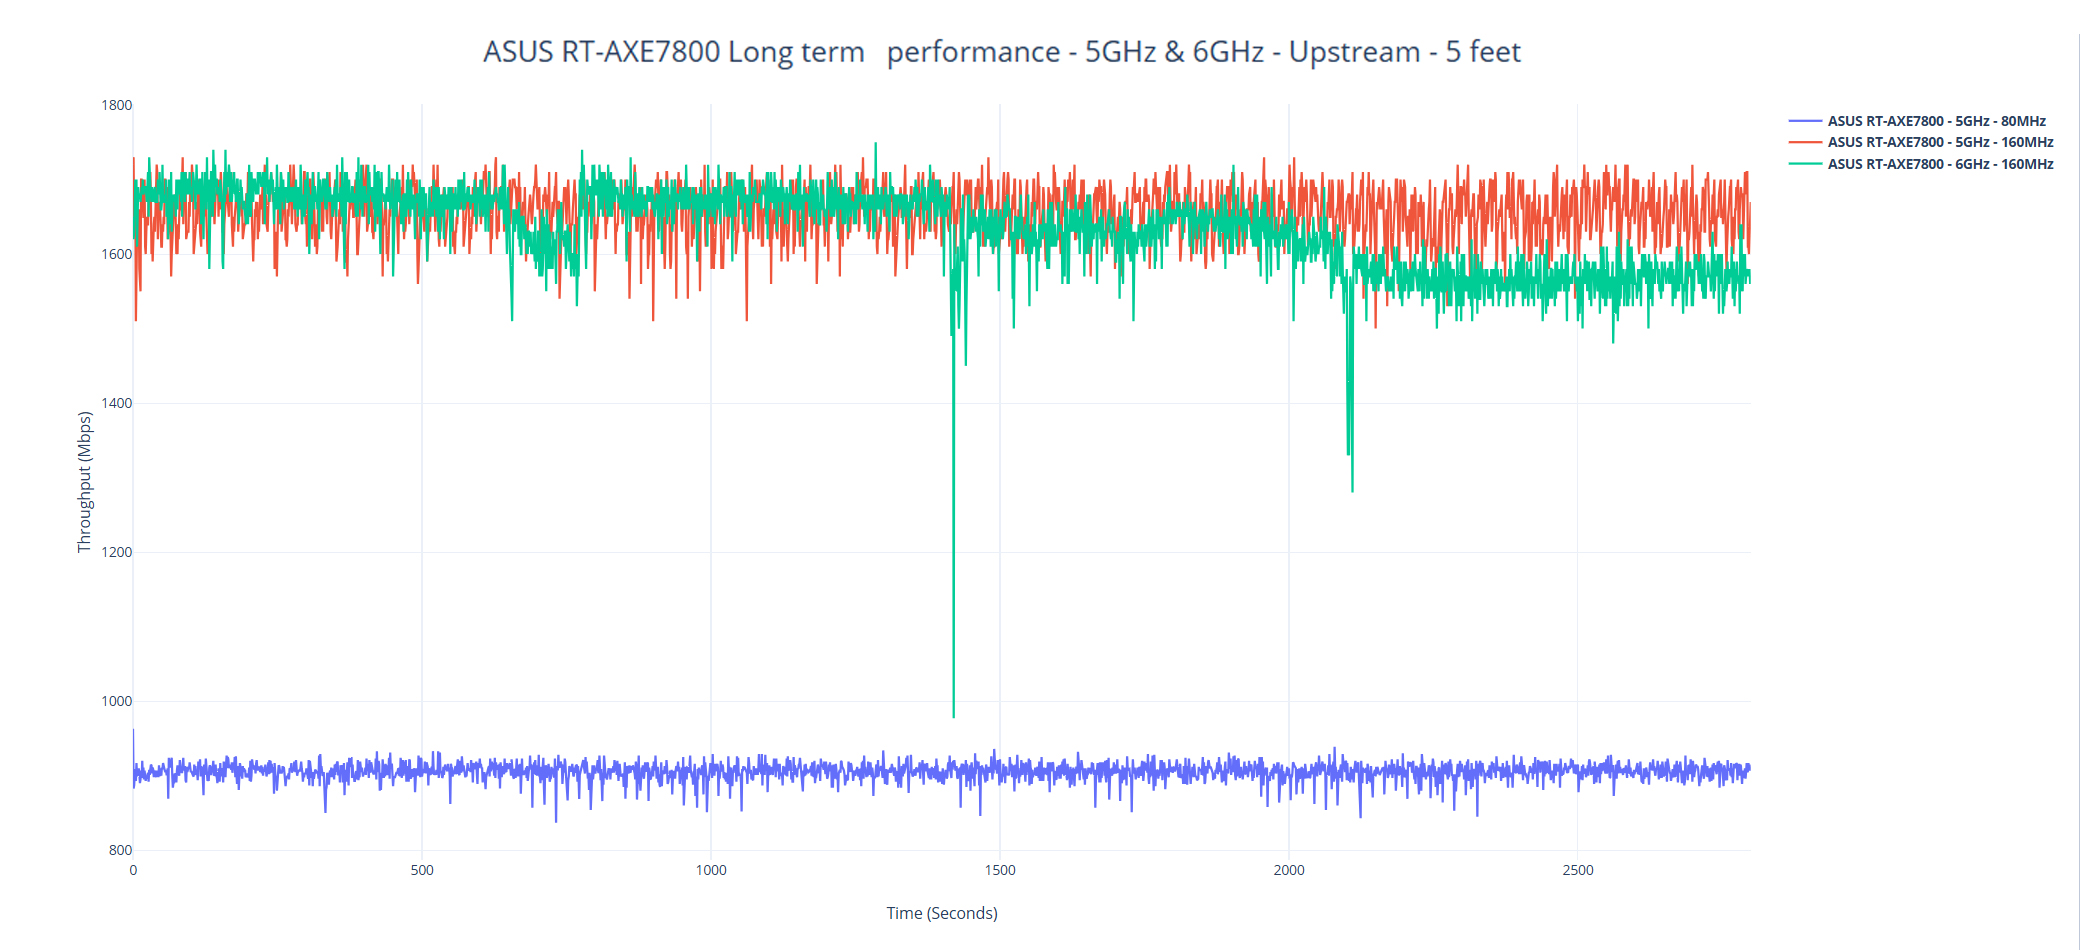
Lastly, let’s have a look at a longer-term performance view and get an idea about the throughput consistency. Before moving forward, I do need to mention that it takes a very long time until the 6GHz radio gets detected and I noticed that turning off some settings, such as MU-MIMO or OFDMA and then re-enabling them did help the client see the network a bit faster, as in a couple of minutes.

The Wireless Test (2.4GHz)
We also need to talk about the 2.4GHz network performance because we do need to use it with older devices and especially anything that’s within the smart devices realm.
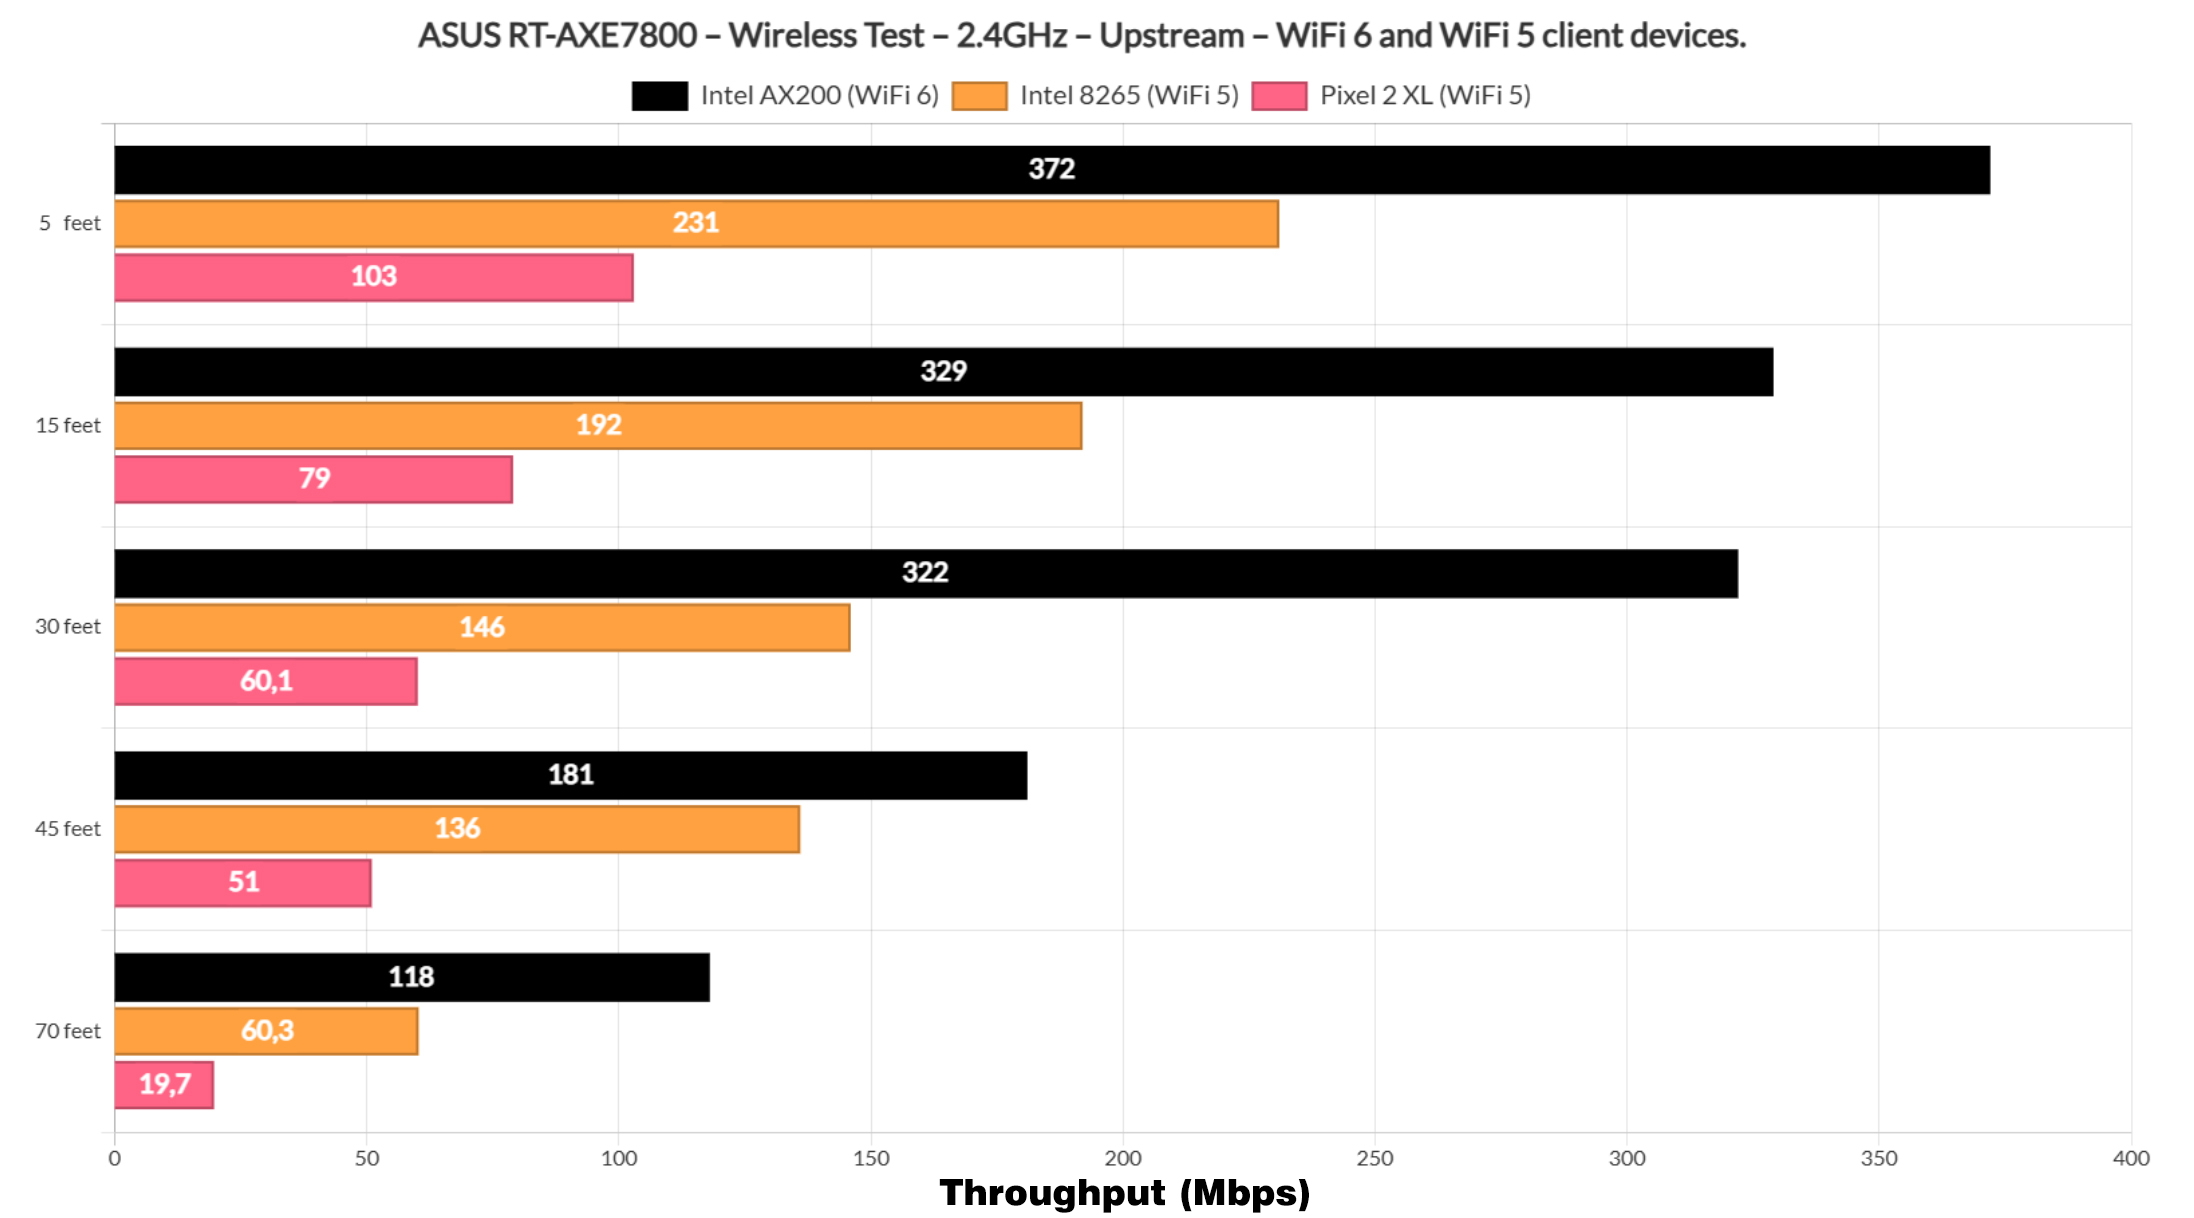

Using the WiFi 6 client, we see very good results and, when compared to other wireless routers that I tested until now, we see that the ASUS RT-AXE7800 falls somewhere in the middle.
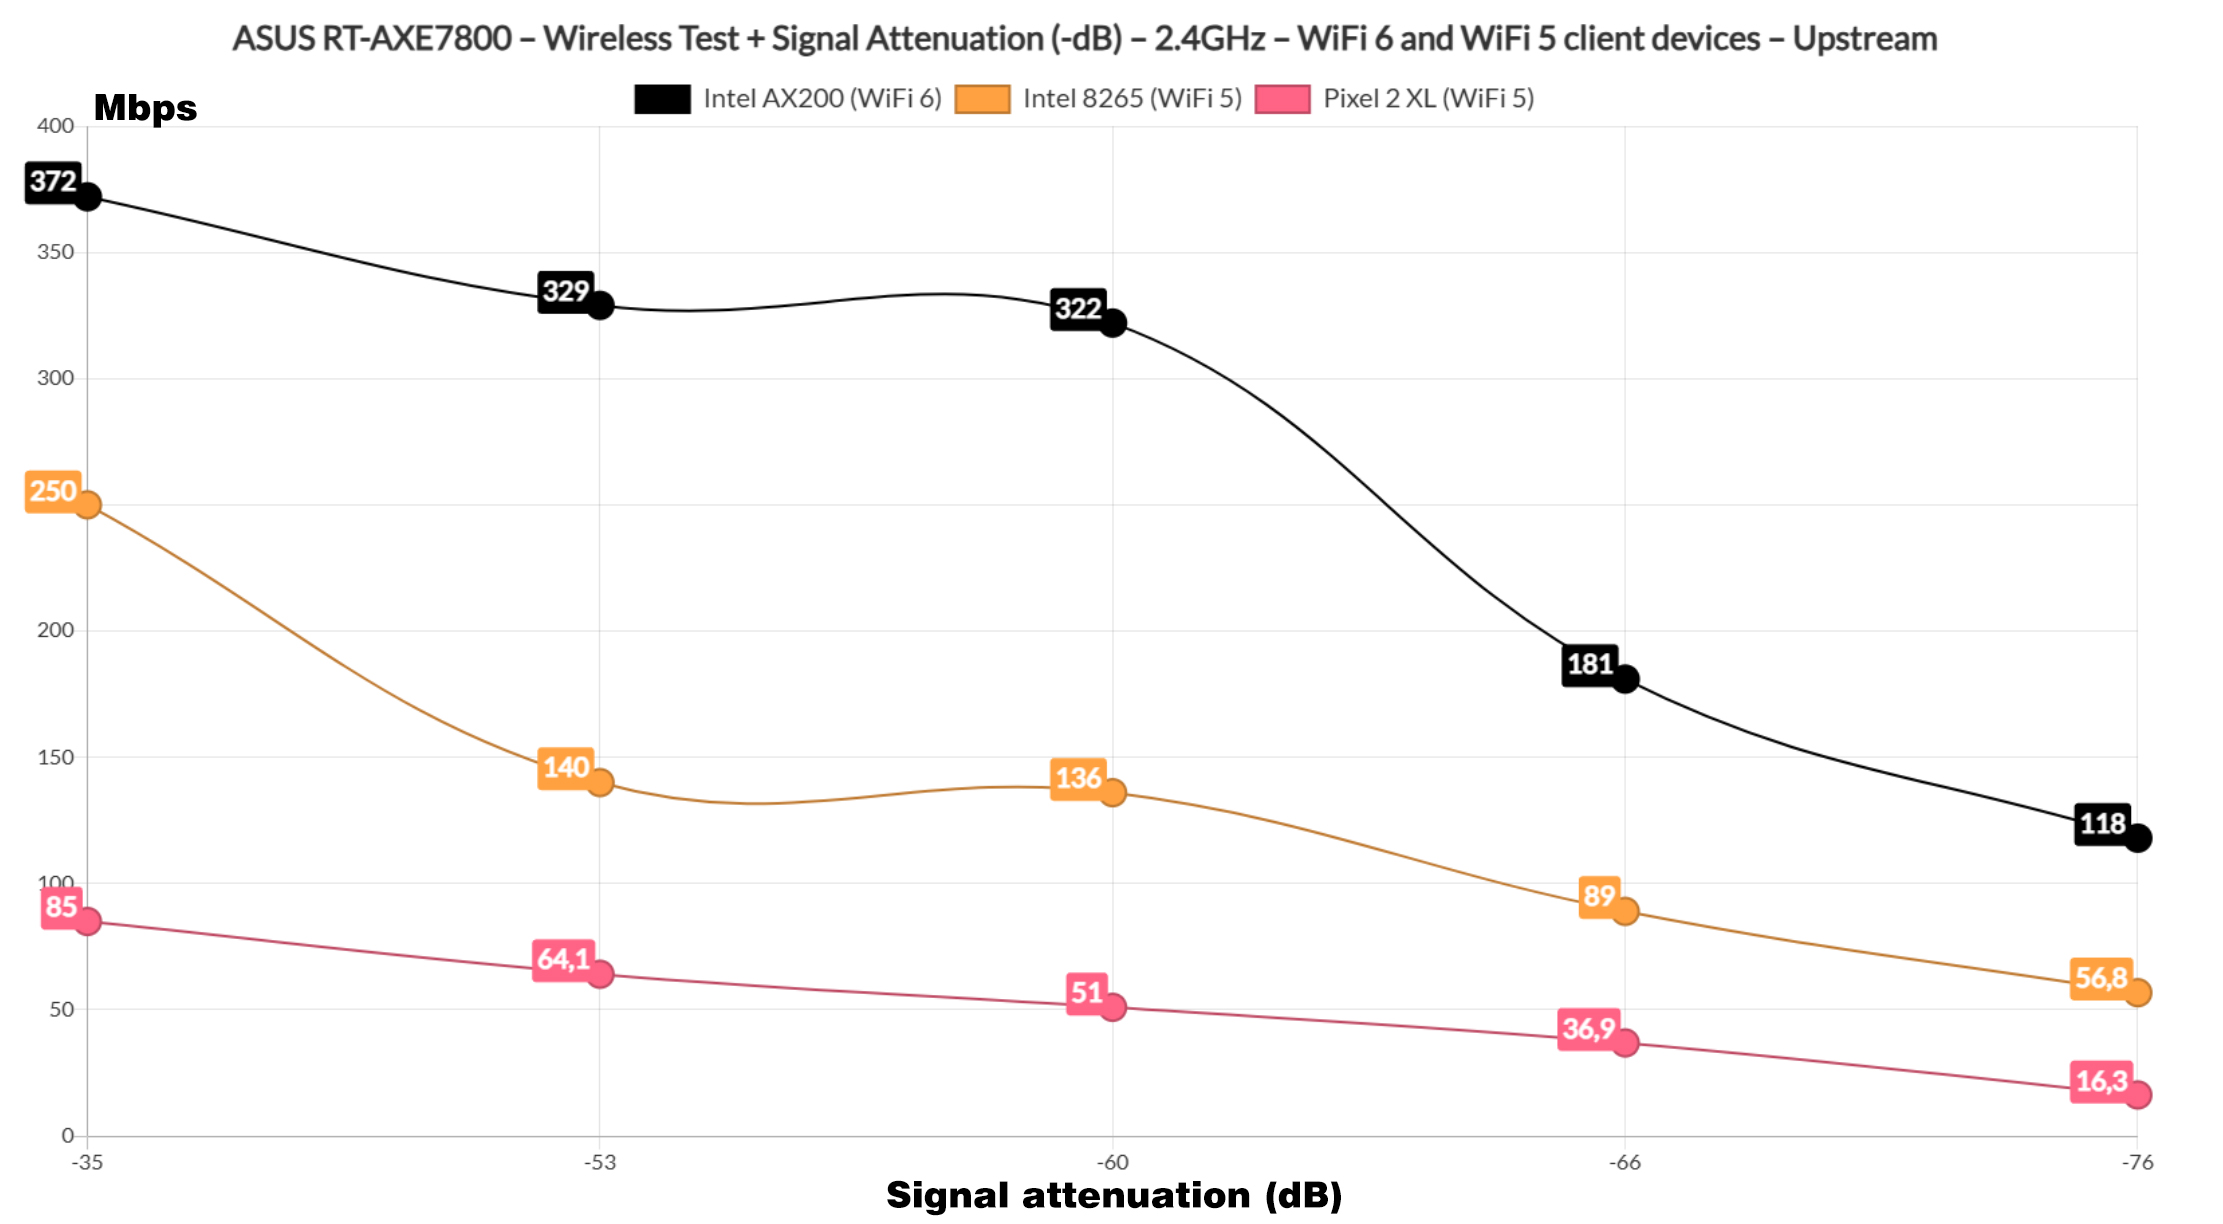

As for range, the throughput remains fairly consistent up until the signal attenuation doesn’t drop below -60dB. At -76dB, the smartphone struggled a bit which makes sense since it’s old and barely functional, but the other two clients did surprisingly well.
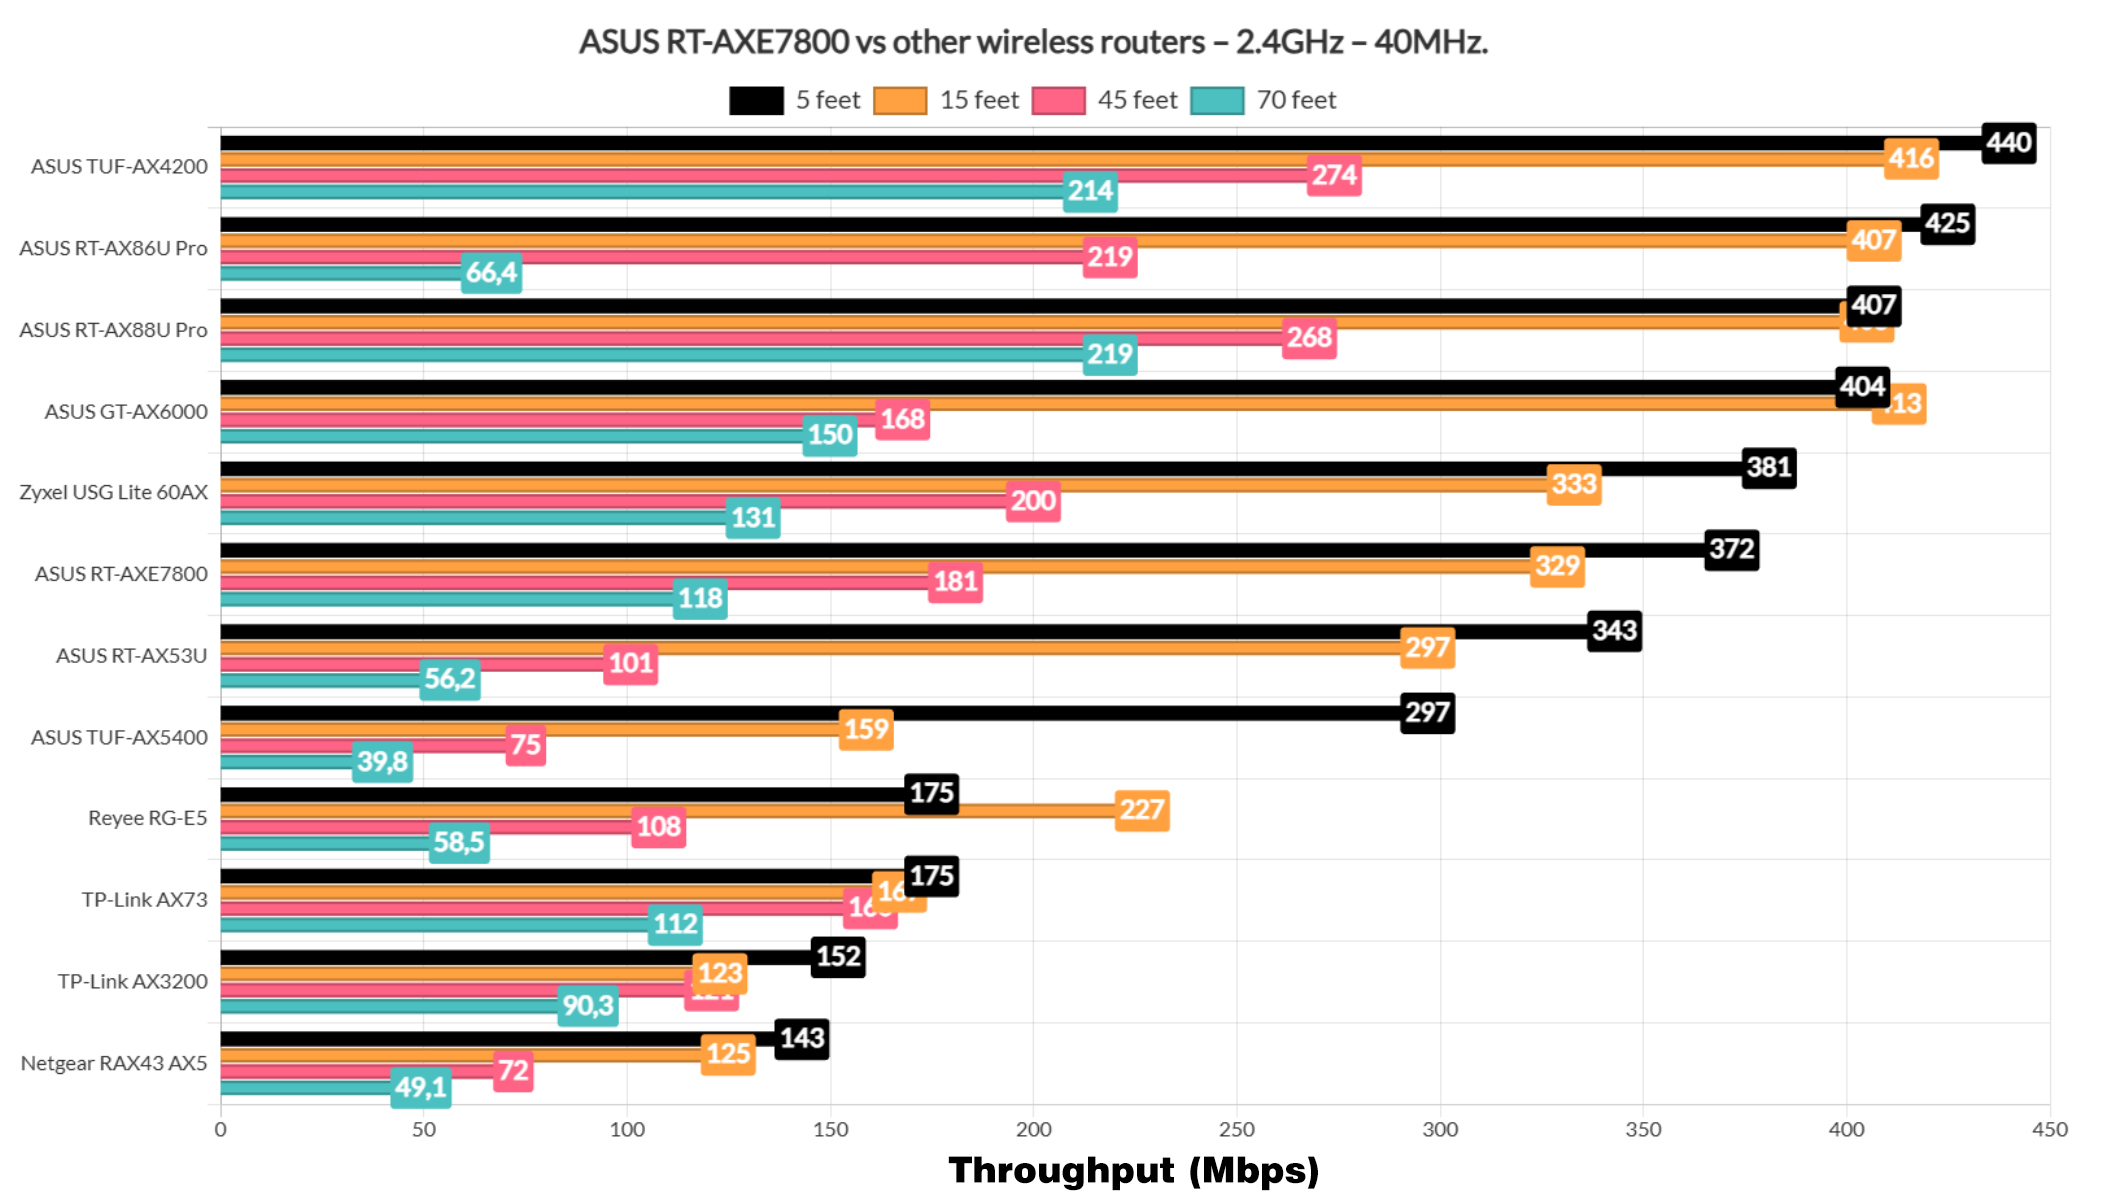

The Multi-Client Tests (5GHz)
Now that we’re done with the single-client tests, let’s see how well the RT-AXE7800 handles multiple clients and we will focus on the latency. I have used the same set of clients as before and the same server PC, but I have included the signal attenuation measured at each client level to get an idea about the amount of interference that I was dealing with.
| 2x Lenovo Y520 | Custom PC | MacBook Pro | ZimaBoard 832 SBC | |
| Signal Attenuation | -33dB & -33dB | -33dB | -41dB | -67dB |
And yes, I used the same open-source tools developed by Mr Jim Salter which you can use as well. You can get it from GitHub. Now, let’s start with the concurrent 1080p streaming traffic on five client devices.
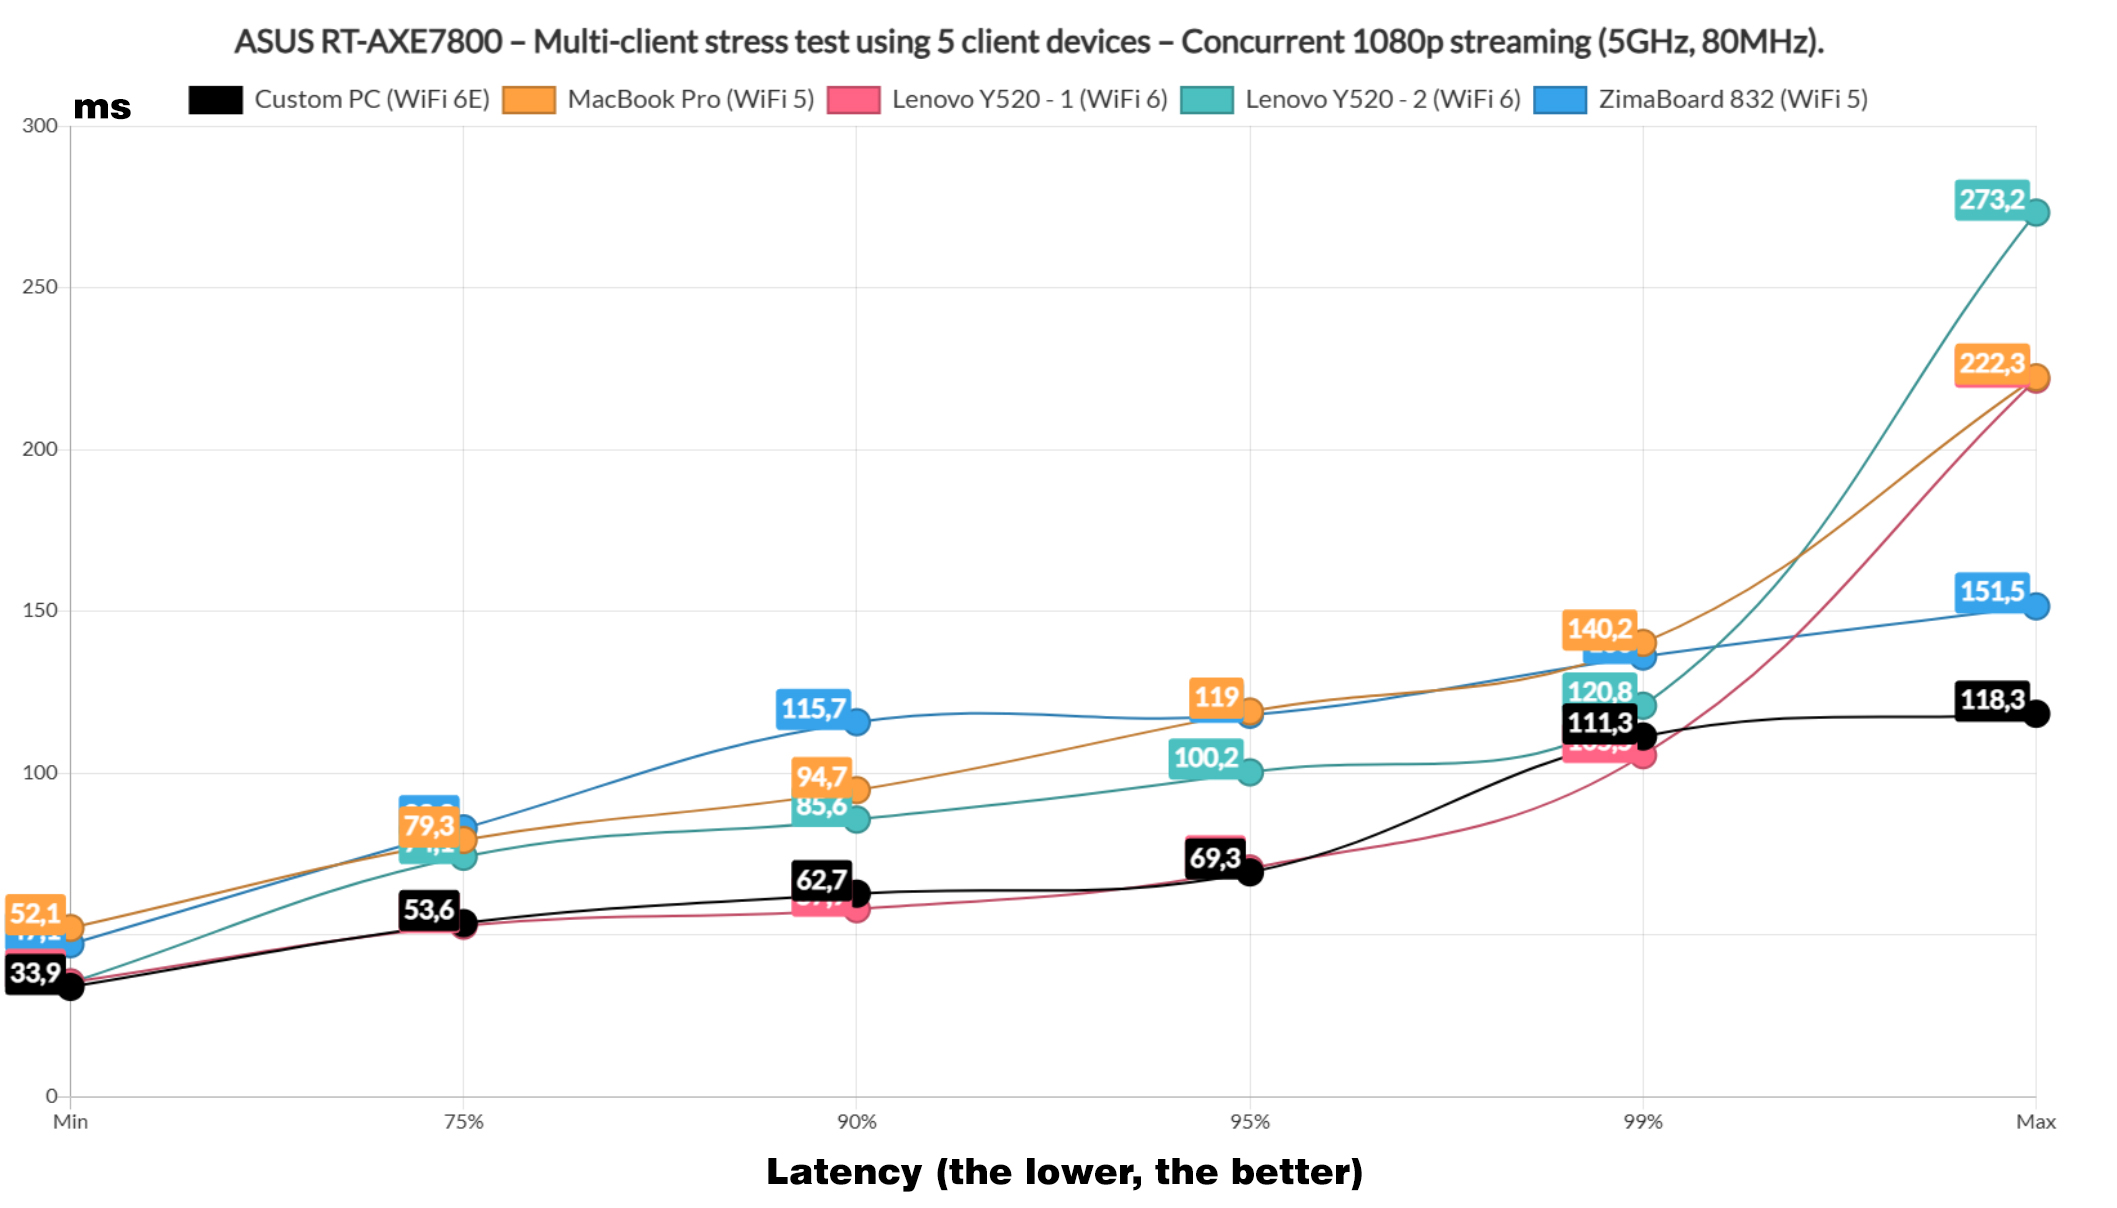

We want the latency to be below 50ms all the time, but only two clients stayed near this value for 75% of the time. Both did raise slowly towards 70ms for about 95% of the time, with a shot above 100ms for 5% of the time. It’s not going to be a bad performance, but the other three client devices did tend to go near 100ms for at least 10% of the time, so you can experience some buffering if you try to stream some 1080p videos on a similar set of clients. Let’s push a bit more and run 4K streaming traffic on the same 5 client devices.
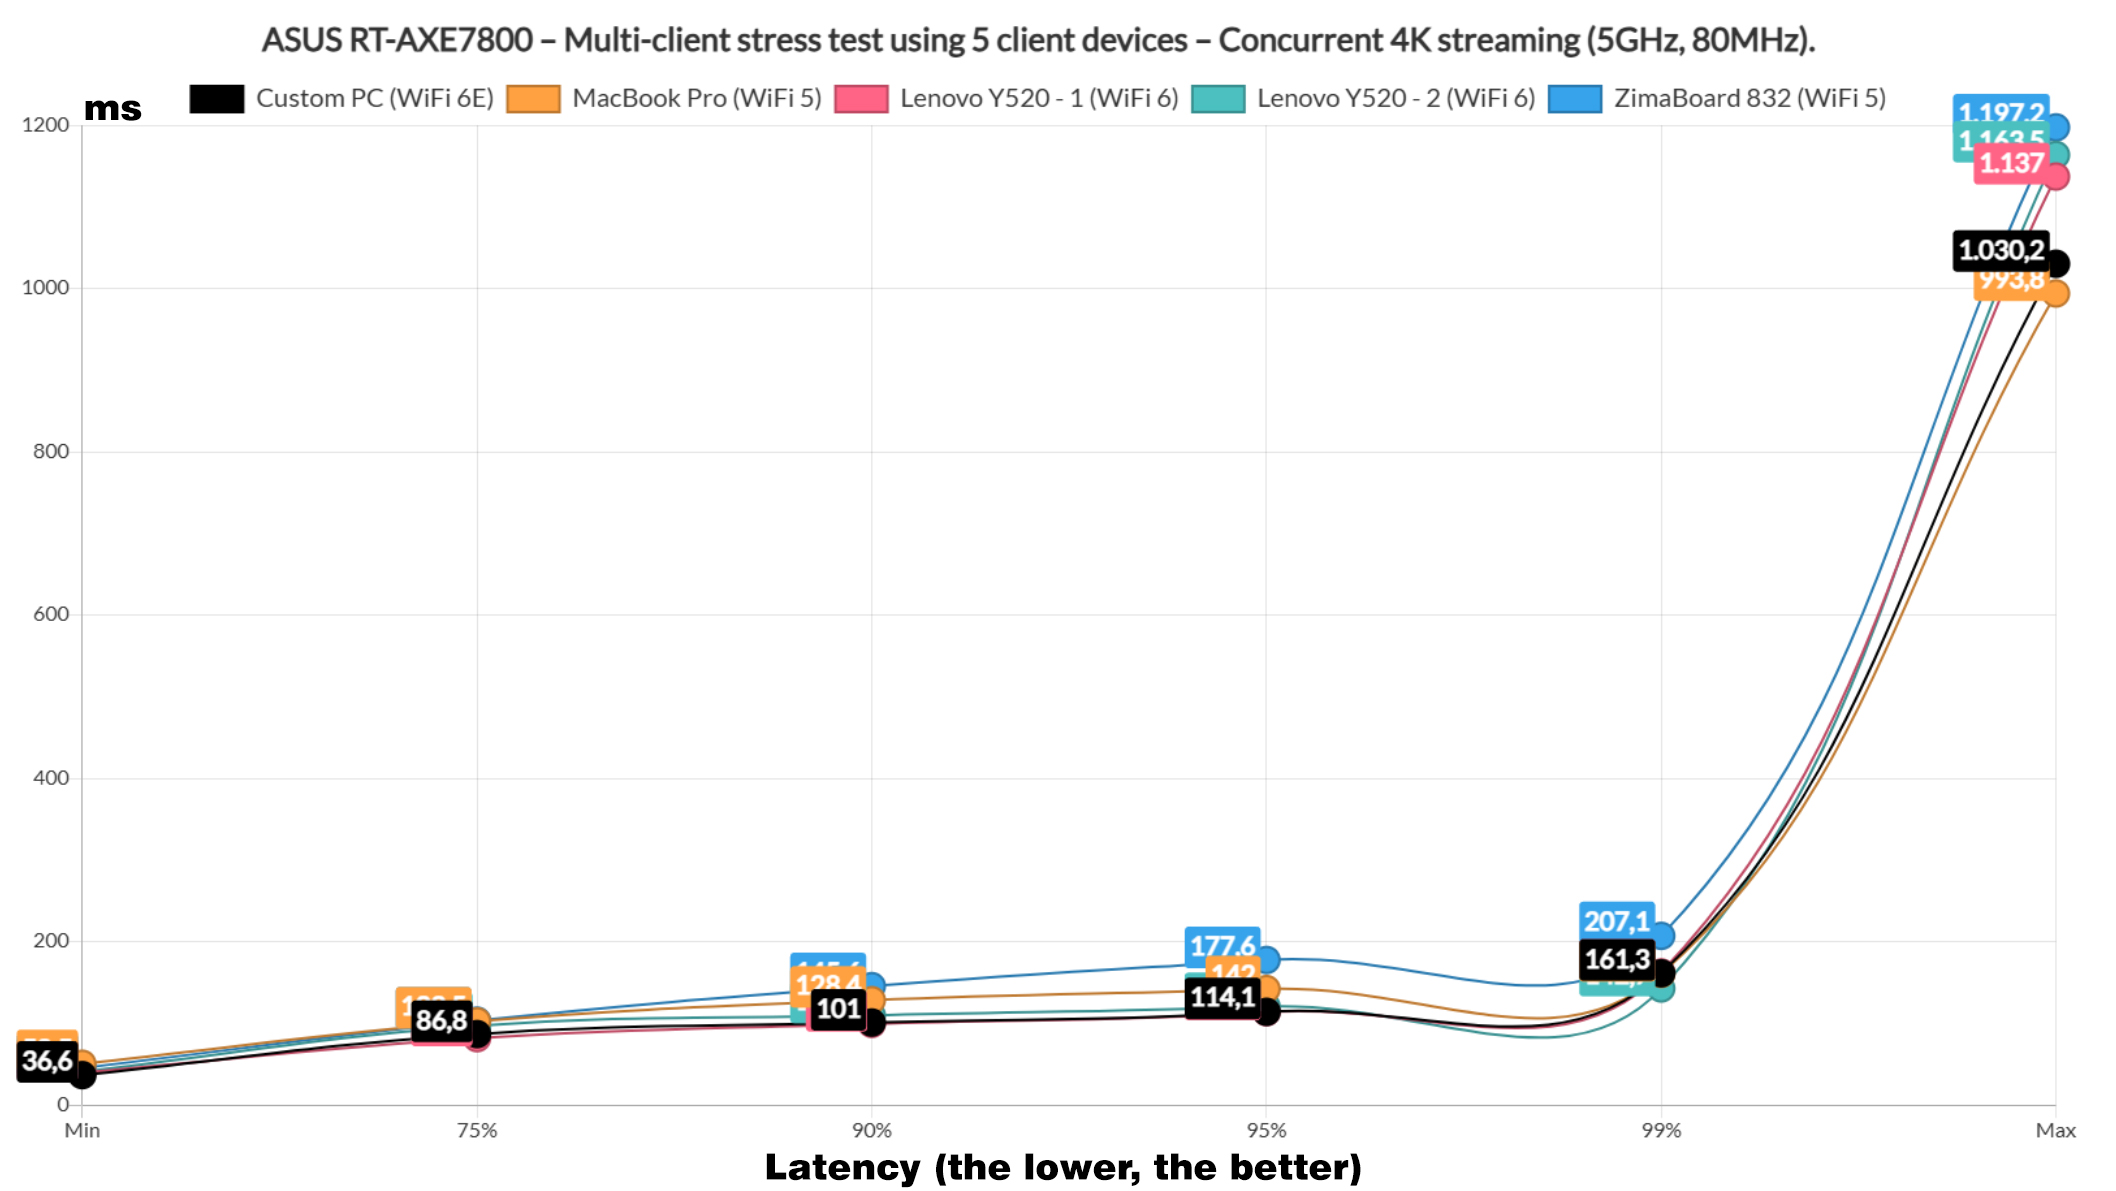

Unsurprisingly, the latency did raise across all clients, with the same couple of devices trying their best to remain beneath 100ms for 75% of the time. The rest didn’t care and rose above that limit, so it’s best to limit the number of clients if you wish to have a good performance. Or, just move a few on the 6GHz network if there’s support for this standard.
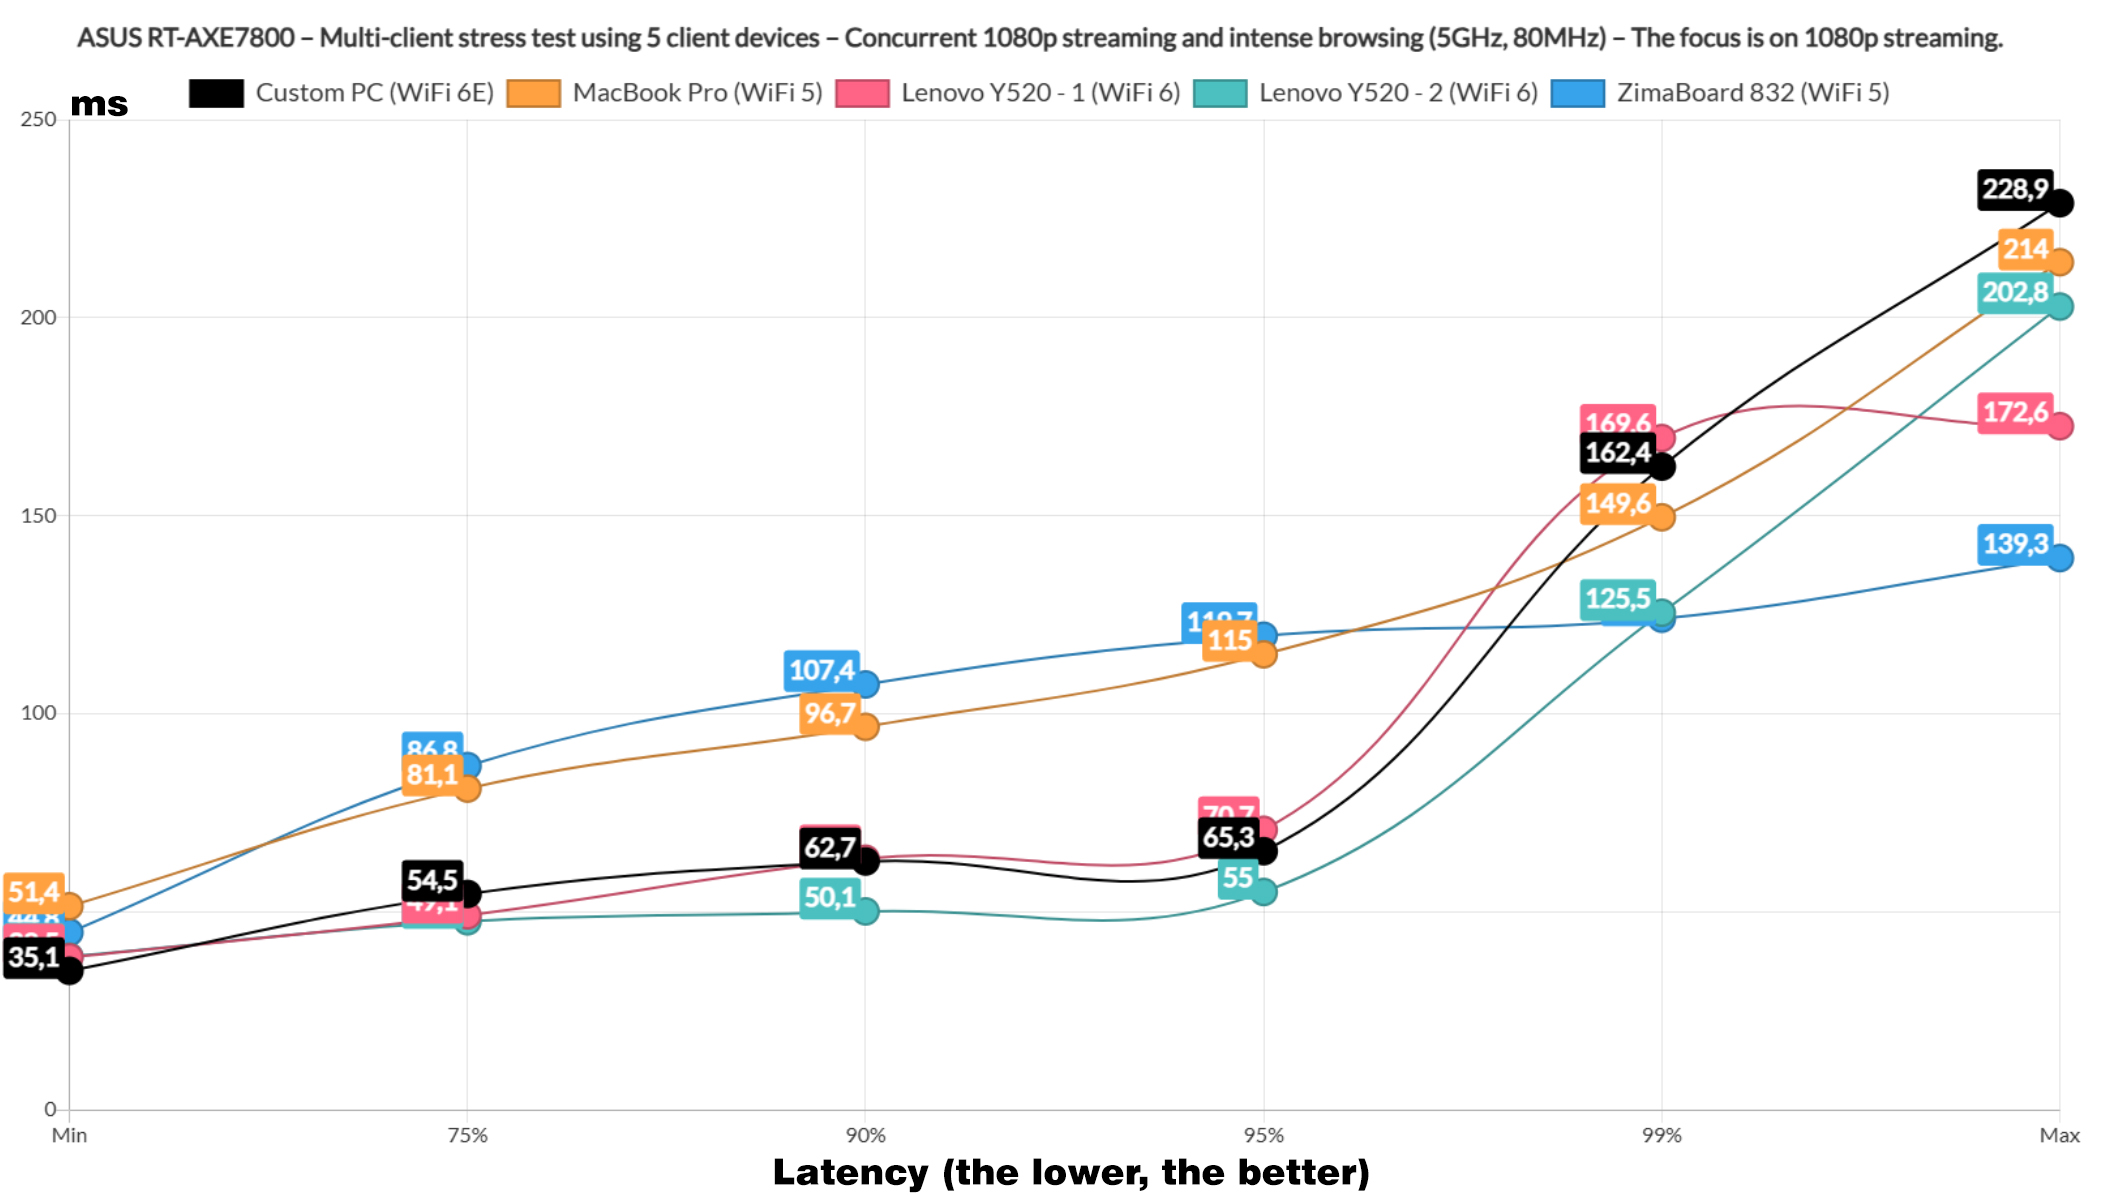

Next, I wanted to see if the router will handle both 1080p streaming and intense browsing to be run at the same time on the five client devices. And, as you can see, the 1080p streaming was handled decently well on the WiFi 6E and WiFi 6 clients which only rose above 100ms for 1% of the time, while the two WiFi 5 clients struggled a bit more.
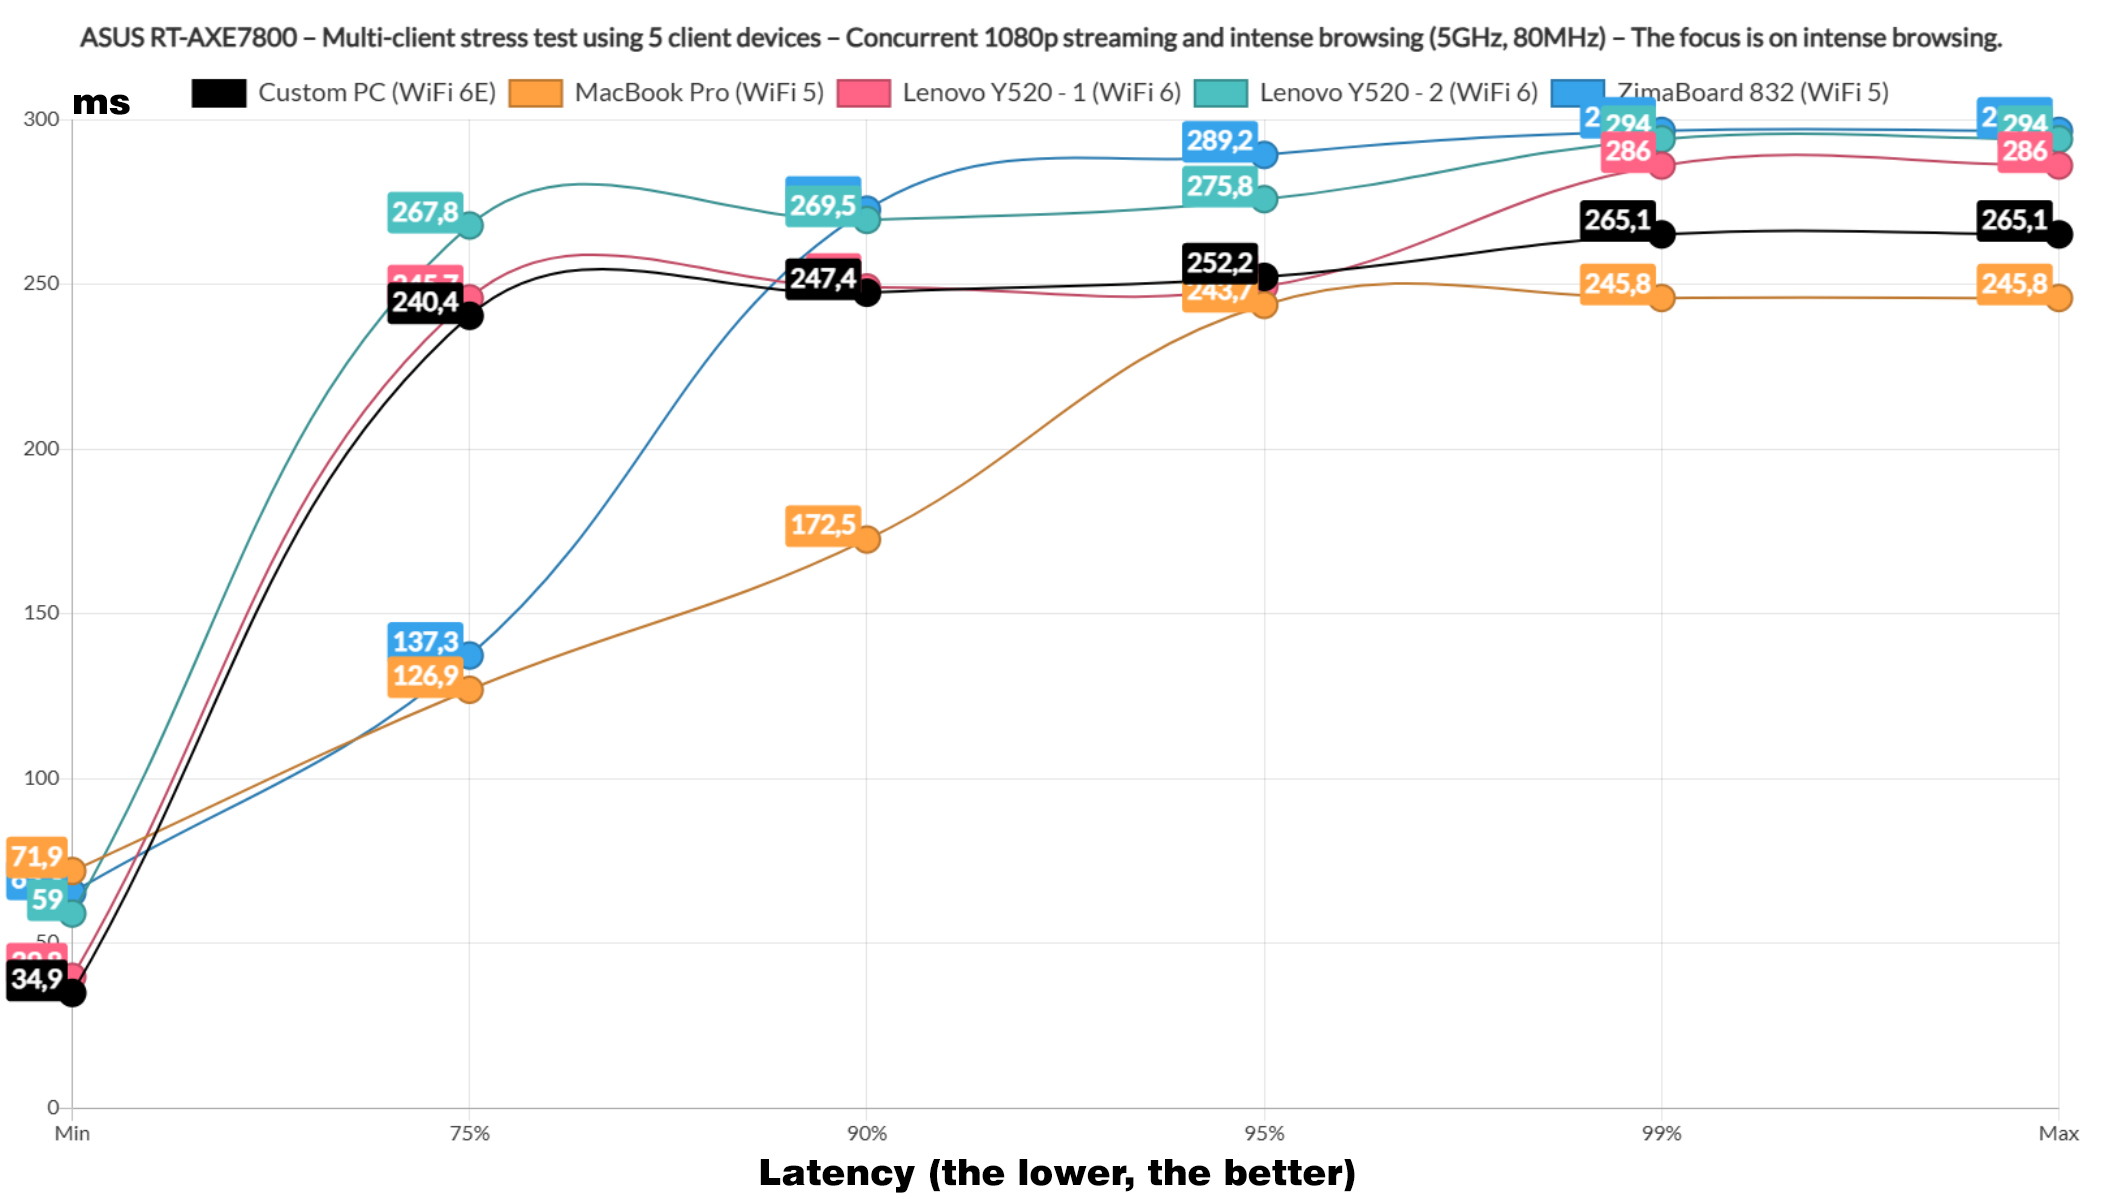

The intense browsing graphic shows that all clients remained beneath 300ms all the time which is perfectly fine. We don’t want the latency to rise above 1.5 seconds. Then, I ran the same test but I simulated 4K streaming traffic instead of 1080p.
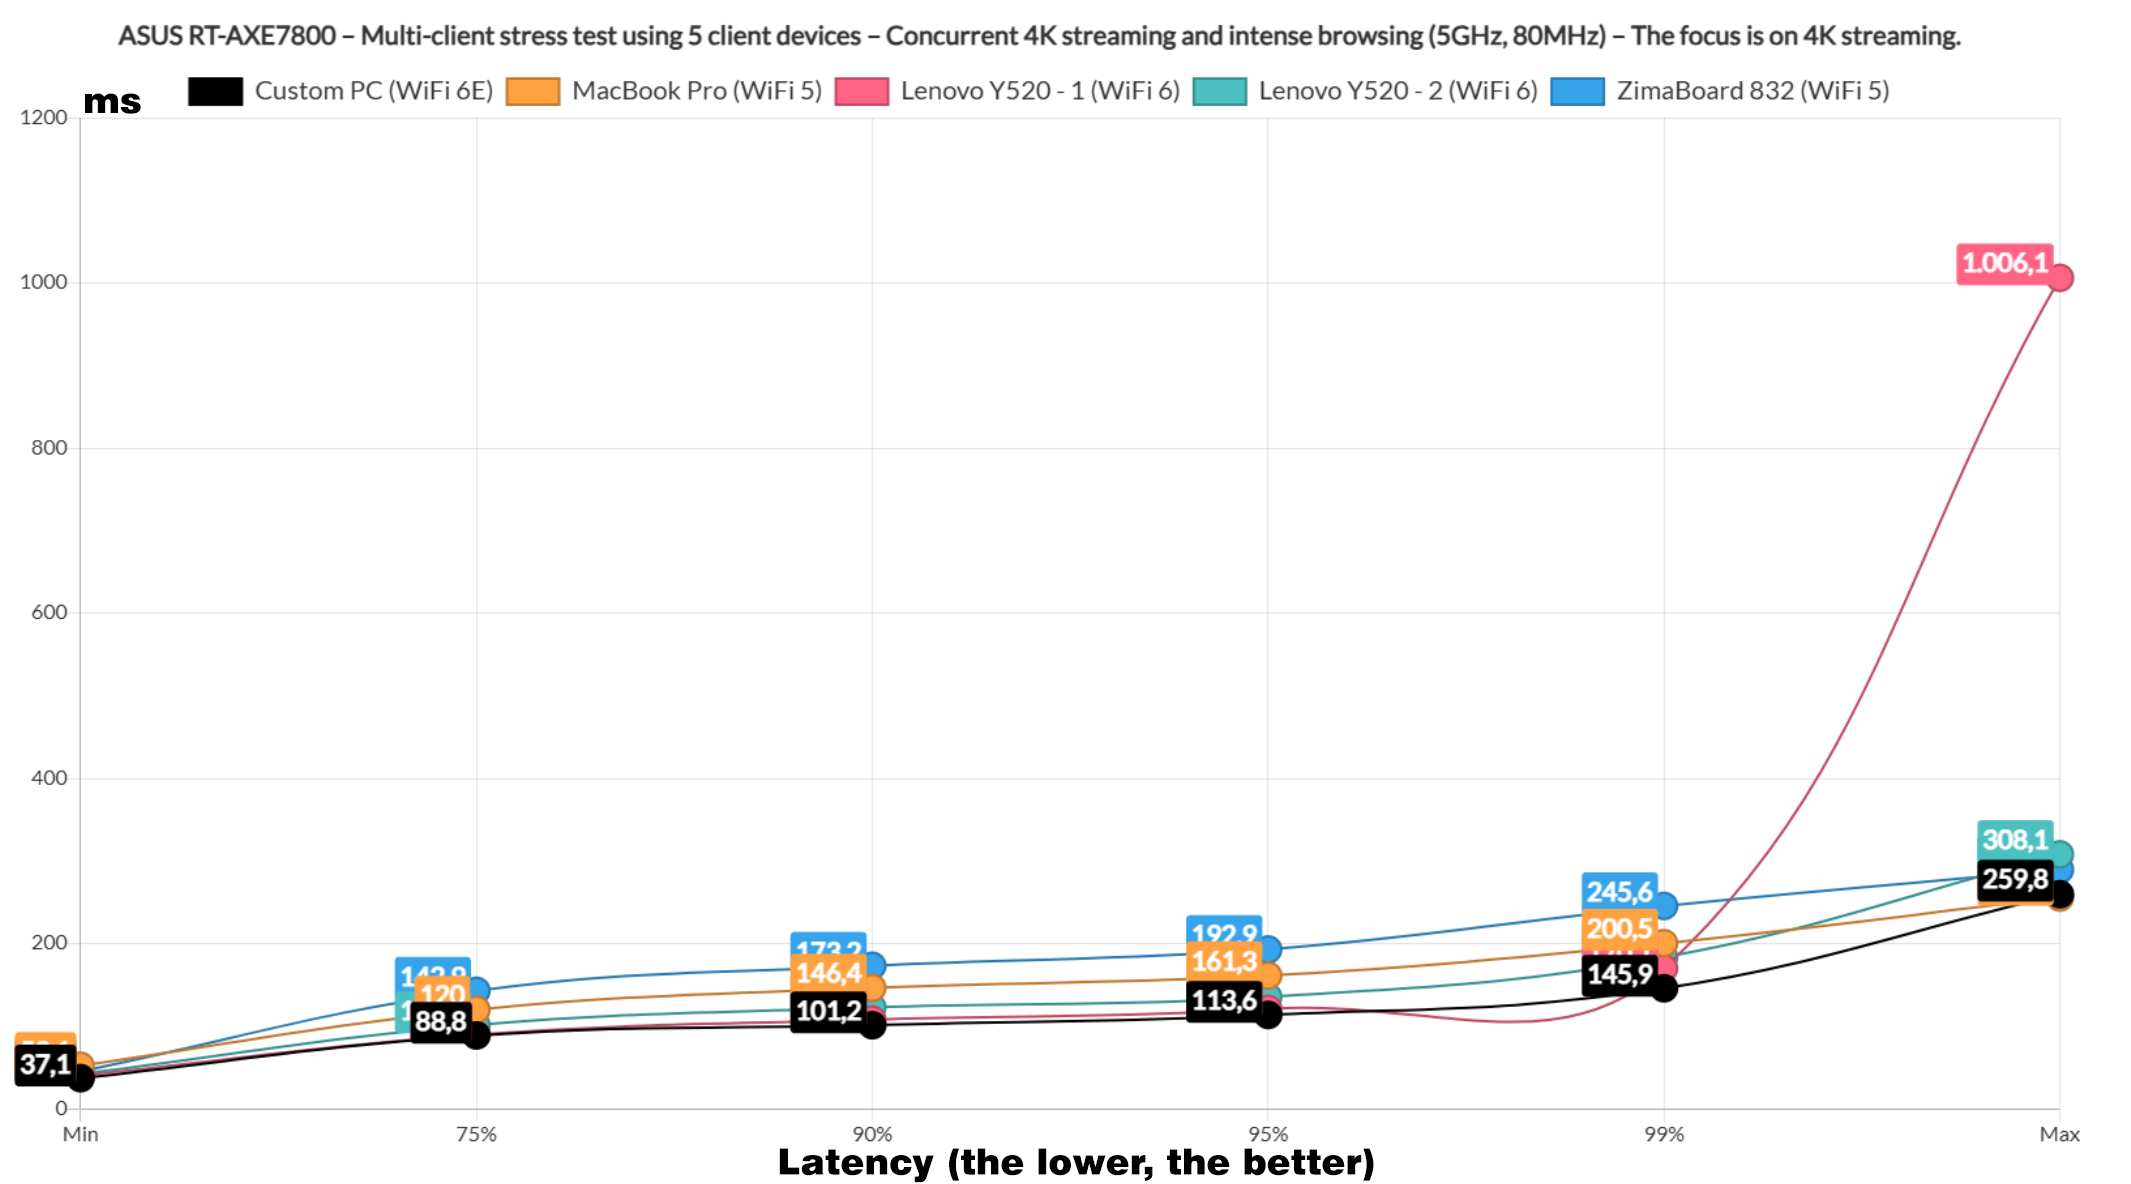

And, as anticipated, the two clients managed to barely stay below 100ms for 75% of the time, while the rest went above this limit and even almost reached 250ms for 1% of the time. Not good. In this case, we need to put some clients on the 6GHz network and/or wire a few of them.
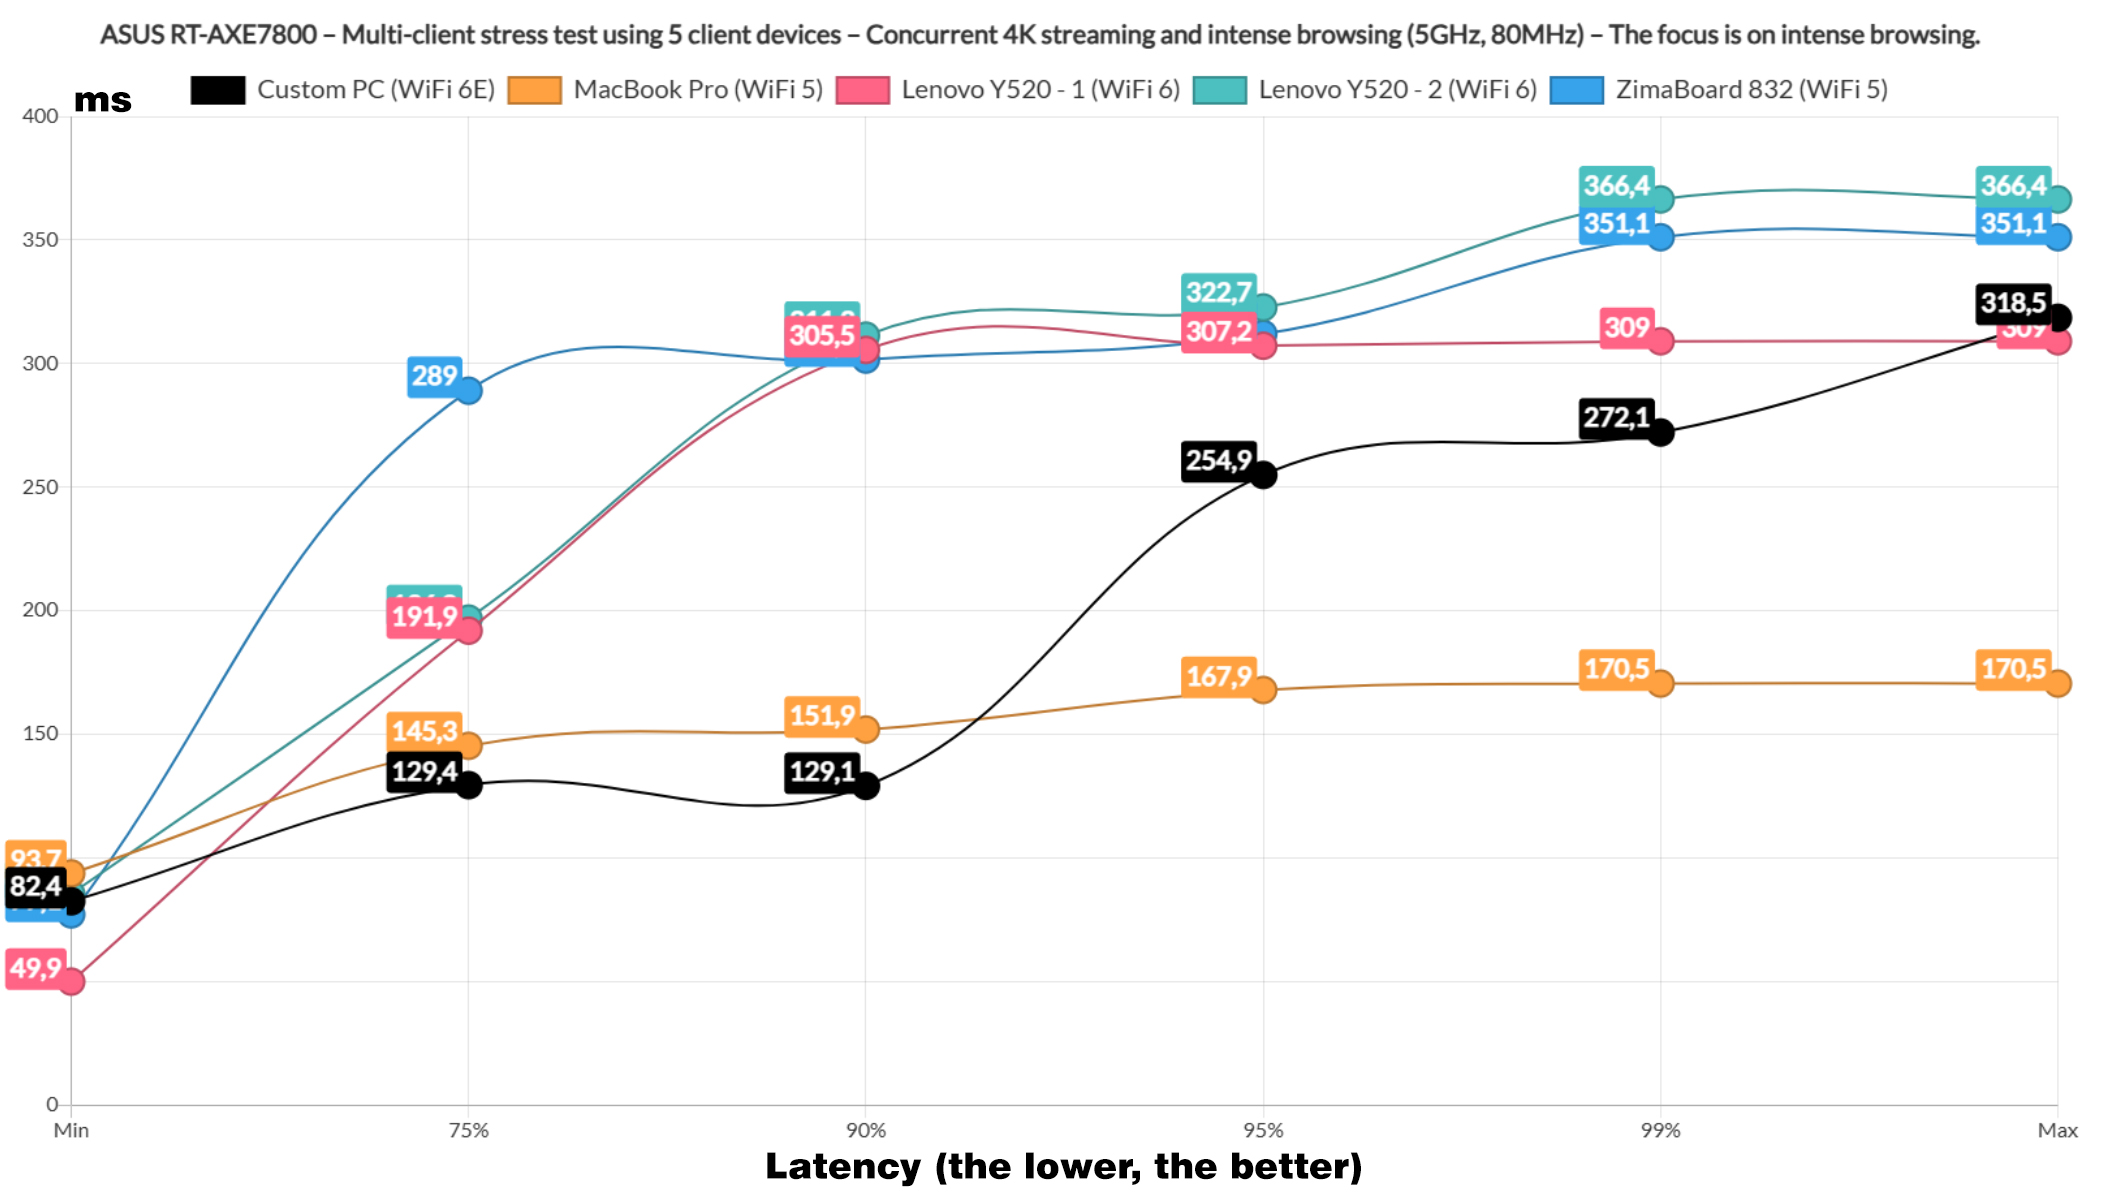

The intense browsing graph shows that all clients stayed below 400ms which, again, is acceptable performance. Moving forward, we changed things a bit and simulated the downloading of a 10MB file continuously on two client devices.
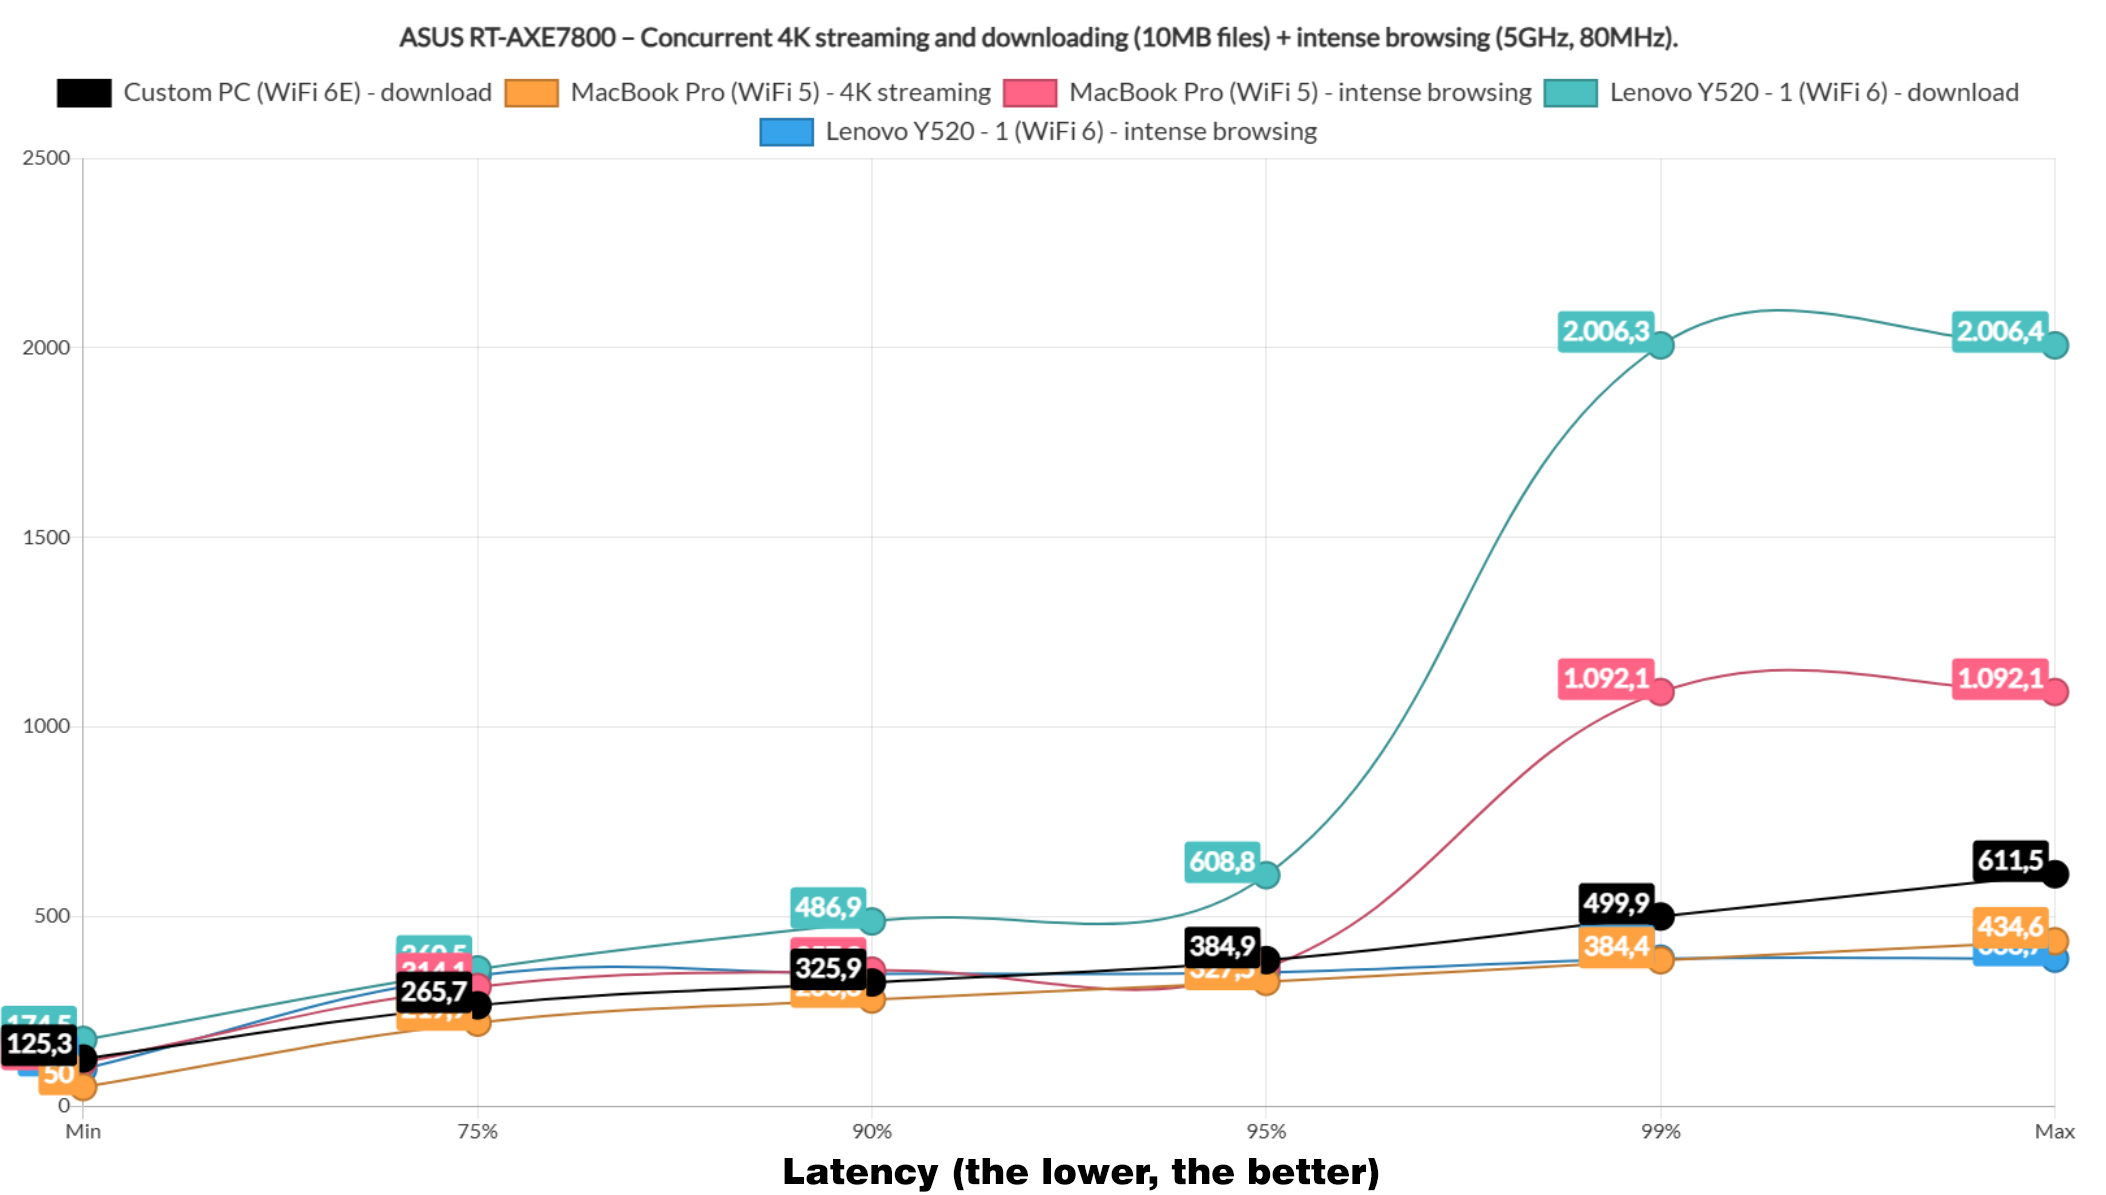

Two handled intense browsing and one for the 4K streaming. Neither of the two downloading clients were spectacular, but one did stay below 100ms for 95% of the time which I did not expect to be honest. The 4K streaming client did not do well, but the intense browsing clients did remain below the 1.5s limit. The total throughput for the downloading clients was 516.3Mbps.
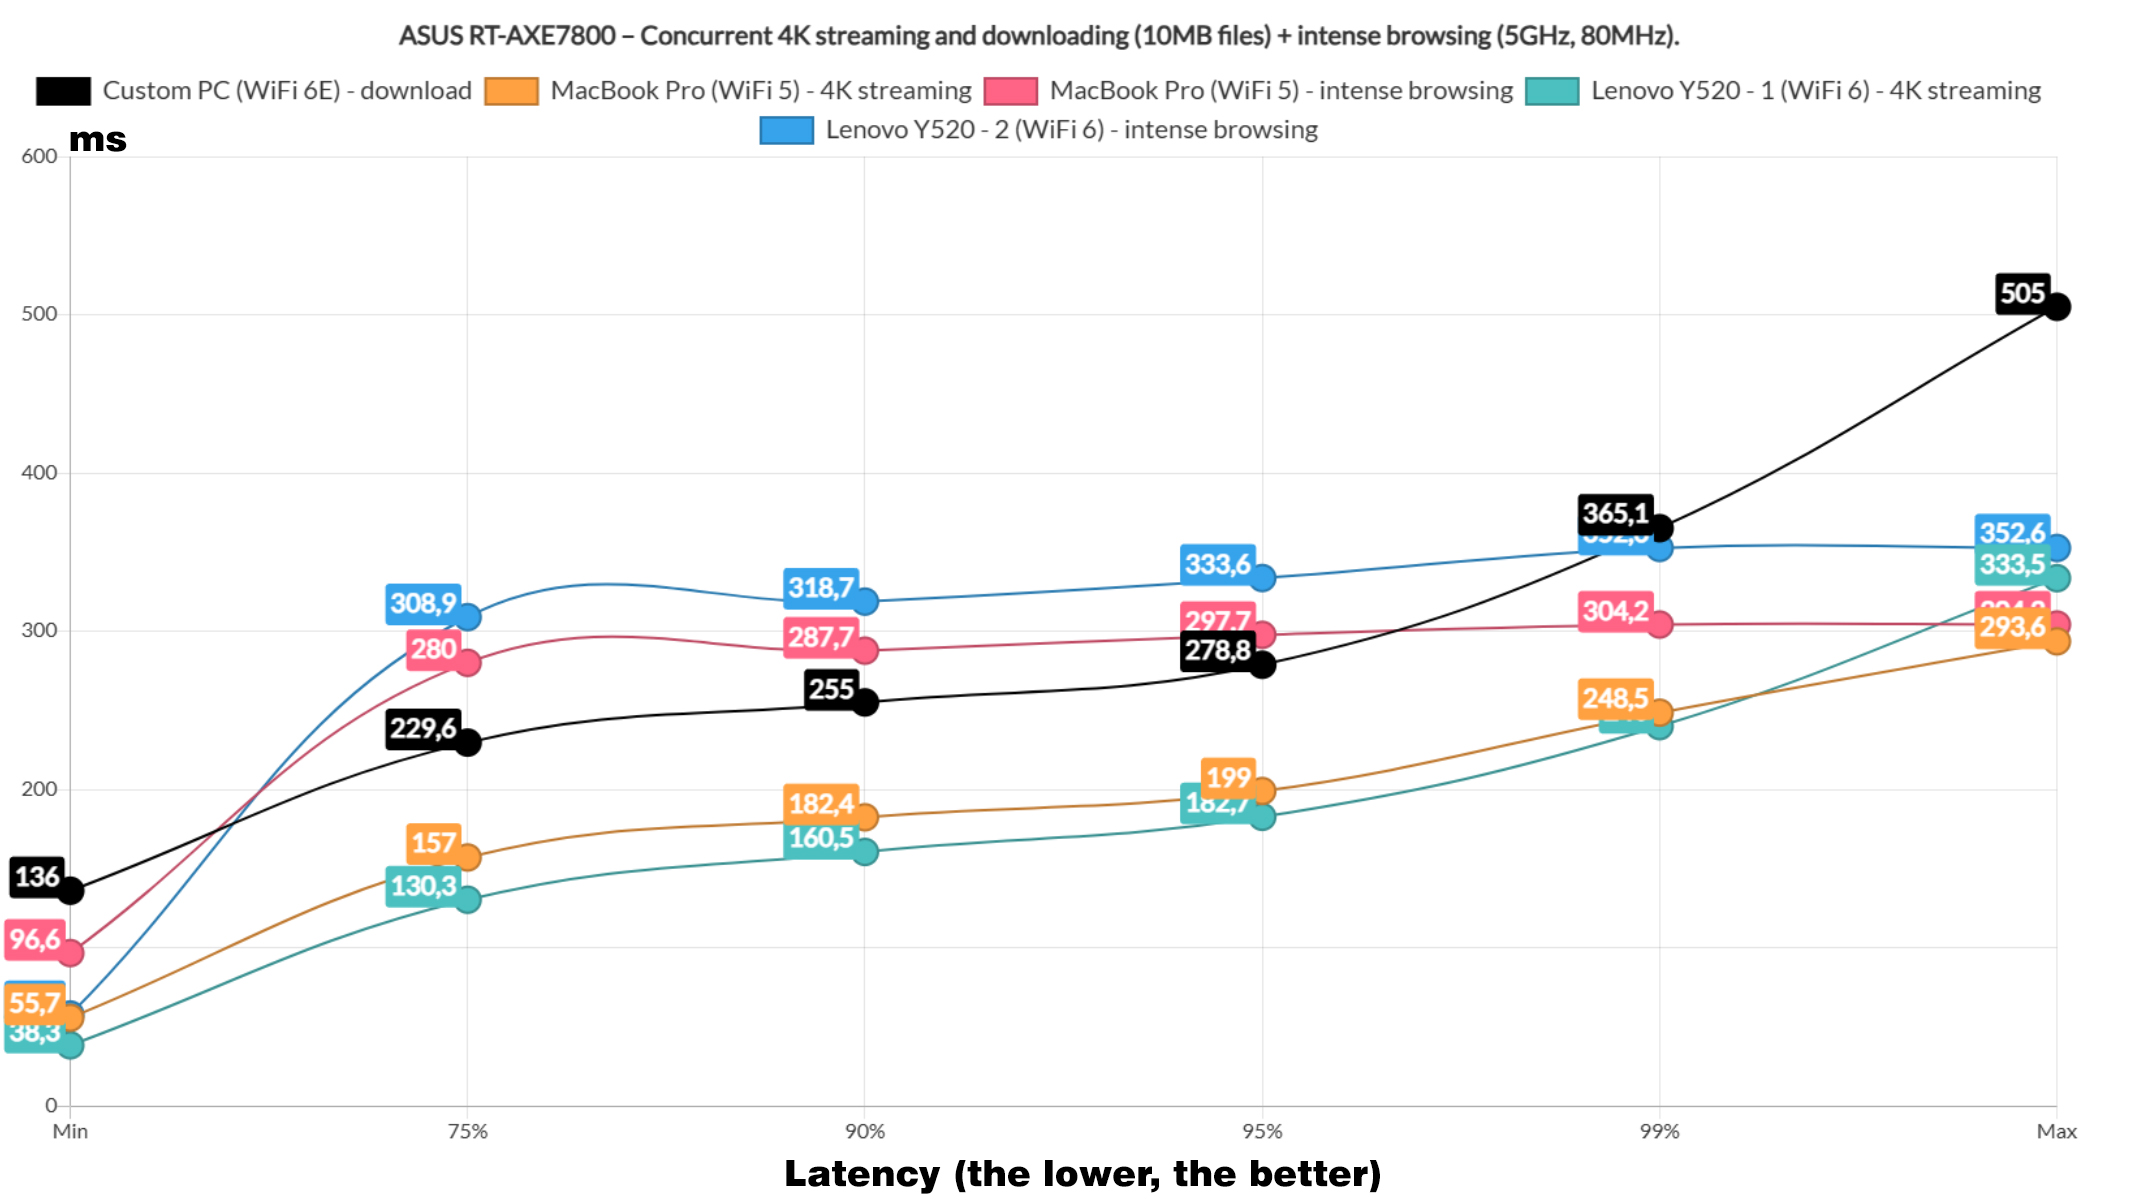

Afterwards, I let one client to handle the downloading traffic, two for the 4K streaming and two for the intense browsing.

And the latency did get better, but I suspect nobody will be happy downloading stuff when the latency is above 200ms. The 4K streaming latency was above 100ms on both clients which is not good, but the intense browsing clients did well.
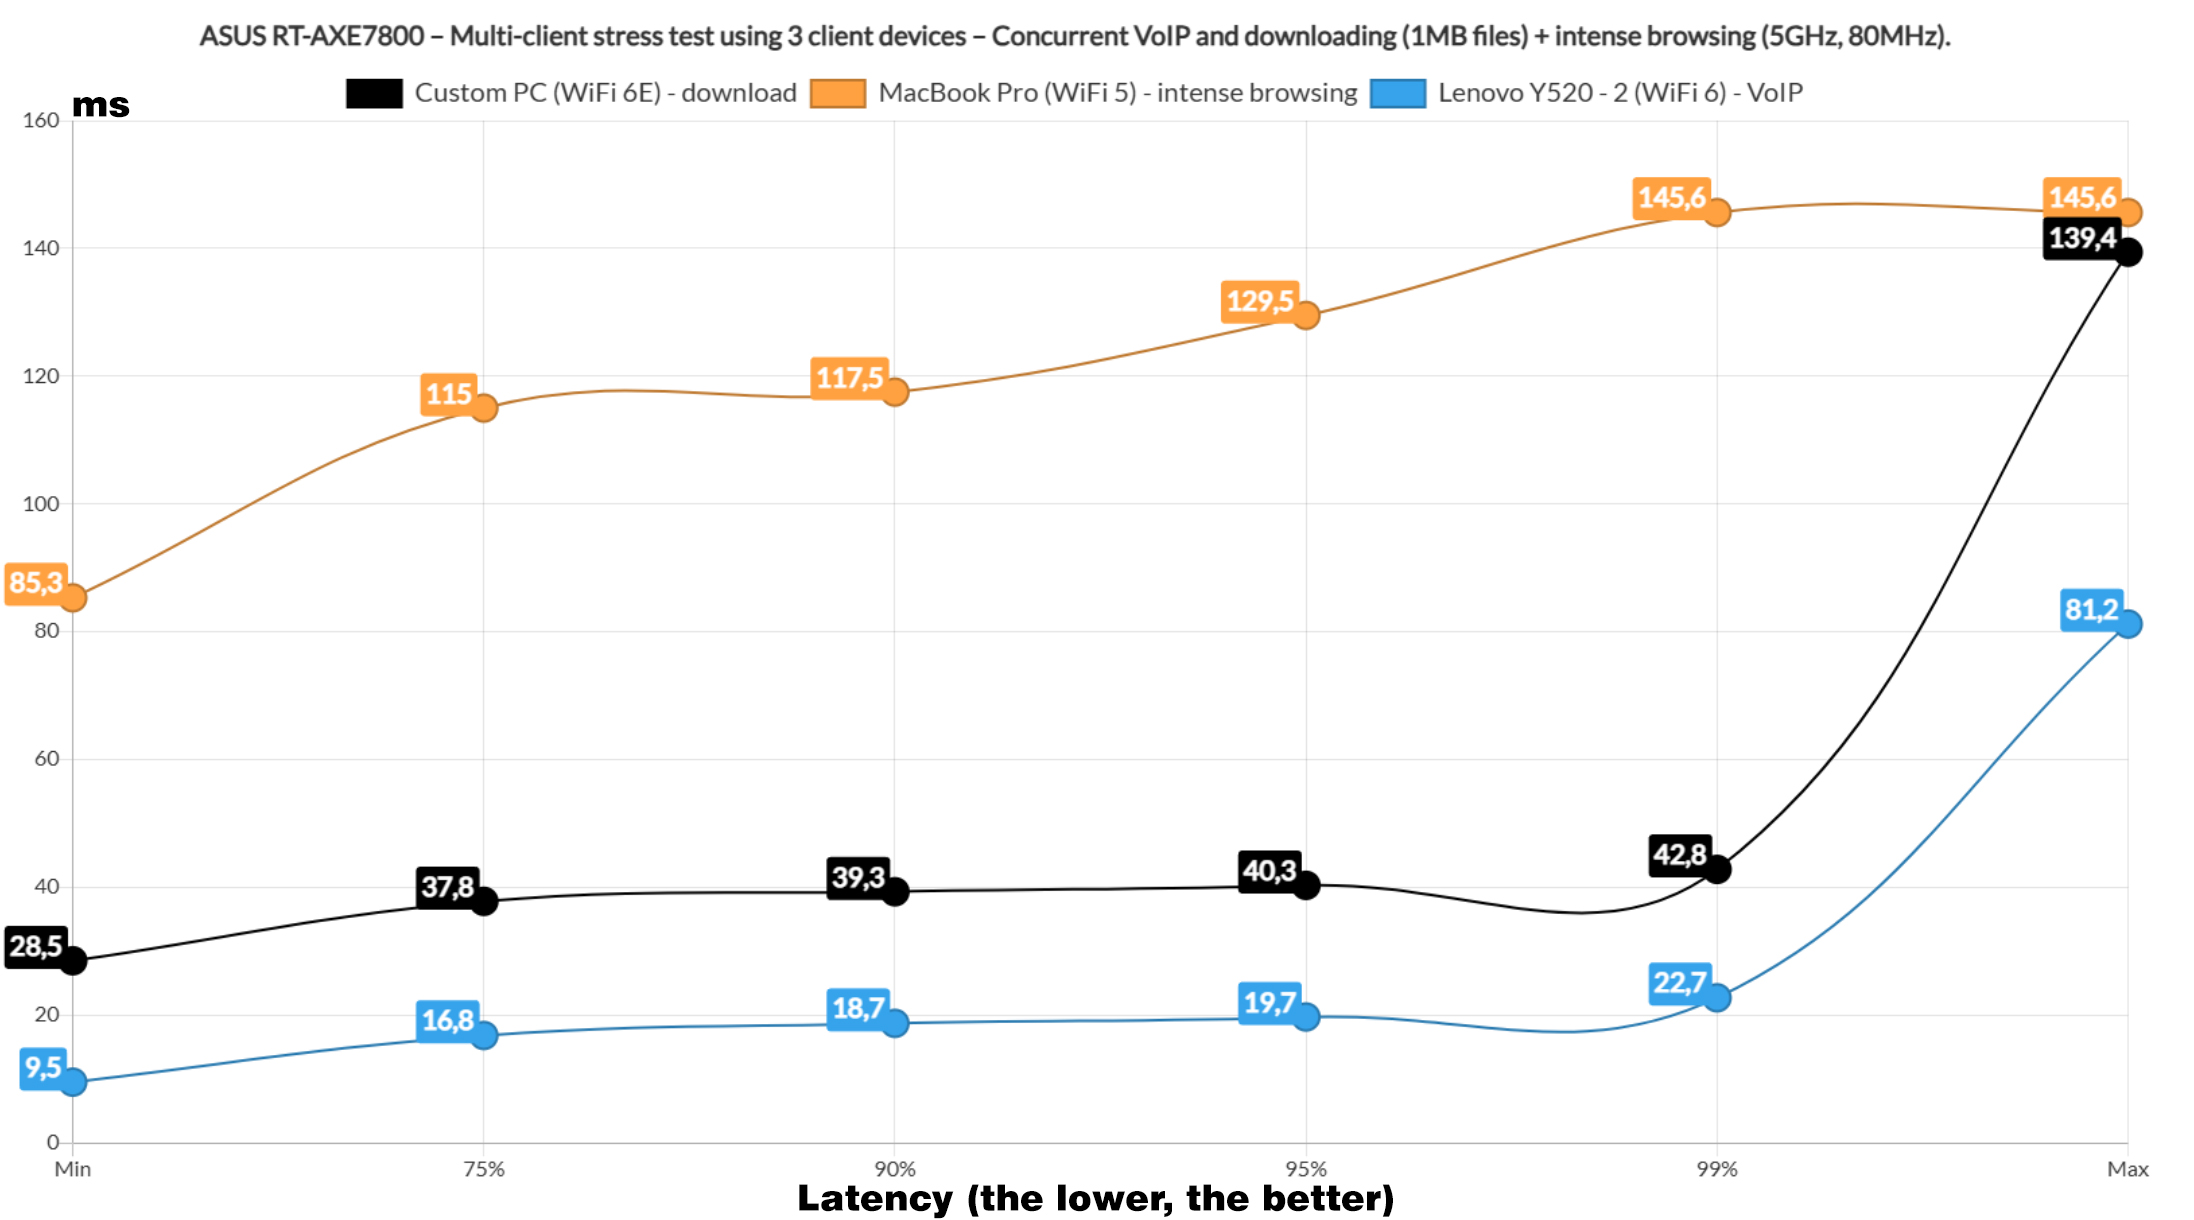

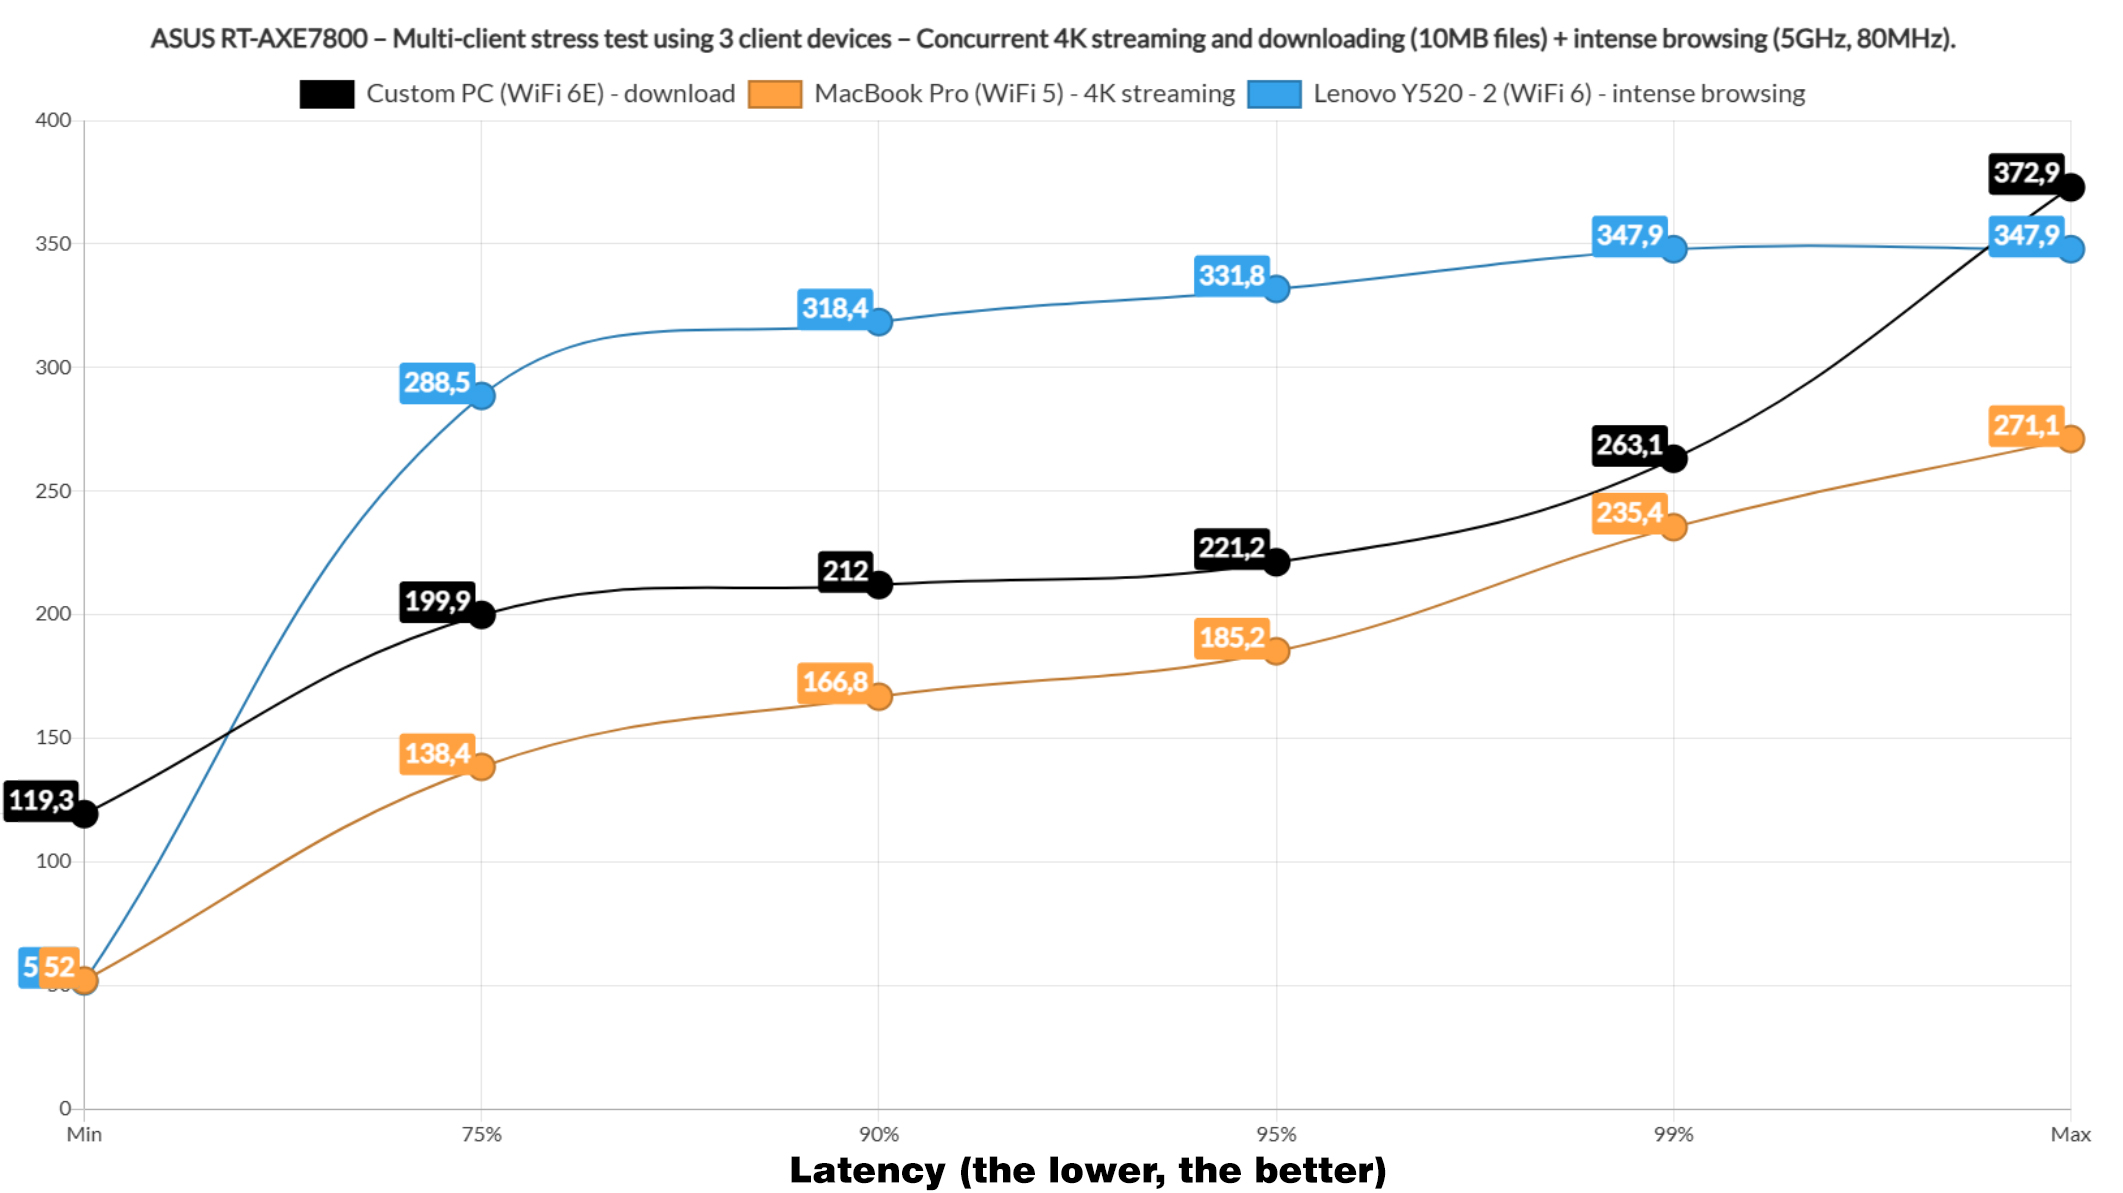
Next, I limited the number of client to three, one for the download traffic, one for the 4K streaming and one for the intense browsing. And the latency got slightly better than before, but we’re still not there, so let’s download a 1MB file this time and replace the 4K streaming with VoIP. There we go. We finally get decent performance, so the conclusion is that you do need to put some heavy QoS limits, spread the clients across the networks and use cable when possible for the best performance.
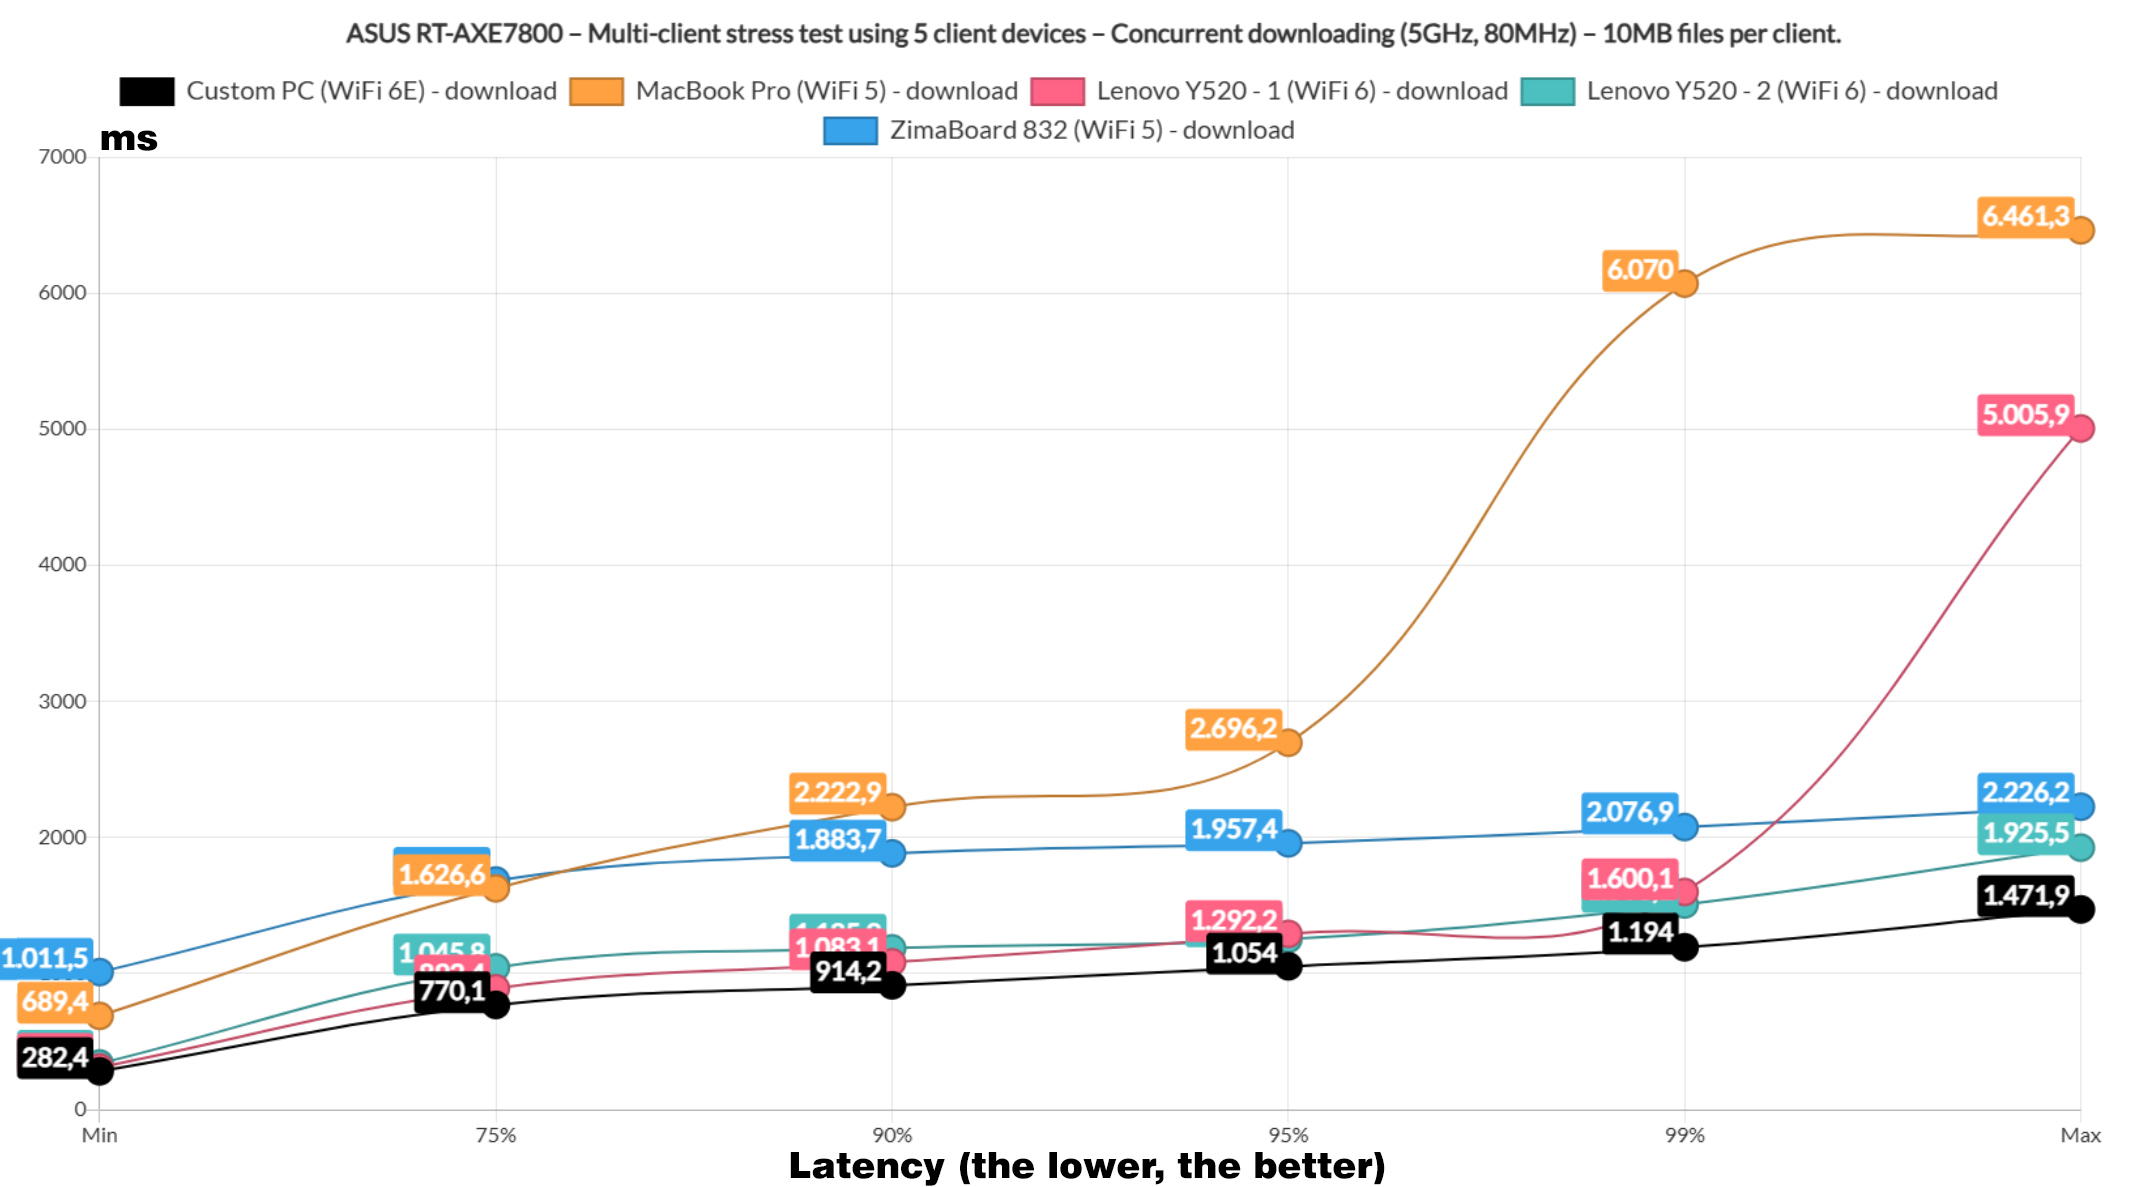

As a bonus, I included a graph where all client devices were downloading a 10MB files continuously. And the latency is as expected.
NAS Link Aggregation
We’re done with the throughput and latency tests, so I wanted to put the TrueNAS device that I recently built to good use. So, I decided to check how well the RT-AXE7800 works with LACP aggregation of a couple of LAN ports. I realized that I had to switch the WAN to the 2.5GbE port in order to let the default LAN1 and LAN2 to be aggregated.
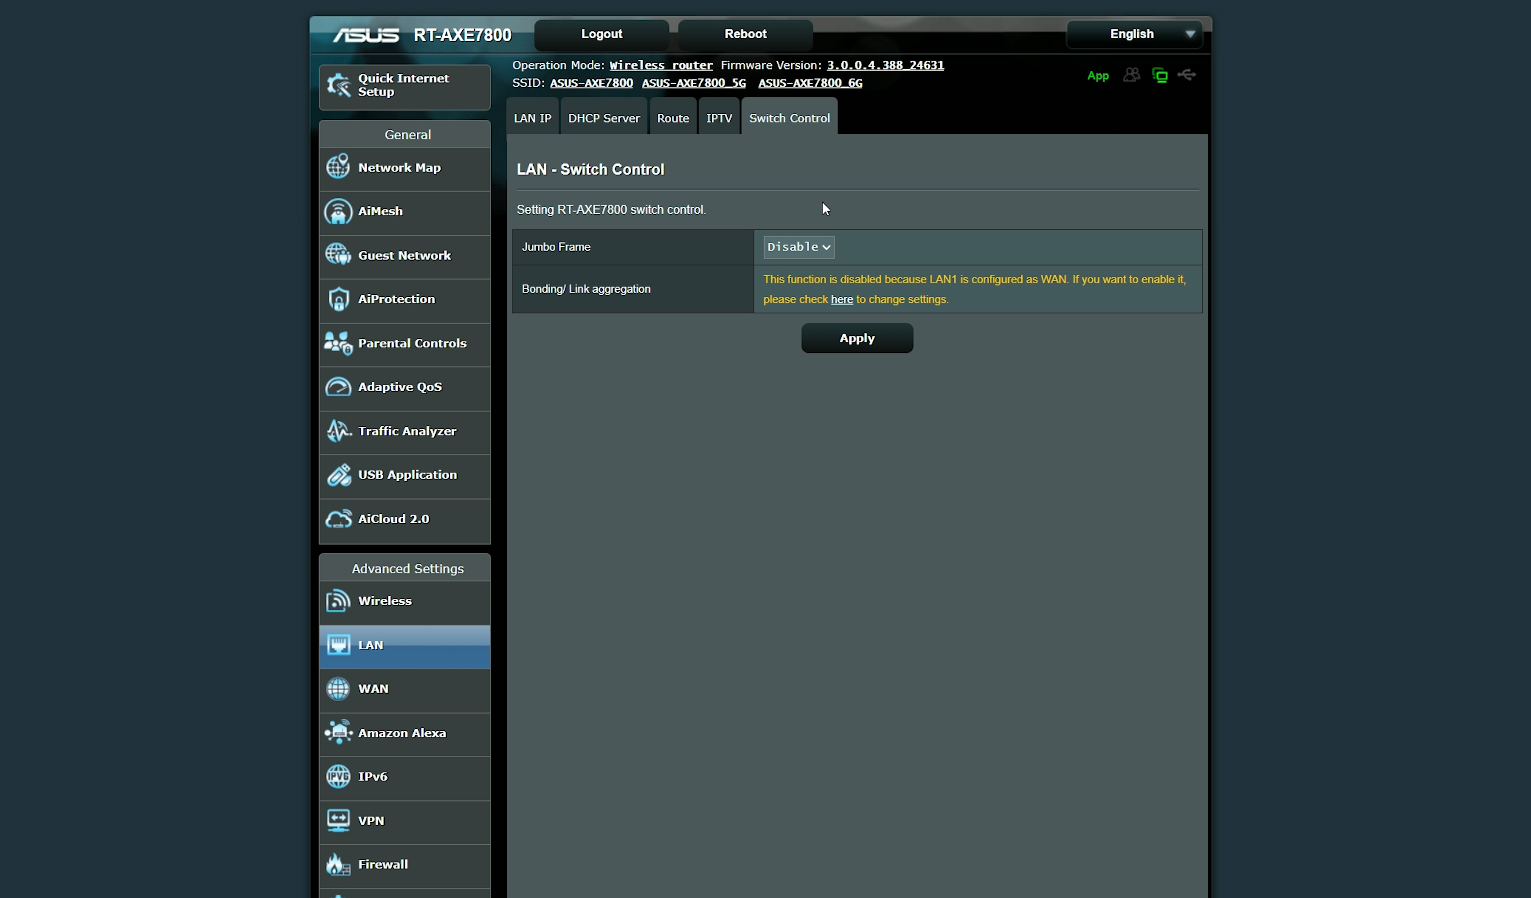

Why not let me use whichever LAN port I want? The problem is that I have a dilemma which I couldn’t figure out. Maybe it’s the long day and it may be something silly that I missed. But I don’t see the point LACP aggregation on this router. I can connect the TrueNAS just fine to the two LAN ports and the links were up and running.
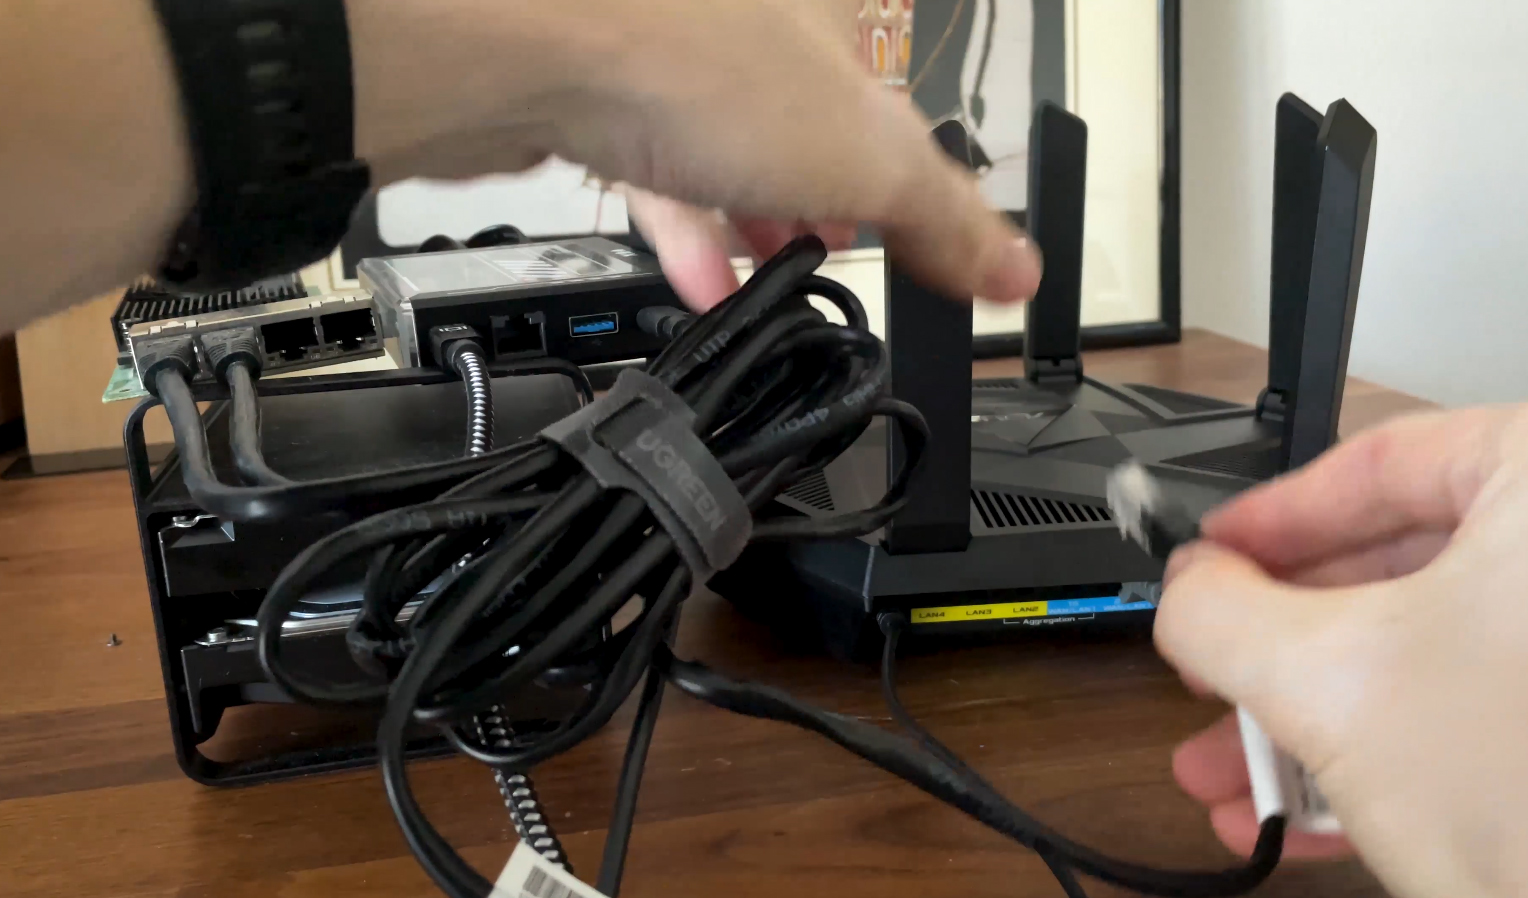

So we should get the full 2Gbps or at least close to it. But now what? I have a computer with a 2.5GbE port, but where do I connect the cable? All that’s left are Gigabit ports, so what’s the point of aggregating LAN ports. Again, it’s been a long day, so do let me know in the comments if I missed something ridiculously obvious. It happens more often than I like to admit.
One last thing, you need to set the WAN port manually because the so-called automatic detection is borderline useless. This is needed if the LAN1 is set to WAN otherwise you won’t be able to set LACP aggregation.
The Dual-WAN performance
Now let’s see the dual-WAN performance of the router. It does support load balancing and failover, so I set up the 2.5GbE port as the main WAN and the 1Gbps LAN1 port as the second WAN.
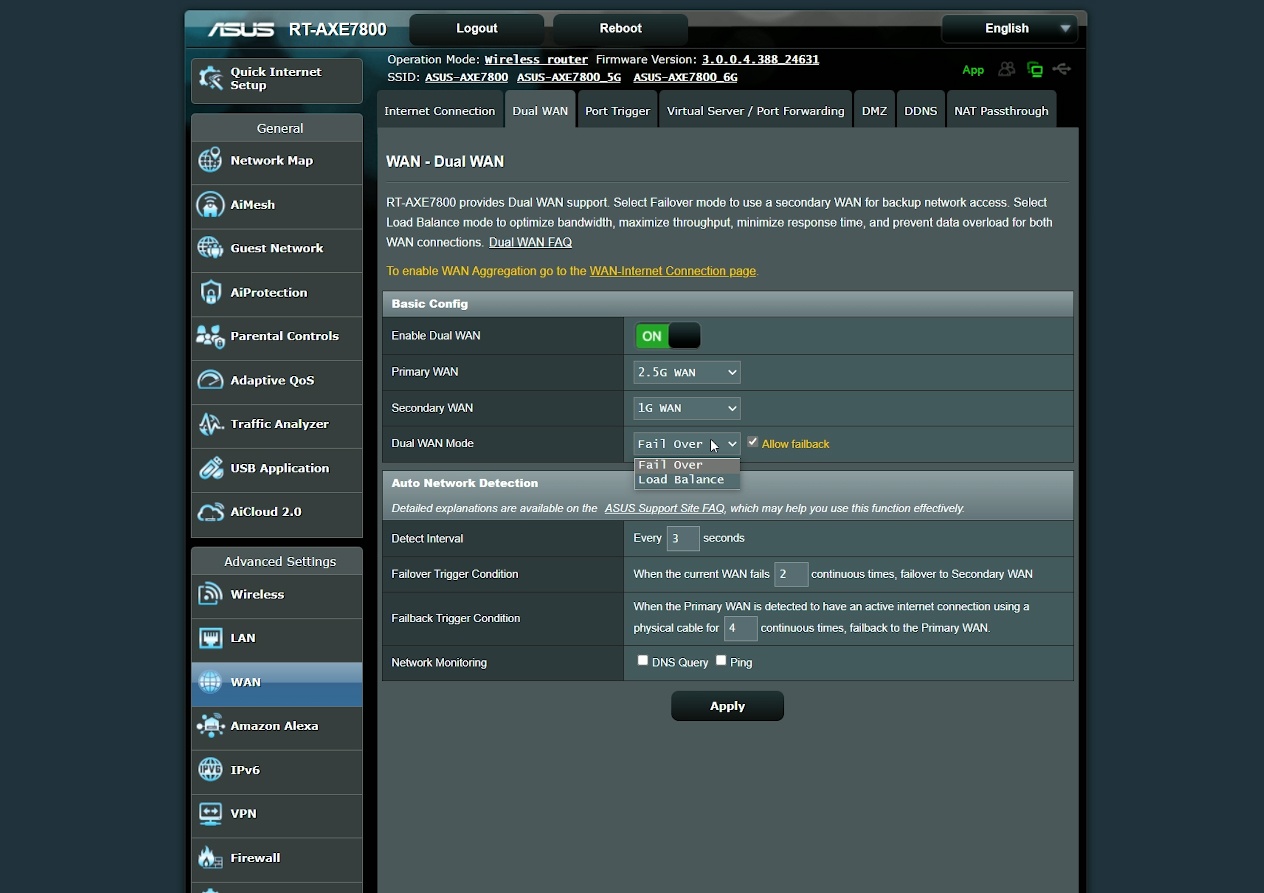

Be aware that the device disconnects the WiFi after every change I make even if it doesn’t pertain to the WAN ports which is mildly annoying. After setting things up, I pinged two domains and disconnected the main cable. It took quite a bit before the RT-AXE7800 switched to the other link, so I checked how long it takes to move back. Only one dropped packet. Not bad. Let’s disconnect the main line again.
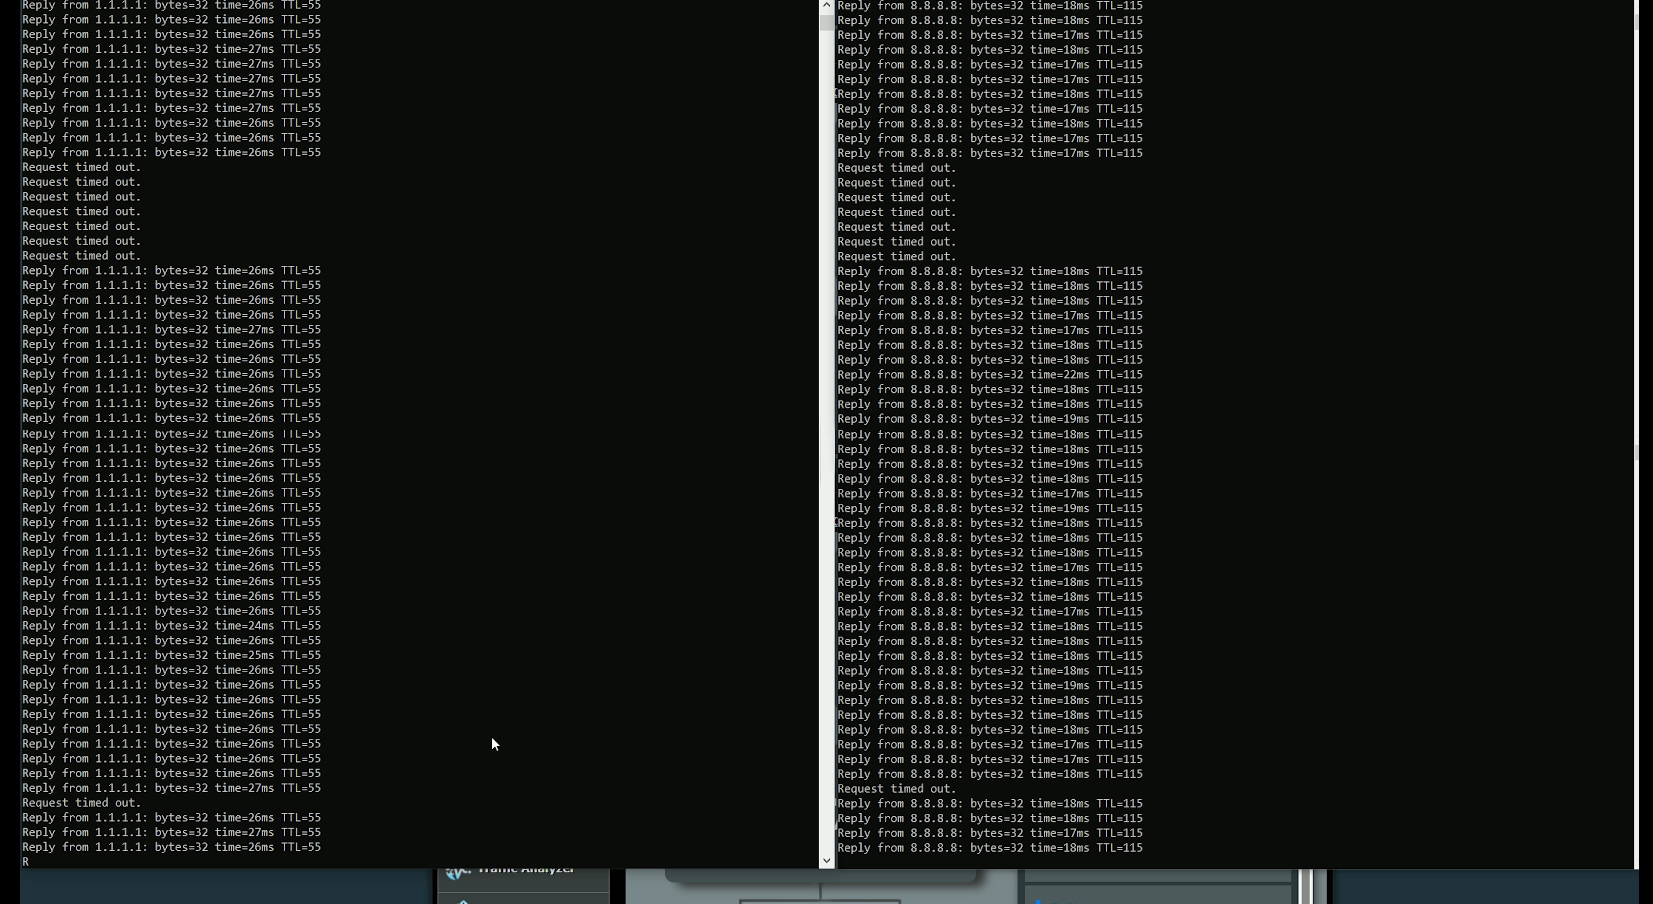

Same performance as before? Yes, so it seems that the router likes to stick more on the main line. Wait up, didn’t ASUS say that there is support for WAN aggregation? Is this all or can we actually increase the bandwidth? Apparently, this function can be found under WAN > Internet Connection and it can be enabled, so the router will use the LAN1 and LAN2 to bond the two links. My internet connection doesn’t go above 1Gbps, but it’s good to know that this feature is available and ready to be used.
The Power Consumption
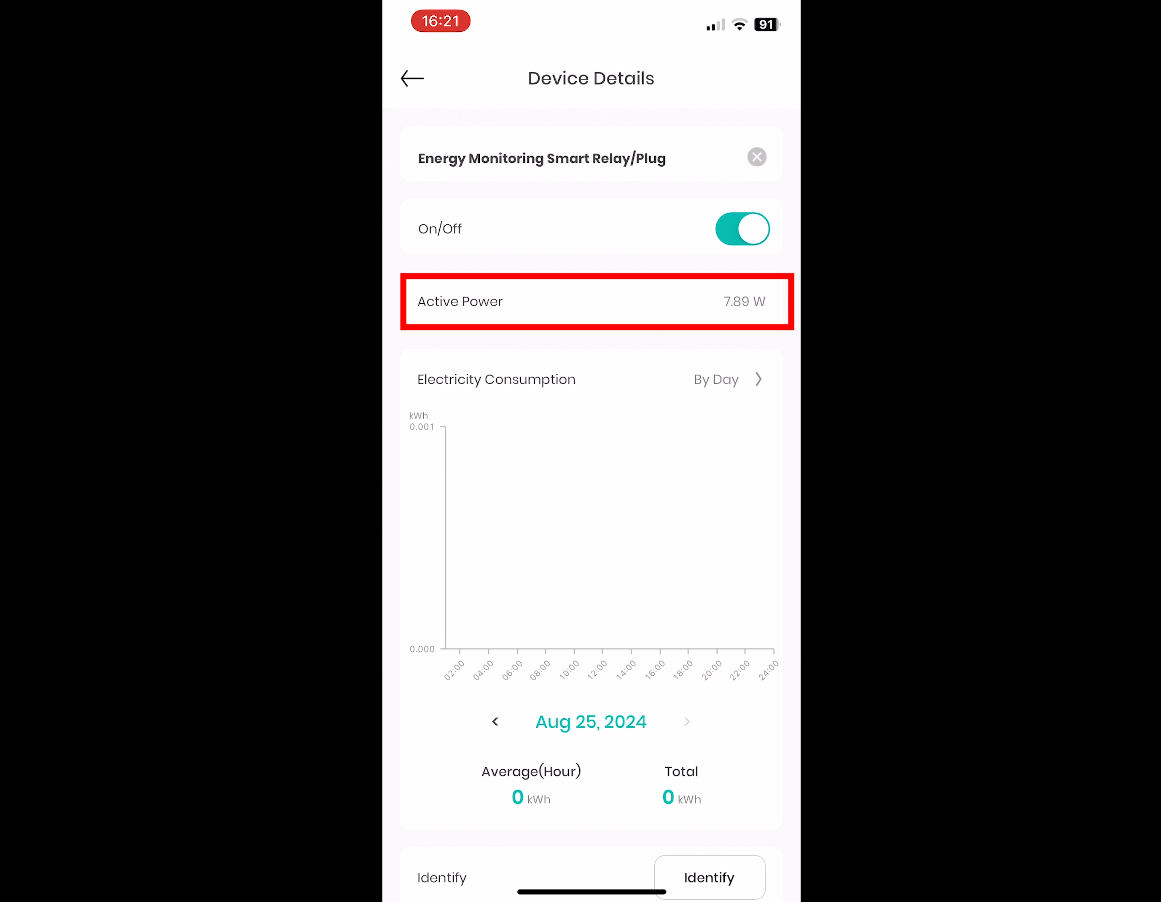
To check the power consumption of the router, I connected a smart relay and used their dedicated app to see the real-time status data. And this is what it needs for most of the times, not at peak load.

The Web-based Interface
After the eye-candy layout of the ExpertWiFi EBR63, I realized that the layout of the ASUS routers definitely needs a revamp, but we’re still getting everything that’s needed in the same place we’re accustomed to. So, there’s the General settings on the left where you can check out the AiProtection section built and maintained by a third-party, TrendMicro but which remains included into the price of the router.
And trust me, ASUS is one of the few that does this. Then, there’s the Parental Controls which are also powered by TrendMicro and will collect some data. We do get to add devices, block certain categories and schedule the Internet access, a feature which again, is usually locked behind a subscription. The QoS is going to let you prioritize which type of applications will receive the most bandwidth and there’s also the Traffic Analyzer by Apps and Devices.
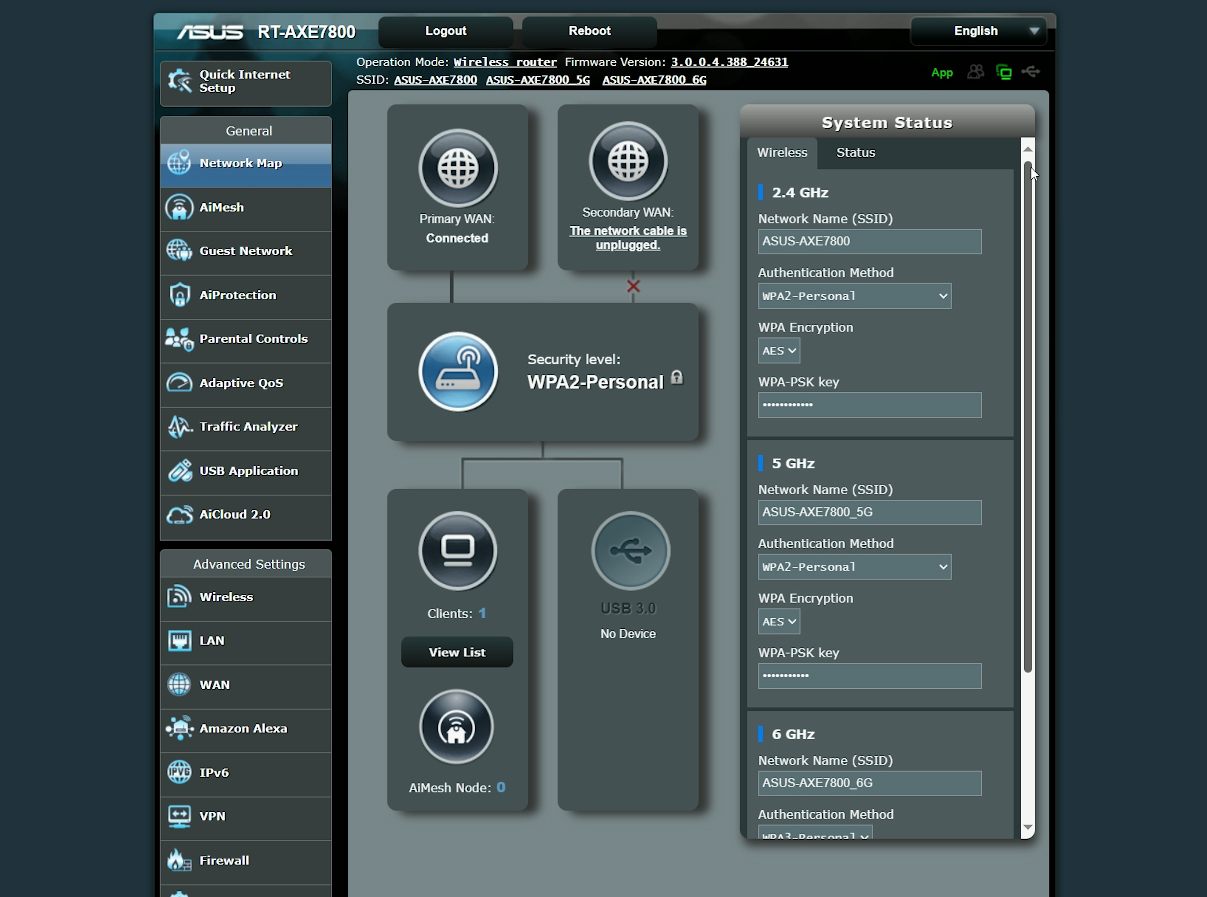

Some of the usual gaming features are missing, so I guess the RT-AXE7800 is not a part of the gaming series. Anyway, we get the Advanced settings where you can go quite in depth with the configuration and control, especially for the Wireless settings.
Some of these features have been previously explored, such as the dual-WAN and the LACP aggregation, but I also need to mention the VPN support which covers PPTP, OpenVPN, IPSec and WireGuard. Of course, the VPN Fusion and the Instant Guard are still present as well.
The Mobile Application
Now let’s talk about the app. The layout is the same as with most other ASUS routers. The Home window shows some status info in the middle, where you can also check the AiMesh connections and I was surprised to see that there was the Game Mode included as well.
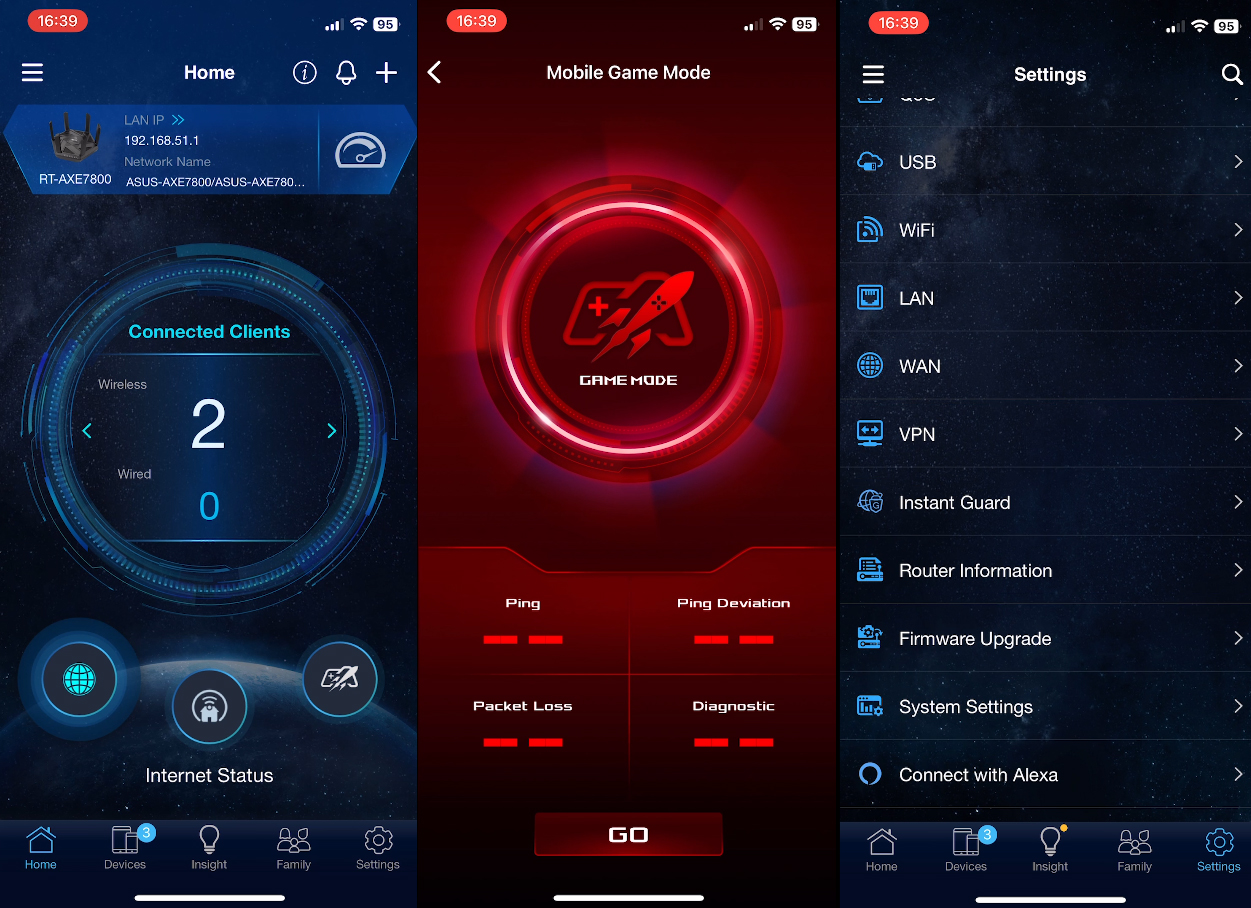

The QoS for the devices is more intuitive here than in the web-based interface since you can choose the priority of each client, while the Family section will let you use templates or create profiles for the web access and to set up Internet access schedules. Lastly, we get the Settings section which offers some amount of control and configuration, but it still pales in comparison with the web-based Advanced settings.
The Conclusion
Now that we’ve reached the end, what did I mean when I wrote that it could have been better in the title you ask? Well, it doesn’t feel very stable and I kept on getting into weird little bugs here and there which usually were solved after a restart, but they’re very annoying. The performance is OK, especially the multi-client latency. The 6GHz does open up more possibilities, kind of, because ASUS is already releasing its WiFi 7 router series which I assume will be better. We’ll see.